Defacing
Now that we understand the different types of XSS and various methods of discovering XSS vulnerabilities in web pages, we can start learning how to exploit these XSS vulnerabilities. As previously mentioned, the damage and the scope of an XSS attack depends on the type of XSS, a stored XSS being the most critical, while a DOM-based being less so.
One of the most common attacks usually used with stored XSS vulnerabilities is website defacing attacks. Defacing a website means changing its look for anyone who visits the website. It is very common for hacker groups to deface a website to claim that they had successfully hacked it, like when hackers defaced the UK National Health Service (NHS) back in 2018. Such attacks can carry great media echo and may significantly affect a company's investments and share prices, especially for banks and technology firms.
Although many other vulnerabilities may be utilized to achieve the same thing, stored XSS vulnerabilities are among the most used vulnerabilities for doing so.
Defacement Elements
We can utilize injected JavaScript code (through XSS) to make a web page look any way we like. However, defacing a website is usually used to send a simple message (i.e., we successfully hacked you), so giving the defaced web page a beautiful look isn't really the primary target.
Four HTML elements are usually utilized to change the main look of a web page:
- Background Color document.body.style.background
- Background document.body.background
- Page Title document.title
- Page Text DOM.innerHTML
We can utilize two or three of these elements to write a basic message to the web page and even remove the vulnerable element, such that it would be more difficult to quickly reset the web page, as we will see next.
Changing Background
Let's go back to our Stored XSS exercise and use it as a basis for our attack. You can go back to the Stored XSS section to spawn the server and follow the next steps.
To change a web page's background, we can choose a certain color or use an image. We will use a color as our background since most defacing attacks use a dark color for the background. To do so, we can use the following payload:
Code: html
Tip: Here we set the background color to the default Hack The Box background color. We can use any other hex value, or can use a named color like = "black".
Once we add our payload to the To-Do list, we will see that the background color changed:

This will be persistent through page refreshes and will appear for anyone who visits the page, as we are utilizing a stored XSS vulnerability.
Another option would be to set an image to the background using the following payload:
Code: html
Try using the above payload to see how the final result may look.
Changing Page Title
We can change the page title from 2Do to any title of our choosing, using the document.title JavaScript property:
Code: html
We can see from the page window/tab that our new title has replaced the previous one:

Changing Page Text
When we want to change the text displayed on the web page, we can utilize various JavaScript functions for doing so. For example, we can change the text of a specific HTML element/DOM using the innerHTML property:
Code: javascript
document.getElementById("todo").innerHTML = "New Text"
We can also utilize jQuery functions for more efficiently achieving the same thing or for changing the text of multiple elements in one line (to do so, the jQuery library must have been imported within the page source):
Code: javascript
$("#todo").html('New Text');
This gives us various options to customize the text on the web page and make minor adjustments to meet our needs. However, as hacking groups usually leave a simple message on the web page and leave nothing else on it, we will change the entire HTML code of the main body, using innerHTML, as follows:
Code: javascript
document.getElementsByTagName('body')[0].innerHTML = "New Text"
As we can see, we can specify the body element with document.getElementsByTagName('body'), and by specifying [0], we are selecting the first body element, which should change the entire text of the web page. We may also use jQuery to achieve the same thing. However, before sending our payload and making a permanent change, we should prepare our HTML code separately and then use innerHTML to set our HTML code to the page source.
For our exercise, we will borrow the HTML code from the main page of Hack The Box Academy:
Code: html
Cyber Security Training
by

Tip: It would be wise to try running our HTML code locally to see how it looks and to ensure that it runs as expected, before we commit to it in our final payload.
We will minify the HTML code into a single line and add it to our previous XSS payload. The final payload should be as follows:
Code: html
Once we add our payload to the vulnerable To-Do list, we will see that our HTML code is now permanently part of the web page's source code and shows our message for anyone who visits the page:

By using three XSS payloads, we were able to successfully deface our target web page. If we look at the source code of the web page, we will see the original source code still exists, and our injected payloads appear at the end:
Code: html
This is because our injected JavaScript code changes the look of the page when it gets executed, which in this case, is at the end of the source code. If our injection was in an element in the middle of the source code, then other scripts or elements may get added after it, so we would have to account for them to get the final look we need.
However, to ordinary users, the page looks defaced and shows our new look.
Phishing
Another very common type of XSS attack is a phishing attack. Phishing attacks usually utilize legitimate-looking information to trick the victims into sending their sensitive information to the attacker. A common form of XSS phishing attacks is through injecting fake login forms that send the login details to the attacker's server, which may then be used to log in on behalf of the victim and gain control over their account and sensitive information.
Furthermore, suppose we were to identify an XSS vulnerability in a web application for a particular organization. In that case, we can use such an attack as a phishing simulation exercise, which will also help us evaluate the security awareness of the organization's employees, especially if they trust the vulnerable web application and do not expect it to harm them.
XSS Discovery
We start by attempting to find the XSS vulnerability in the web application at /phishing from the server at the end of this section. When we visit the website, we see that it is a simple online image viewer, where we can input a URL of an image, and it'll display it:
http://SERVER_IP/phishing/index.php?url=https://www.hackthebox.eu/ima

This form of image viewers is common in online forums and similar web applications. As we have control over the URL, we can start by using the basic XSS payload we've been using. But when we try that payload, we see that nothing gets executed, and we get the dead image url icon:

So, we must run the XSS Discovery process we previously learned to find a working XSS payload. Before you continue, try to find an XSS payload that successfully executes JavaScript code on the page.
Tip: To understand which payload should work, try to view how your input is displayed in the HTML source after you add it.
Login Form Injection
Once we identify a working XSS payload, we can proceed to the phishing attack. To perform an XSS phishing attack, we must inject an HTML code that displays a login form on the targeted page. This form should send the login information to a server we are listening on, such that once a user attempts to log in, we'd get their credentials.
We can easily find an HTML code for a basic login form, or we can write our own login form. The following example should present a login form:
Code: html
Please login to continue
In the above HTML code, OUR_IP is the IP of our VM, which we can find with the (ip a) command under tun0. We will later be listening on this IP to retrieve the credentials sent from the form. The login form should look as follows:
Code: html
Please login to continue
Next, we should prepare our XSS code and test it on the vulnerable form. To write HTML code to the vulnerable page, we can use the JavaScript function document.write(), and use it in the XSS payload we found earlier in the XSS Discovery step. Once we minify our HTML code into a single line and add it inside the write function, the final JavaScript code should be as follows:
Code: javascript
document.write('Please login to continue
');
We can now inject this JavaScript code using our XSS payload (i.e., instead of running the alert(window.origin) JavaScript Code). In this case, we are exploiting a Reflected XSS vulnerability, so we can copy the URL and our XSS payload in its parameters, as we've done in the Reflected XSS section, and the page should look as follows when we visit the malicious URL:

Cleaning Up
We can see that the URL field is still displayed, which defeats our line of "Please login to continue". So, to encourage the victim to use the login form, we should remove the URL field, such that they may think that they have to log in to be able to use the page. To do so, we can use the JavaScript function document.getElementById().remove() function.
To find the
idof the HTML element we want to remove, we can open the
Page Inspector Pickerby clicking [
CTRL+SHIFT+C] and then clicking on the element we need:
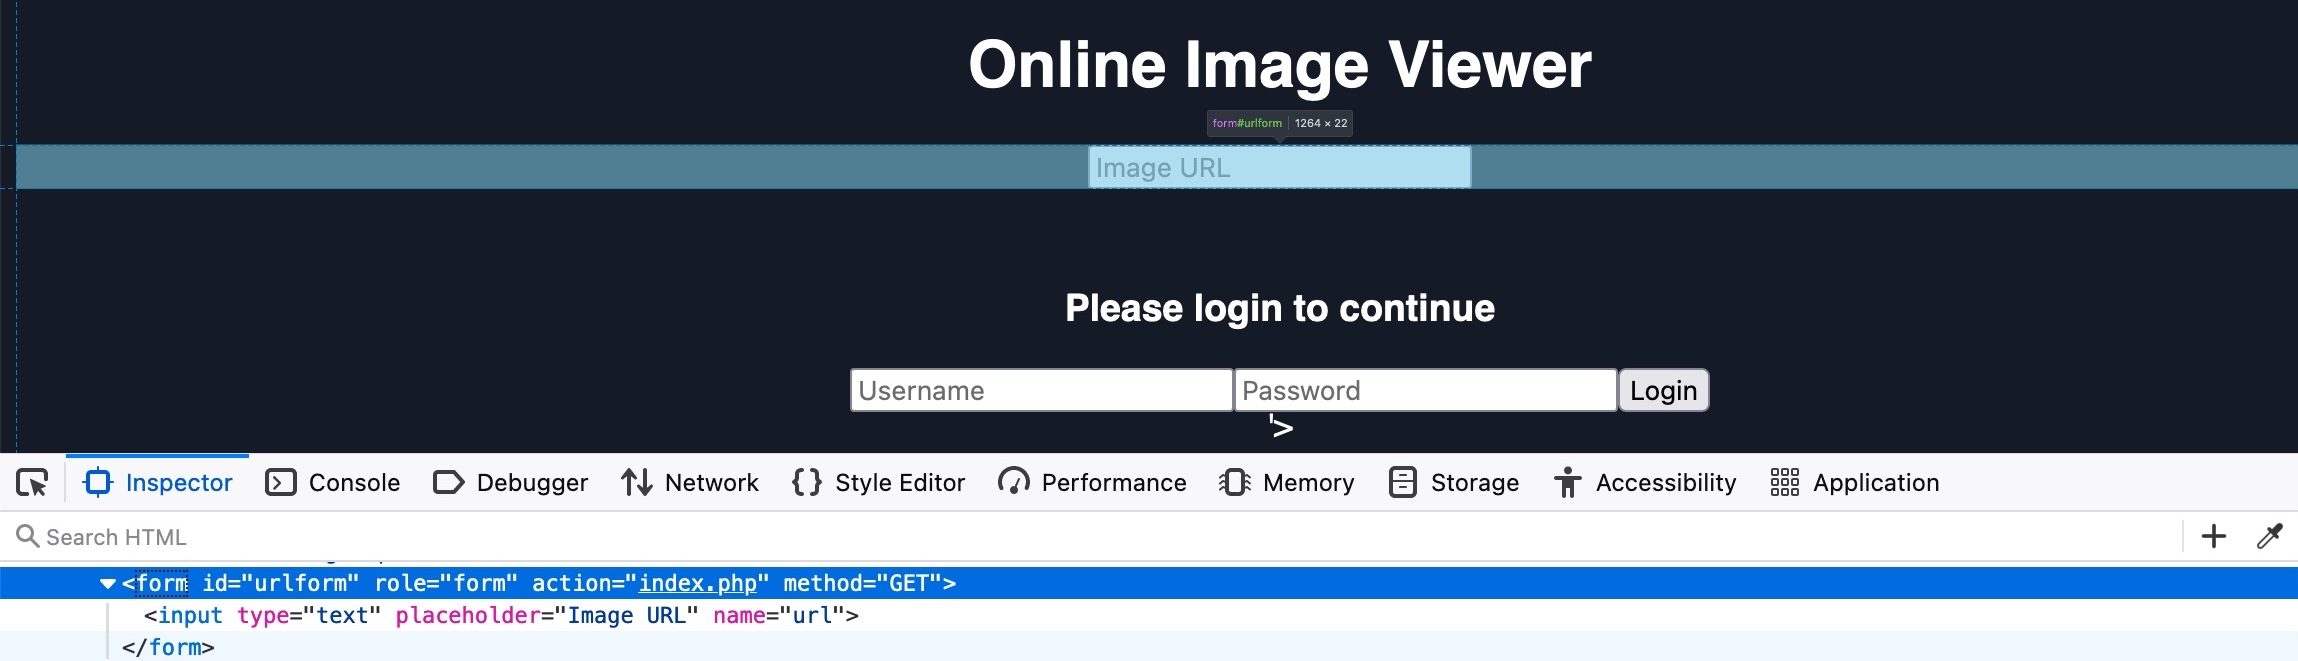
As we see in both the source code and the hover text, the url form has the id urlform: