How to Write Up a Finding
The Findings section of our report is the "meat." This is where we get to show off what we found, how we exploited them, and give the client guidance on how to remediate the issues. The more detail we can put into each finding, the better. This will help technical teams reproduce the finding on their own and then be able to test that their fix worked. Being detailed in this section will also help whoever is tasked with the post-remediation assessment if the client contracts your firm to perform it. While we'll often have "stock" findings in some sort of database, it's essential to tweak them to fit our client's environment to ensure we aren't mispresenting anything.
Breakdown of a Finding
Each finding should have the same general type of information that should be customized to your client's specific circumstances. If a finding is written to suit several different scenarios or protocols, the final version should be adjusted to only reference the particular circumstances you identified. "Default Credentials" could have different meanings for risk if it affects a DeskJet printer versus the building's HVAC control or another high-impact web application. At a minimum, the following information should be included for each finding:
- Description of the finding and what platform(s) the vulnerability affects
- Impact if the finding is left unresolved
- Affected systems, networks, environments, or applications
- Recommendation for how to address the problem
- Reference links with additional information about the finding and resolving it
- Steps to reproduce the issue and the evidence that you collected
Some additional, optional fields include:
- CVE
- OWASP, MITRE IDs
- CVSS or similar score
- Ease of exploitation and probability of attack
- Any other information that might help learn about and mitigate the attack
Showing Finding Reproduction Steps Adequately
As mentioned in the previous section regarding the Executive Summary, it's important to remember that even though your point-of-contact might be reasonably technical, if they don't have a background specifically in penetration testing, there is a pretty decent chance they won't have any idea what they're looking at. They may have never even heard of the tool you used to exploit the vulnerability, much less understand what's important in the wall of text it spits out when the command runs. For this reason, it's crucial to guard yourself against taking things for granted and assuming people know how to fill in the blanks themselves. If you don't do this correctly, again, this will erode the effectiveness of your deliverable, but this time in the eyes of your technical audience. Some concepts to consider:
- Break each step into its own figure. If you perform multiple steps in the same figure, a reader unfamiliar with the tools being used may not understand what is taking place, much less have an idea of how to reproduce it themselves.
- If setup is required (e.g., Metasploit modules), capture the full configuration so the reader can see what the exploit config should look like before running the exploit. Create a second figure that shows what happens when you run the exploit.
- Write a narrative between figures describing what is happening and what is going through your head at this point in the assessment. Do not try to explain what is happening in the figure with the caption and have a bunch of consecutive figures.
- After walking through your demonstration using your preferred toolkit, offer alternative tools that can be used to validate the finding if they exist (just mention the tool and provide a reference link, don't do the exploit twice with more than one tool).
Your primary objective should be to present evidence in a way that is understandable and actionable to the client. Think about how the client will use the information you're presenting. If you're showing a vulnerability in a web application, a screenshot of Burp isn't the best way to present this information if you're crafting your own web requests. The client will probably want to copy/paste the payload from your testing to recreate it, and they can't do that if it's just a screenshot.
Another critical thing to consider is whether your evidence is completely and utterly defensible. For example, if you're trying to demonstrate that information is being transmitted in clear text because of the use of basic authentication in a web application, it's insufficient just to screenshot the login prompt popup. That shows that basic auth is in place but offers no proof that information is being transmitted in the clear. In this instance, showing the login prompt with some fake credentials entered into it, and the clear text credentials in a Wireshark packet capture of the human-readable authentication request leaves no room for debate. Similarly, if you're trying to demonstrate the presence of a vulnerability in a particular web application or something else with a GUI (like RDP), it's important to capture either the URL in the address bar or output from an ifconfig or ipconfig command to prove that it's on the client's host and not some random image you downloaded from Google. Also, if you're screenshotting your browser, turn your bookmarks bar off and disable any unprofessional browser extensions or dedicate a specific web browser to your testing.
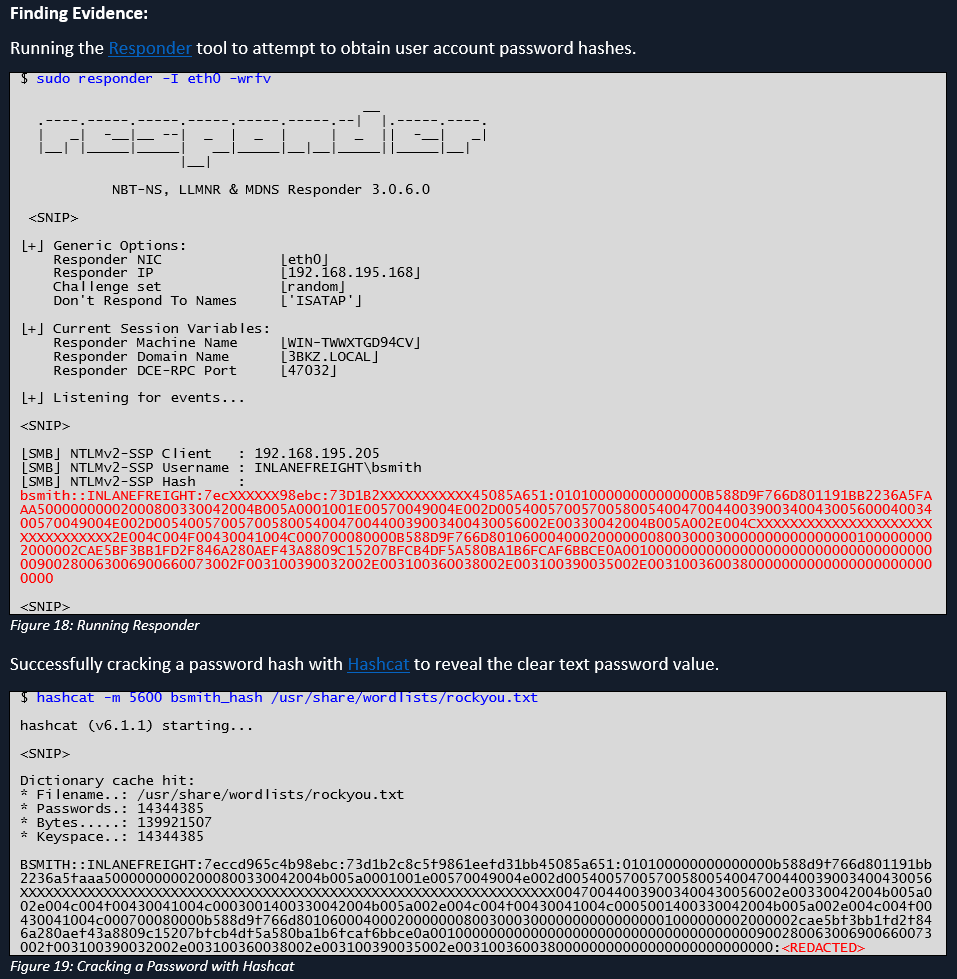
Below is an example of how we could show the steps for capturing a hash using the Responder tool and cracking it offline using Hashcat. While it is not 100% necessary, it can be good to list alternate tools as we did with this finding. The client may be working from a Windows box and find a PowerShell script or executable to be more user-friendly or may be more familiar with another toolset. Note that we also redacted the hash and cleartext passwords as this report could be passed around to many different audiences, so it can be best to redact credentials wherever possible.
Effective Remediation Recommendations
Example 1
- Bad: Reconfigure your registry settings to harden against X.
- Good: To fully remediate this finding, the following registry hives should be updated with the specified values. Note that changes to critical components like the registry should be approached with caution and tested in a small group prior to making large-scale changes.
Rationale
While the "bad" example is at least somewhat helpful, it's fairly lazy, and you're squandering a learning opportunity. Once again, the reader of this report may not have the depth of experience in Windows as you, and giving them a recommendation that will require hours' worth of work for them to figure out how to do it is only going to frustrate them. Do your homework and be as specific as reasonably possible. Doing so has the following benefits:
- You learn more this way and will be much more comfortable answering questions during the report review. This will reinforce the client's confidence in you and will be knowledge that you can leverage on future assessments and to help level up your team.
- The client will appreciate you doing the research for them and outlining specifically what needs to be done so they can be as efficient as possible. This will increase the likelihood that they will ask you to do future assessments and recommend you and your team to their friends.
It's also worth drawing attention to the fact that the "good" example includes a warning that changing something as important as the registry carries its own set of risks and should be performed with caution. Again, this indicates to the client that you have their best interests in mind and genuinely want them to succeed. For better or worse, there will be clients that will blindly do whatever you tell them to and will not hesitate to try and hold you accountable if doing so ends up breaking something.
Example 2
- Bad: Implement [some commercial tool that costs a fortune] to address this finding.
- Good: There are different approaches to addressing this finding. [Name of the affected software vendor] has published a workaround as an interim solution. For the sake of brevity, a link to the walkthrough has been provided in the reference links below. Alternatively, there are commercial tools available that would make it possible to disable the vulnerable functionality in the affected software altogether, but these tools may be cost-prohibitive.
Rationale
The "bad" example gives the client no way to remediate this issue without spending a lot of money that they may not have. While the commercial tool may be the easiest solution far and away, many clients will not have the budget to do that and need an alternative solution. The alternative solution may be a bandaid or extraordinarily cumbersome, or both, but it will at least buy the client some time until the vendor has released an official fix.
Selecting Quality References
Each finding should include one or more external references for further reading on a particular vulnerability or misconfiguration. Some criteria that enhance the usefulness of a reference:
- A vendor-agnostic source is helpful. Obviously, if you find an ASA vulnerability, a Cisco reference link makes sense, but I wouldn't lean on them for a writeup on anything outside of networking. If you reference an article written by a product vendor, chances are the article's focus will be telling the reader how their product can help when all the reader wants is to know how to fix it themselves.
A thorough walkthrough or explanation of the finding and any recommended workarounds or mitigations is preferable. Don't choose articles behind a paywall or something where you only get part of what you need without paying.
- Use articles that get to the point quickly. This isn't a recipe website, and no one cares how often your grandmother used to make those cookies. We have problems to solve, and making someone dig through the entire NIST 800-53 document or an RFC is more annoying than helpful.
- Choose sources that have clean websites and don't make you feel like a bunch of crypto miners are running in the background or ads pop up everywhere.
- If possible, write some of your own source material and blog about it. The research will aid you in explaining the impact of the finding to your clients, and while the infosec community is pretty helpful, it'd be preferable not to send your clients to a competitor's website.
Example Findings
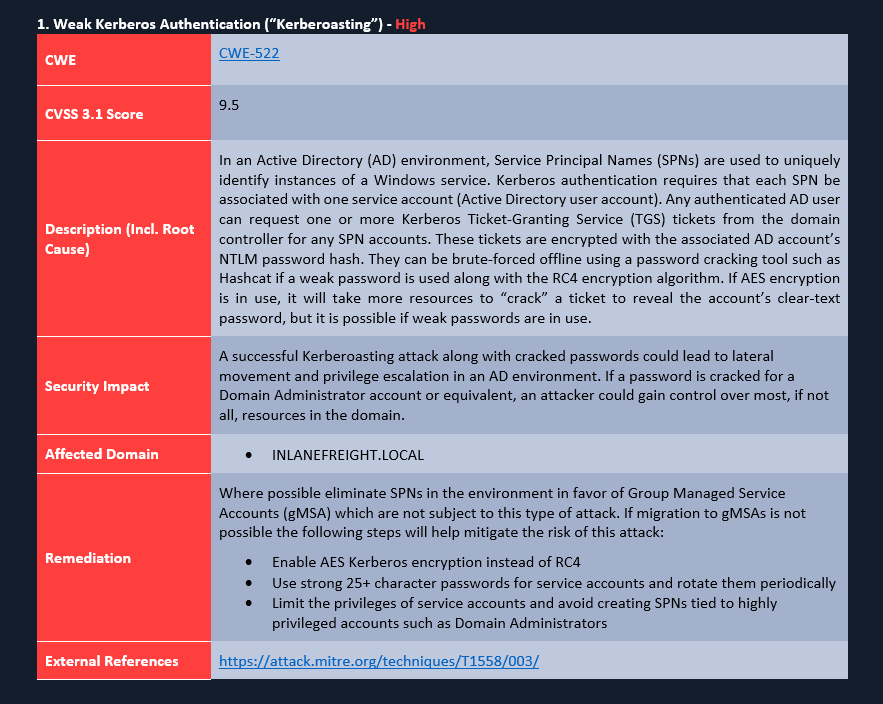
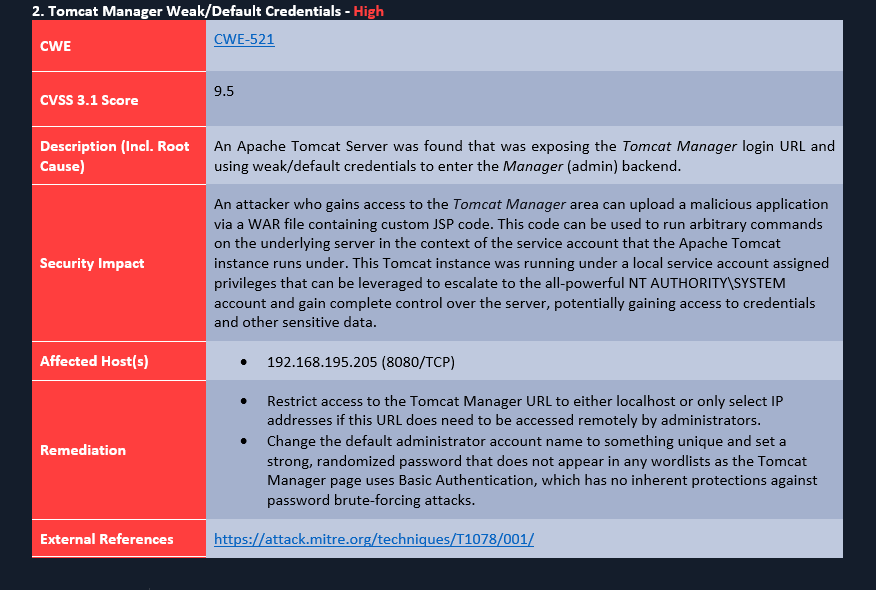
Below are a few example findings. The first two are examples of issues that may be discovered during an Internal Penetration Test. As you can see, each finding includes all of the key elements: a detailed description to explain what is going on, the impact to the environment if the finding is left unfixed, the hosts affected by the issue (or the entire domain), remediation advice that is generic, does not recommend specific vendor tools and gives several options for remediation. Finally, the reference links are from well-known, reputable sources that will likely not be taken down anytime soon as a personal blog may.
A note on the formatting: This could potentially be a hotly contested topic. The example findings here have been laid out in a tabular format, but if you've ever worked in Word or tried to automate some of your report generation, you know that tables can be a nightmare to deal with. For this reason, others opt to separate sections of their findings with different heading levels. Either of these approaches is acceptable because what is important is whether your message gets across to the reader and how easy it is to pick out the visual cues for when one finding ends and another begins; readability is paramount. If you can accomplish this, colors, layout, order, and even section names can be adjusted.
Weak Kerberos Authentication (“Kerberoasting”)
Tomcat Manager Weak/Default Credentials
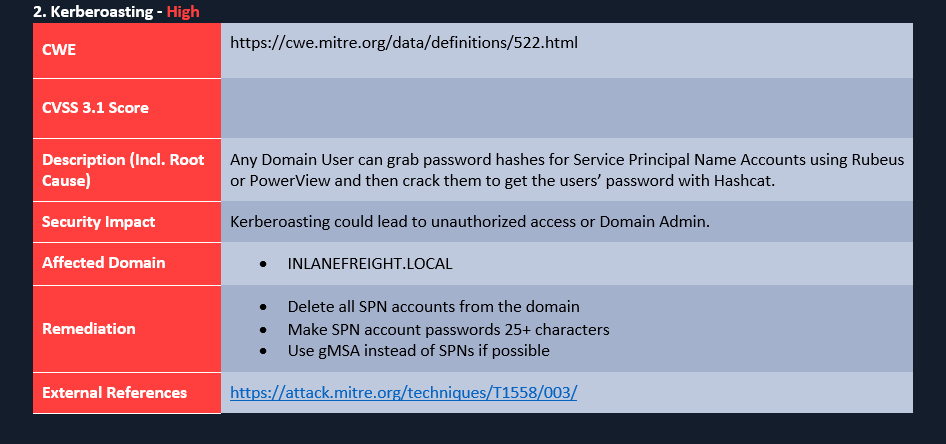
Poorly Written Finding
Below is an example of a poorly written finding which has several issues:
- Formatting is sloppy with the CWE link
- No CVSS score is filled in (not mandatory, but if your report template uses it, you should fill it in)
- The Description does not clearly explain the issue or root cause
- The security impact is vague and generic
- The Remediation section is not clear and actionable
If I am reading this report, I can see that this finding is bad (because it's red), but why do I care? What do I do about it? Each finding should present the issue in detail and educate the reader on the issue at hand (they may very likely have never heard of Kerberoasting or some other attack). Clearly articulate the security risk and why this needs to be remediated and some actionable remediation recommendations.
Hands-On Practice
The target VM that can be spawned in this section has a copy of the WriteHat reporting tool running. This is a helpful tool for building a findings database and generating customized reports. While we do not endorse any one specific tool in this module, many reporting tools are similar, so playing around with WriteHat will give you a good idea of how these types of tools work. Practice adding findings to the database, building and generating a report, etc. We prepopulated the findings database with some common findings categories, and some of the findings included in the sample report attached to this module. Experiment with it as much as you like and practice the skills taught in this section. Keep in mind that anything you enter into the tool will not be saved once the target expires, so if you write up any practice findings, make sure to keep a copy locally. This tool will also be helpful for the hands-on guided lab at the end of this module.
Once the target spawns, browse to https://< target IP > and log in with the credentials htb-student:HTB_@cademy_stdnt!.
Practice writing up findings and exploring the tool. You may even decide you like it enough to use it as part of your workflow. One idea would be to install a copy locally and practice writing findings for issues you discover in Academy module labs or boxes/labs on the HTB main platform.
Nearly There
Now that we've covered how to stay organized during a penetration test, types of reports, the standard components of a report, and how to write up a finding, we have some reporting tips/tricks to share with you from our collective experience in the field.
Reporting Tips and Tricks
Reporting is an essential part of the penetration testing process but, if poorly managed, can become very tedious and prone to mistakes. One key aspect of reporting is that we should be working on building our report from the onset. This starts with our organizational structure/notetaking setup, but there are times when we may be running a long discovery scan where we could fill out templated parts of the report such as contact information, client name, scope, etc. While testing, we can be writing up our Attack Chain and each finding with all of the required evidence so we don't have to scramble to recapture evidence after the assessment is over. Working as we go will ensure that our report isn't rushed and comes back from QA with loads of changes in red.
Templates
This should go without saying, but we shouldn't be recreating the wheel with every report we write. It's best to have a blank report template for every assessment type we perform (even the more obscure ones!). If we are not using a reporting tool and just working in old-fashioned MS Word, we can always build a report template with macros and placeholders to fill in some of the data points we fill out for every assessment. We should work with blank templates every time and not just modify a report from a previous client, as we could risk leaving another client's name in the report or other data that does not match our current environment. This type of error makes us look amateur and is easily avoidable.
MS Word Tips & Tricks
Microsoft Word can be a pain to work with, but there are several ways we can make it work for us to make our lives easier, and in our experience, it's easily the least of the available evils. Here are a few tips & tricks that we've gathered over the years on the road to becoming an MS Word guru. First, a few comments:
- The tips and tricks here are described for Microsoft Word. Some of the same functionality may also exist in LibreOffice, but you'll have to [preferred search engine] your way around to figure out if it's possible.
- Do yourself a favor, use Word for Windows, and explicitly avoid using Word for Mac. If you want to use a Mac as your testing platform, get a Windows VM in which you can do your reporting. Mac Word lacks some basic features that Windows Word has, there is no VB Editor (in case you need to use macros), and it cannot natively generate PDFs that look and work correctly (it trims the margins and breaks all of the hyperlinks in the table of contents), to name a few.
- There are many more advanced features like font-kerning that you can use to crank your fancy to 11 if you'd like, but we're going to try to stay focused on the things that improve efficiency and will leave it to the reader (or their marketing department) to determine specific cosmetic preferences.
Let's cover the basics:
- Font styles
- Table styles
- Captions
- Page numbers
- Table of Contents
- List of Figures/Tables
- Bookmarks
- Custom Dictionary
- Language Settings
- Custom Bullet/Numbering
- Quick Access Toolbar Setup
- Useful Hotkeys